
Documentation
Overview
Table of Contents
1 Welcome to AiKlicksWelcome to AiKlicks
AiKlicks is a revolutionary AI-powered platform that redefines productivity and creativity. With its versatile capabilities, is designed to be your go-to solution for intelligent interactions, content generation, and seamless voice-based functionalities.
Key Features
- AI Chat Assistant: Engage with an intelligent AI capable of answering questions, solving problems, and providing meaningol conversations on a variety of topics.
- Image Generation and Editing: Unlock your creative potential by generating stunning visuals or editing existing images with the power of AI, perfect for personal or professional use.
- Text-to-Speech (TTS): Transform text into natural-sounding speech, making content accessible and enhancing the user experience.
- Speech-to-Text (STT): Convert audio file into text effortlessly, enabling hands-free communication and accessibility.
| Solutions/ Deliverables | Technology Used | Key Aspect |
|---|---|---|
| Super Admin | Flutter + Firebase | The admin can assign role-based access, manage user roles, change plans, and oversee plan history to |
| Admin App | Flutter + Firebase | Available in both Android & iOS |
| User App | Flutter + Firebase | Available in both Android & iOS |
mandatory Setup
Run an existing flutter project on IDE
To begin, it’s essential to verify that your Flutter and Integrated Development Environment (IDE) setup has been configured accurately
-
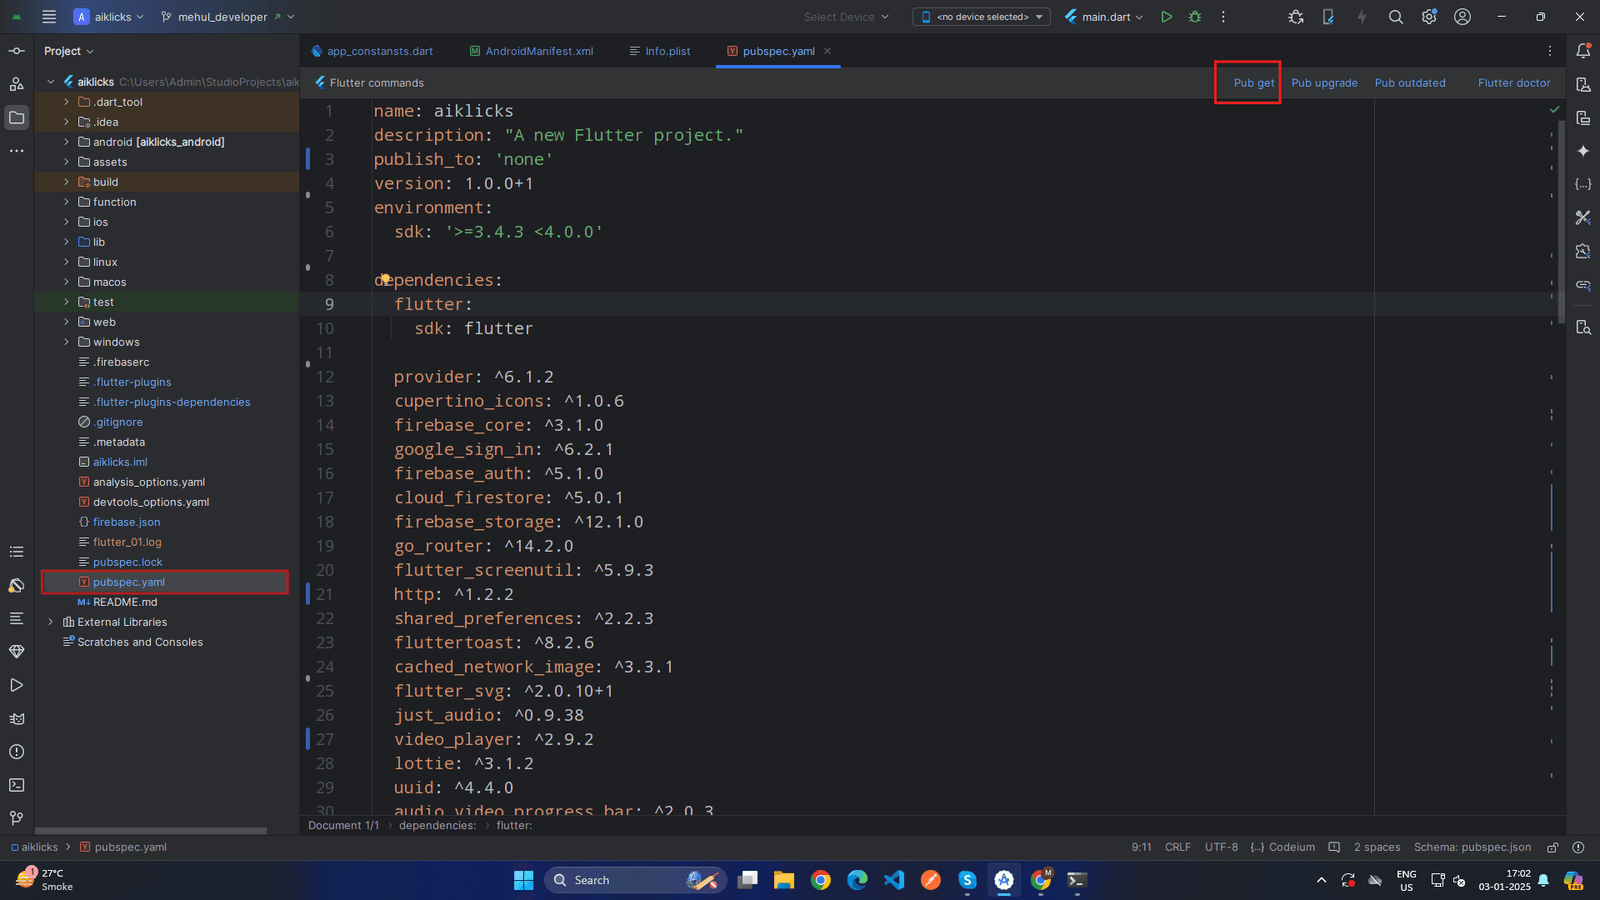
Go to file
> open > then choose your downloaded project location then your project will open and if you see upar right part 'enable dart support' then click that and go to
pubspec.yaml
file and in uper right part click
pub
get or package get and then press run button.
-
 x
x
-
-
Also you can open your IDE terminal then execute command
- flutter clean
- flutter pub get
- flutter run
-
If your are getting error then you can perform below hack
- if in your system firewall is on, then you can temporary disable firewall and then try to run project
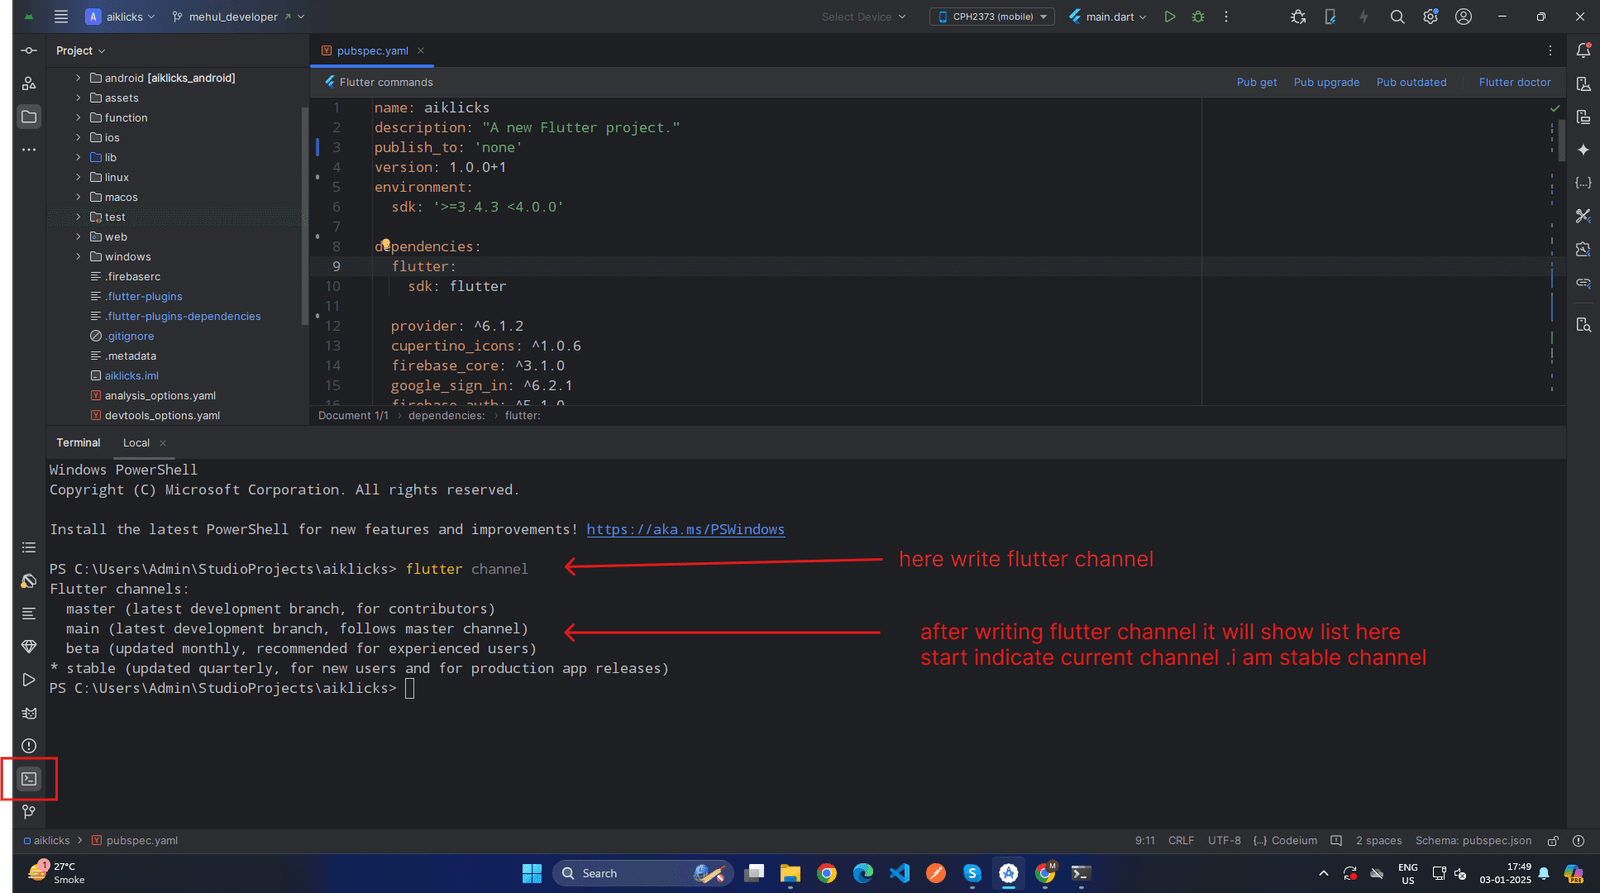
- if your flutter channel is not stable then you need to change it to stable. you can check your flutter channel by terminal.
- go to android studio in bottom line click on terminal, in terminal write flutter channel.as shown below.
-
 x
x
- if your are not in stable then write flutter channel stable in terminal
- go to Tools > Flutter > Flutter Clean.
- go to file > invalidate cache/ restart .
Change App Logo and Icon
To change App logo and App Icon you need to follow these steps :
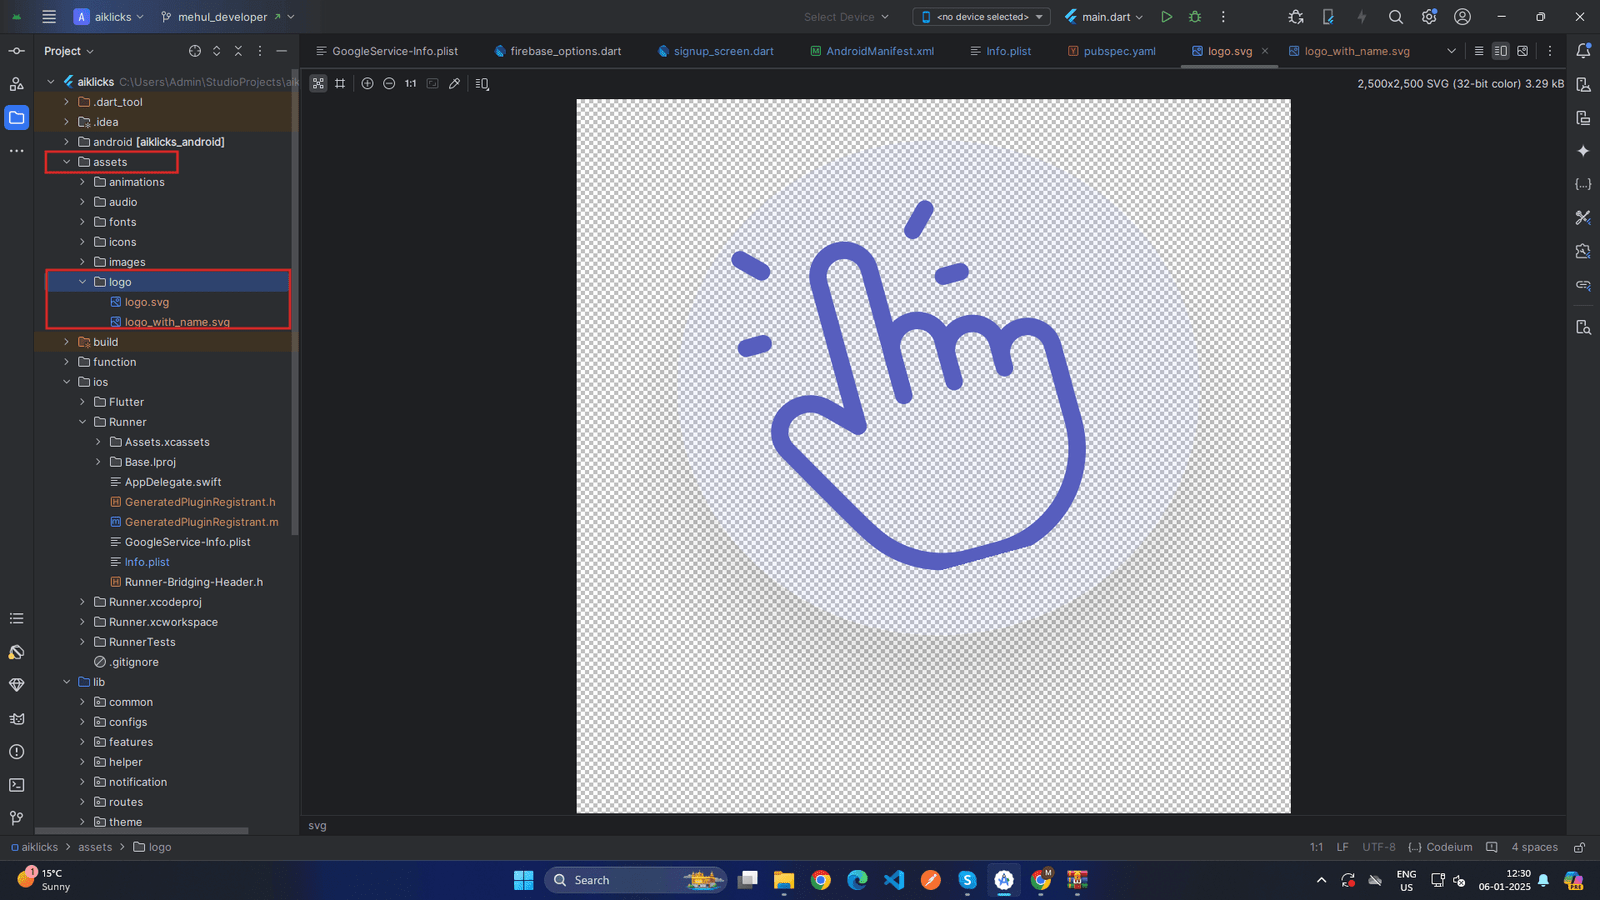
App Logo :
- Go to <project>/assets/logo/ and replace logo.svg with your own svg logo.
-
Go to
<project>/assets/logo/
and replace
logo_with_name.svg
with your svg logo with name.
-
 x
x
-
Warning
Please use the same file name; otherwise, it will not work.
If anything goes wrong with the customization you made, we won’t be responsible for that
×App Icon :
You can generate your app icon using this site Visit.
- Then go to /android/app/src/main/res and replace all mipmap folders with your <generated icon>/ android folder.
- Again go to /ios/Runner and replace Assets.xcassets with your generated Assets.xcassets folder.
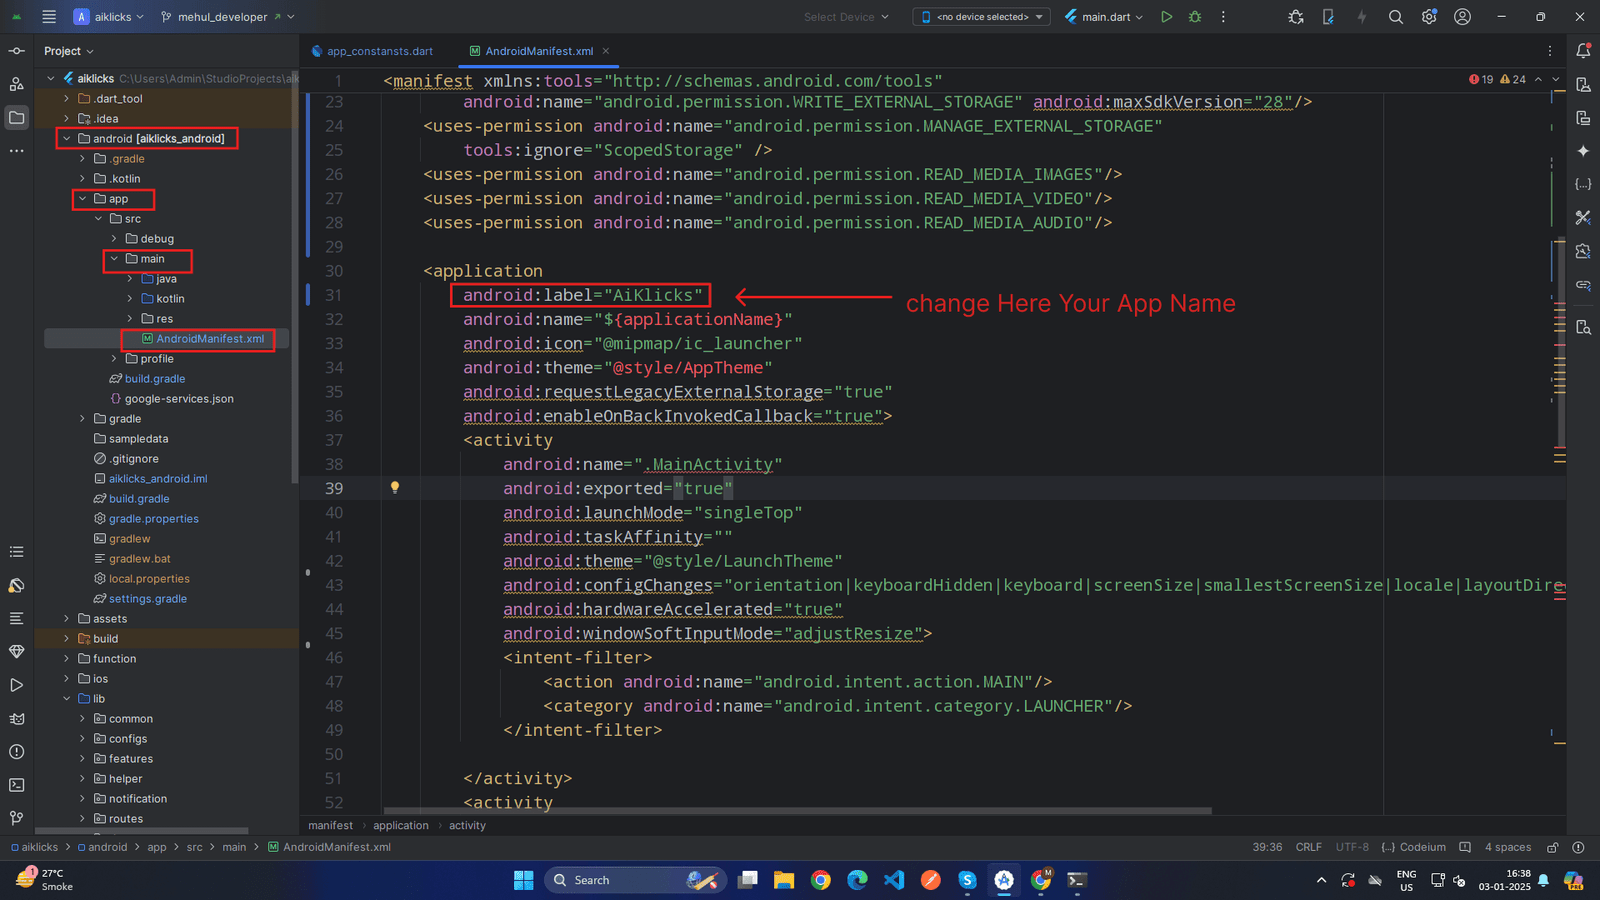
Change App Name :
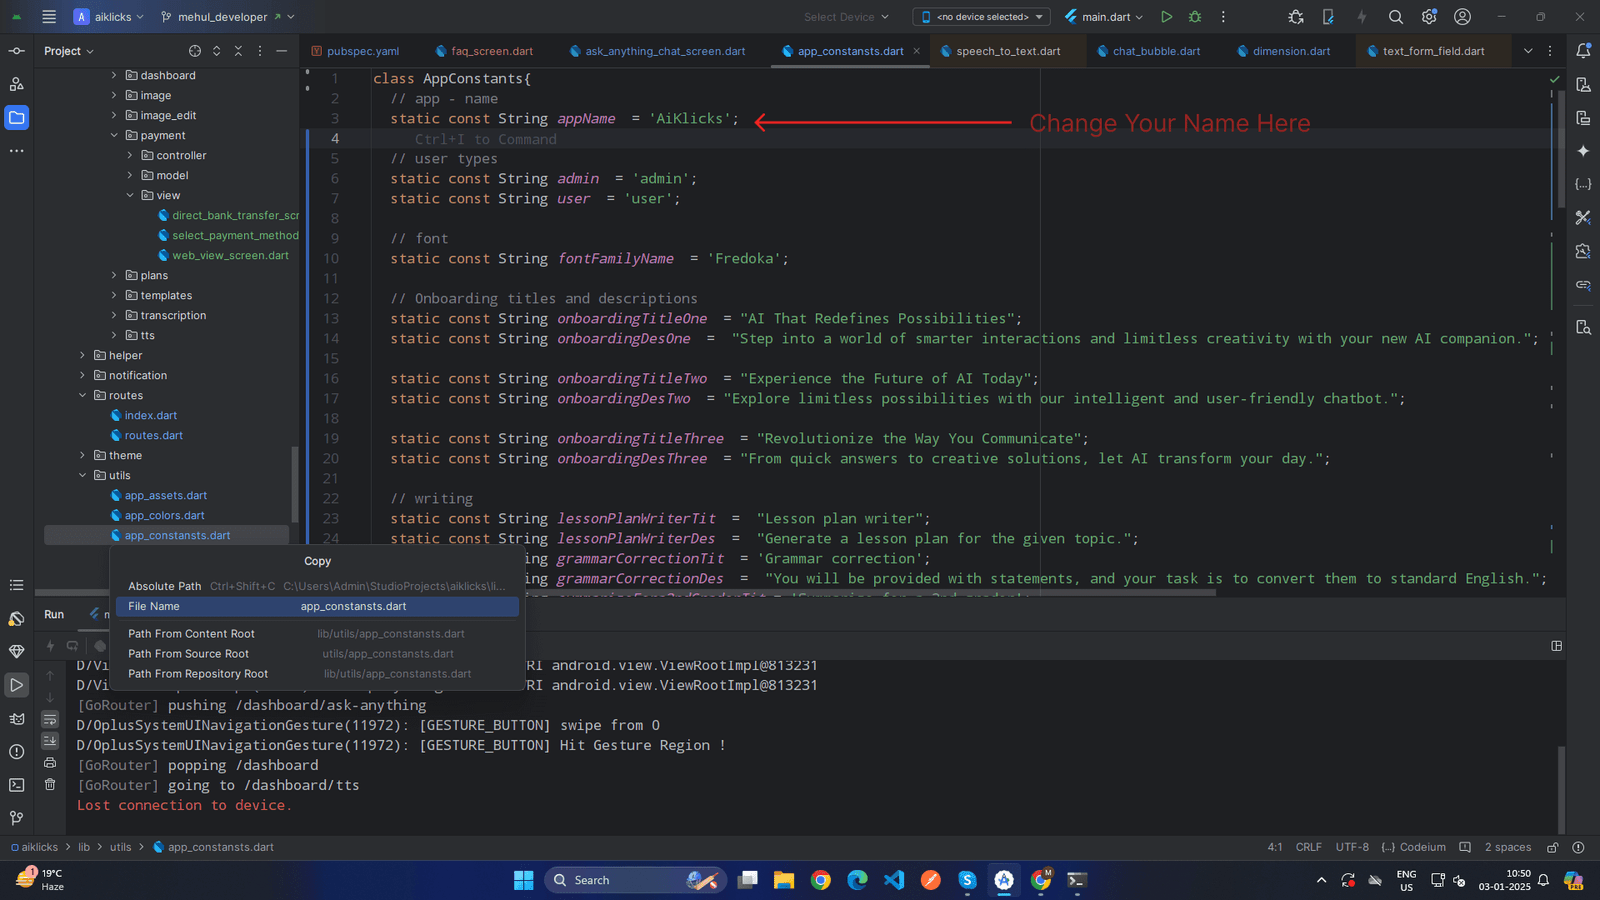
You need to set your app name in three different places
- Go to <project>lib/utils/app_constansts.dart and set the value of appName
static const String appName = 'YOUR_APP_NAME';
-
 x
x
- Change the value of label from <project>/android/app/src/main/AndroidManifest.xml
android:label = 'YOUR_APP_NAME';
-
 x
x
- Change the value of CFBundleName from <project>/iOS/Runner/info.plist/iOS/Runner/info.plist
<key> CFBundleName >/key>
<string> YOUR_APP_NAME </string>
-
 x
x
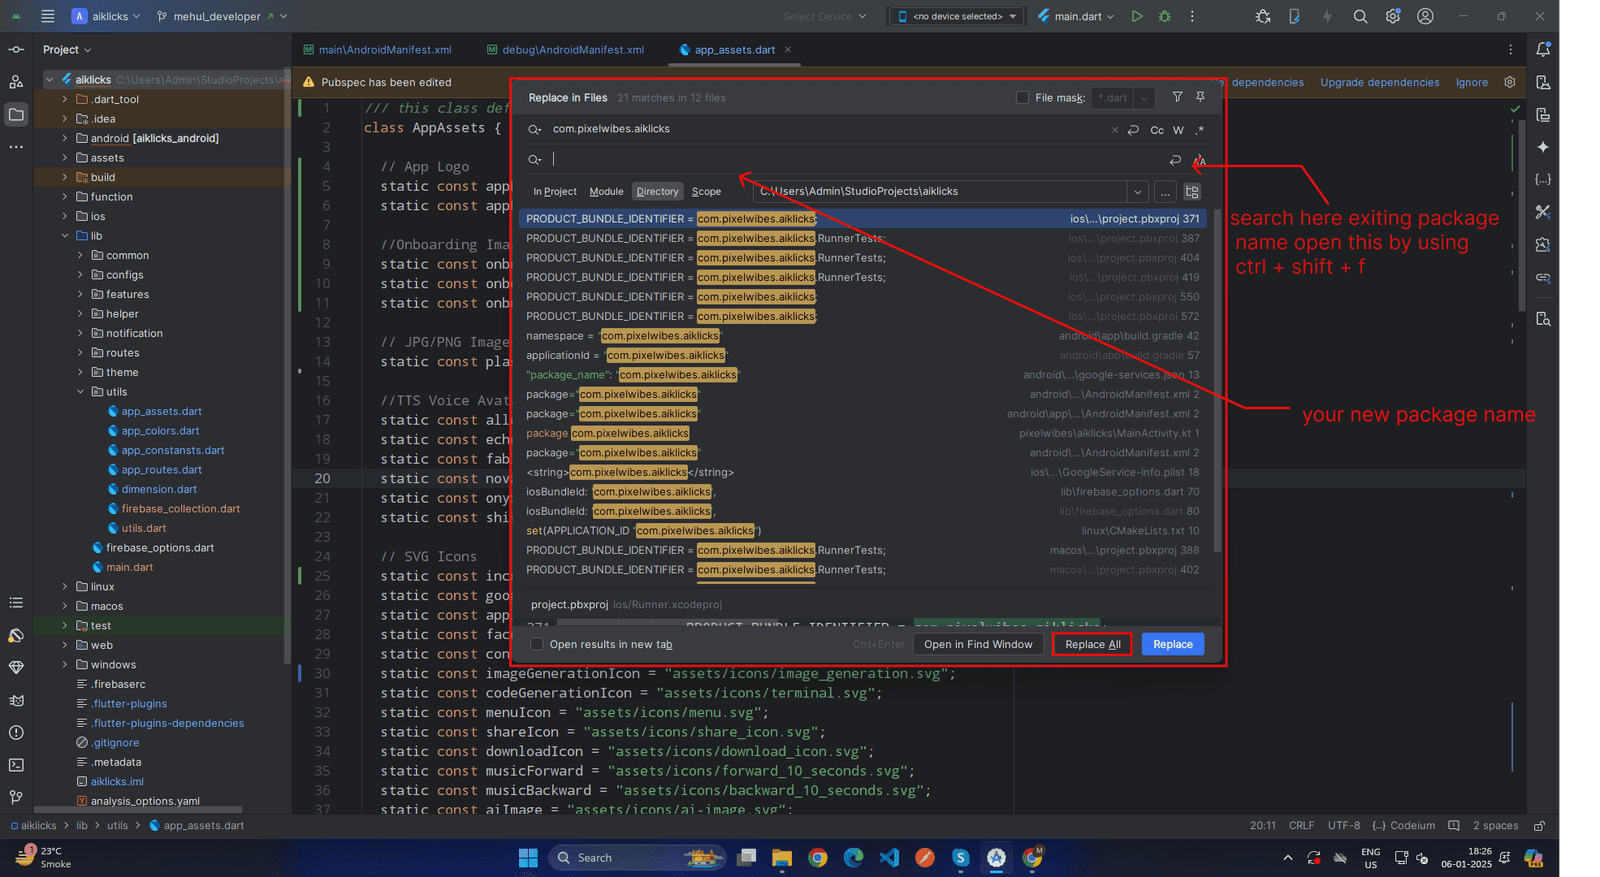
Change App Package
-
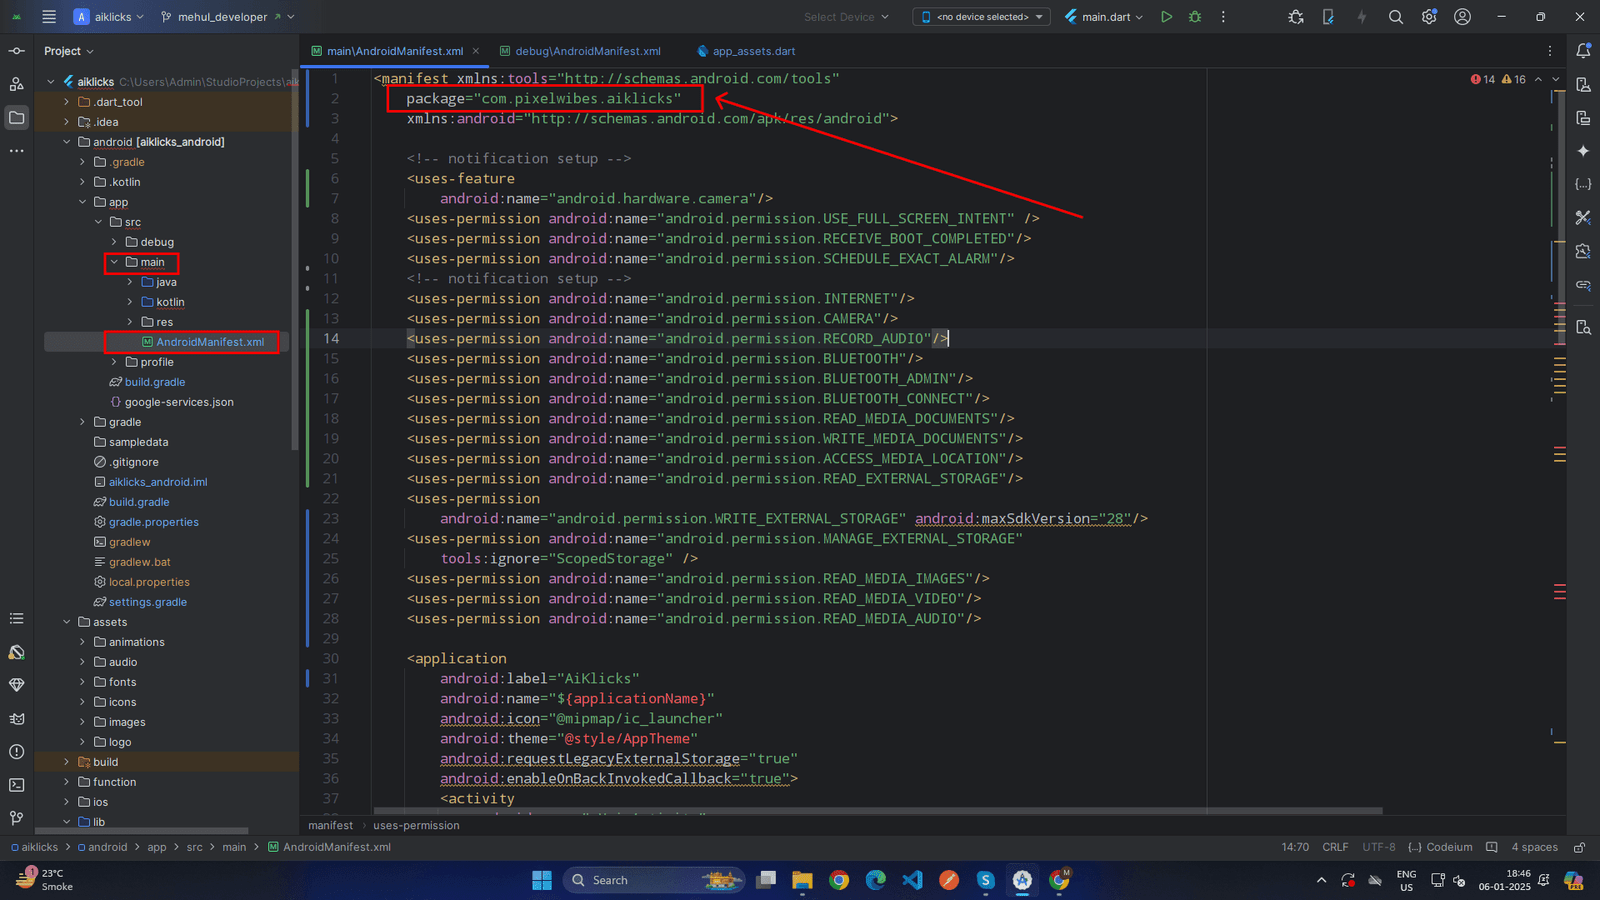
First, you have to find out the existing package name. You can find it out from the top of the
/app/src/main/AndroidManifest.xml
file. Now right-click on the project folder from Android Studio and click on replace in the path. You will get a popup window with two input boxes. In the first box, you have to put the existing package name that you saw in the
AndroidManifest.xml
file previously and write down your preferred package name in the second box and then click on the
Replace All
button.
-
 X
X
-
-
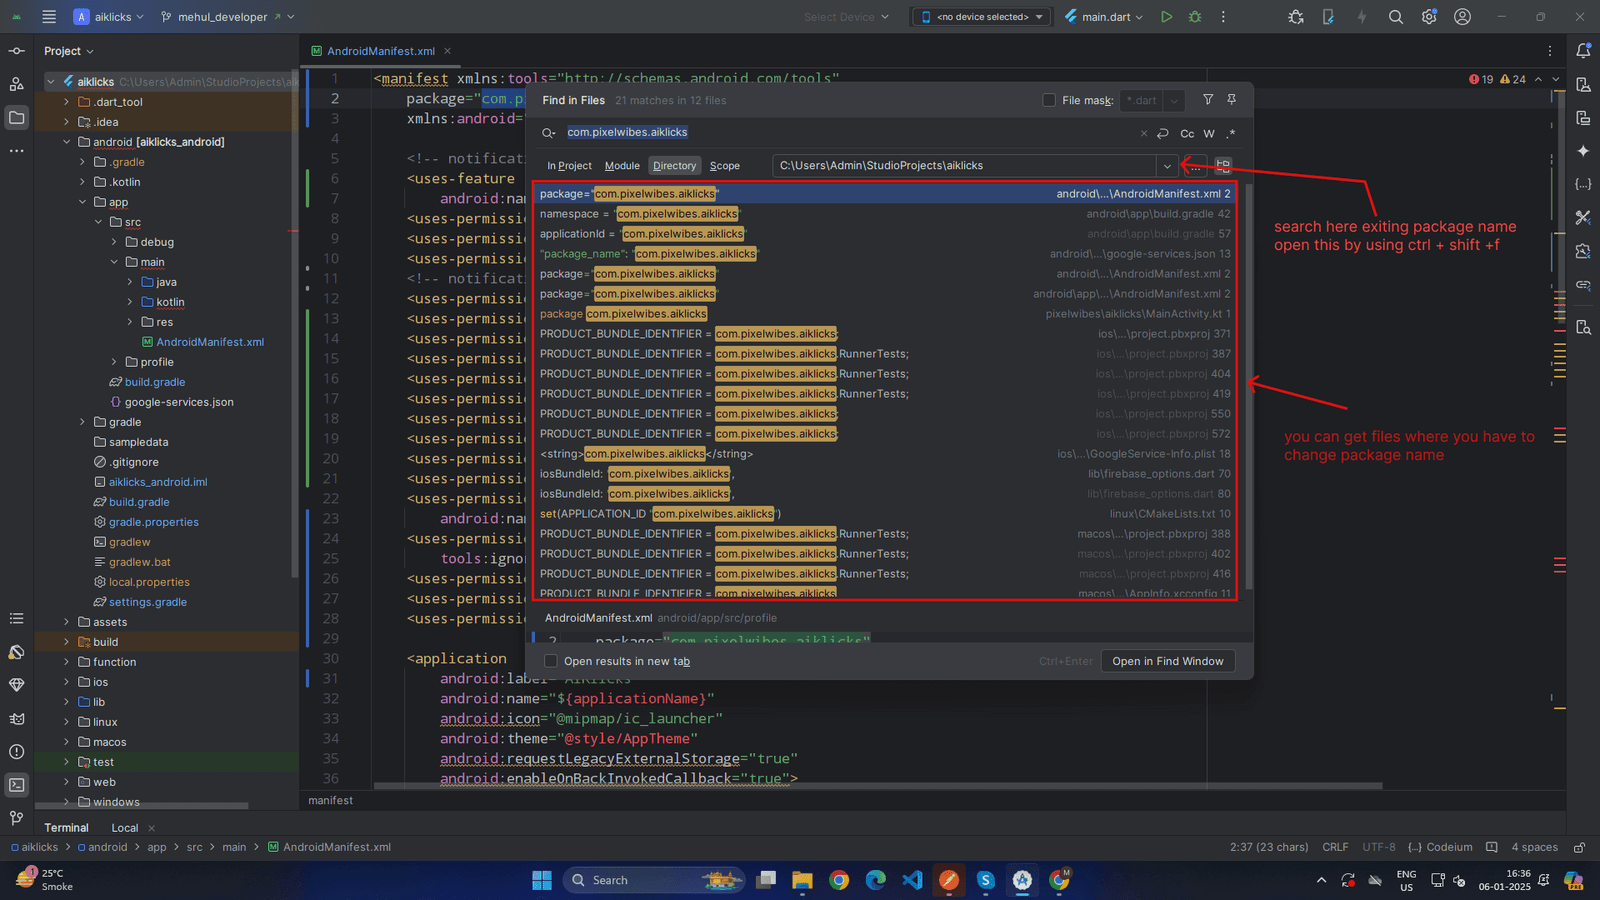
Press
ctrl + shift + F
and enter existing package name and change all result which show in search, else you have change it manually buy replace package name in below files.
-
 X
X
-
-
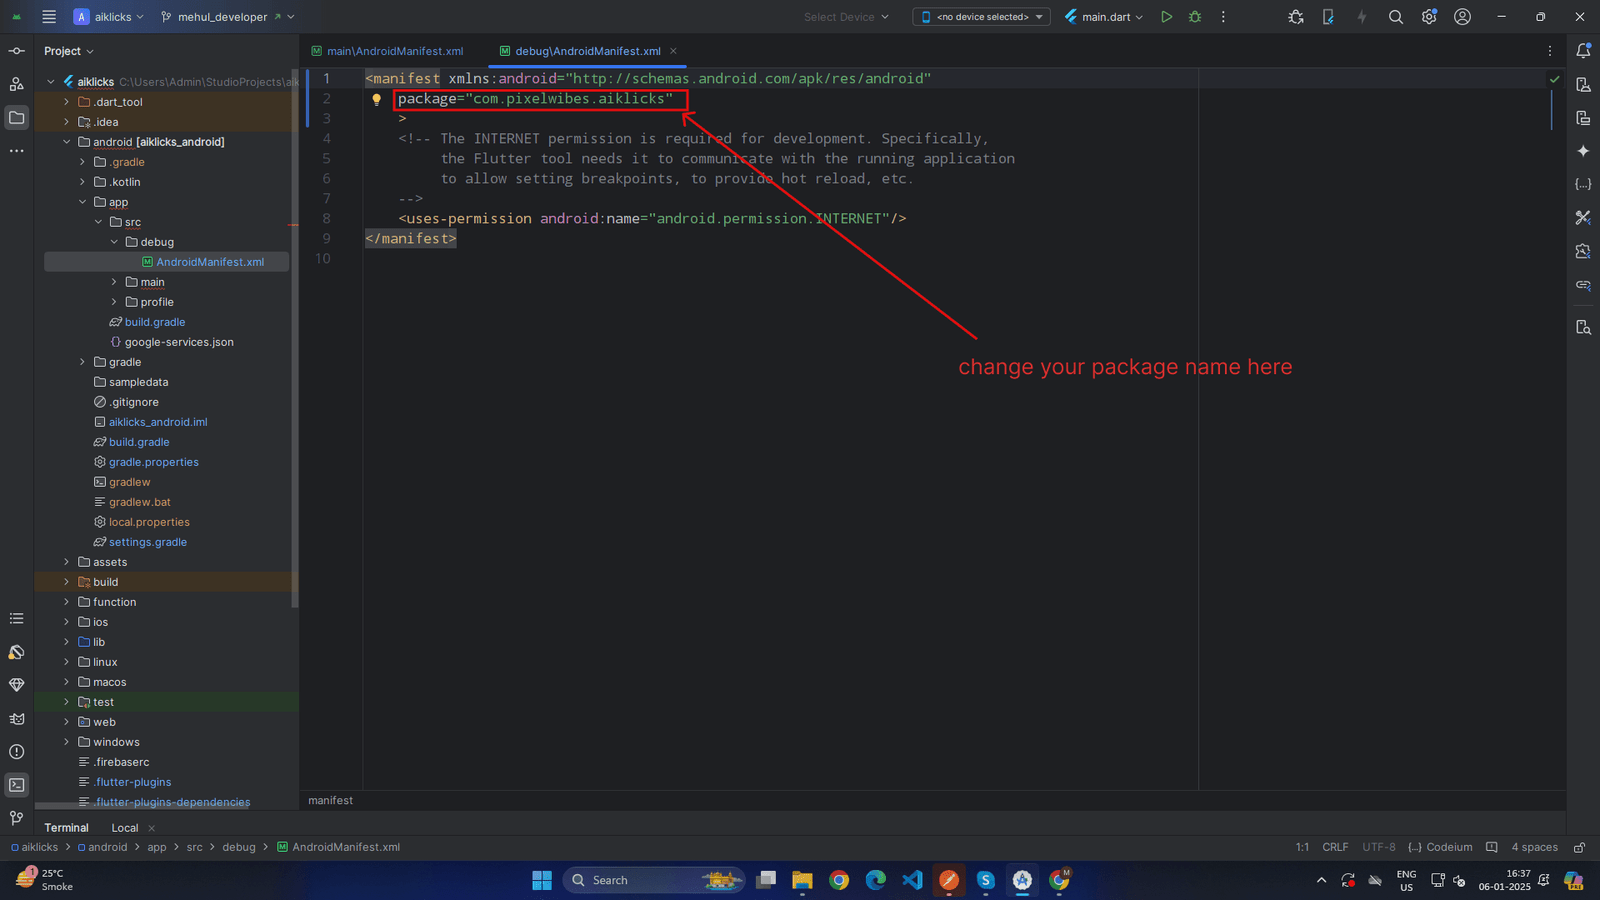
android/app/src/debug/AndroidManifest.xml
-
 X
X
-
-
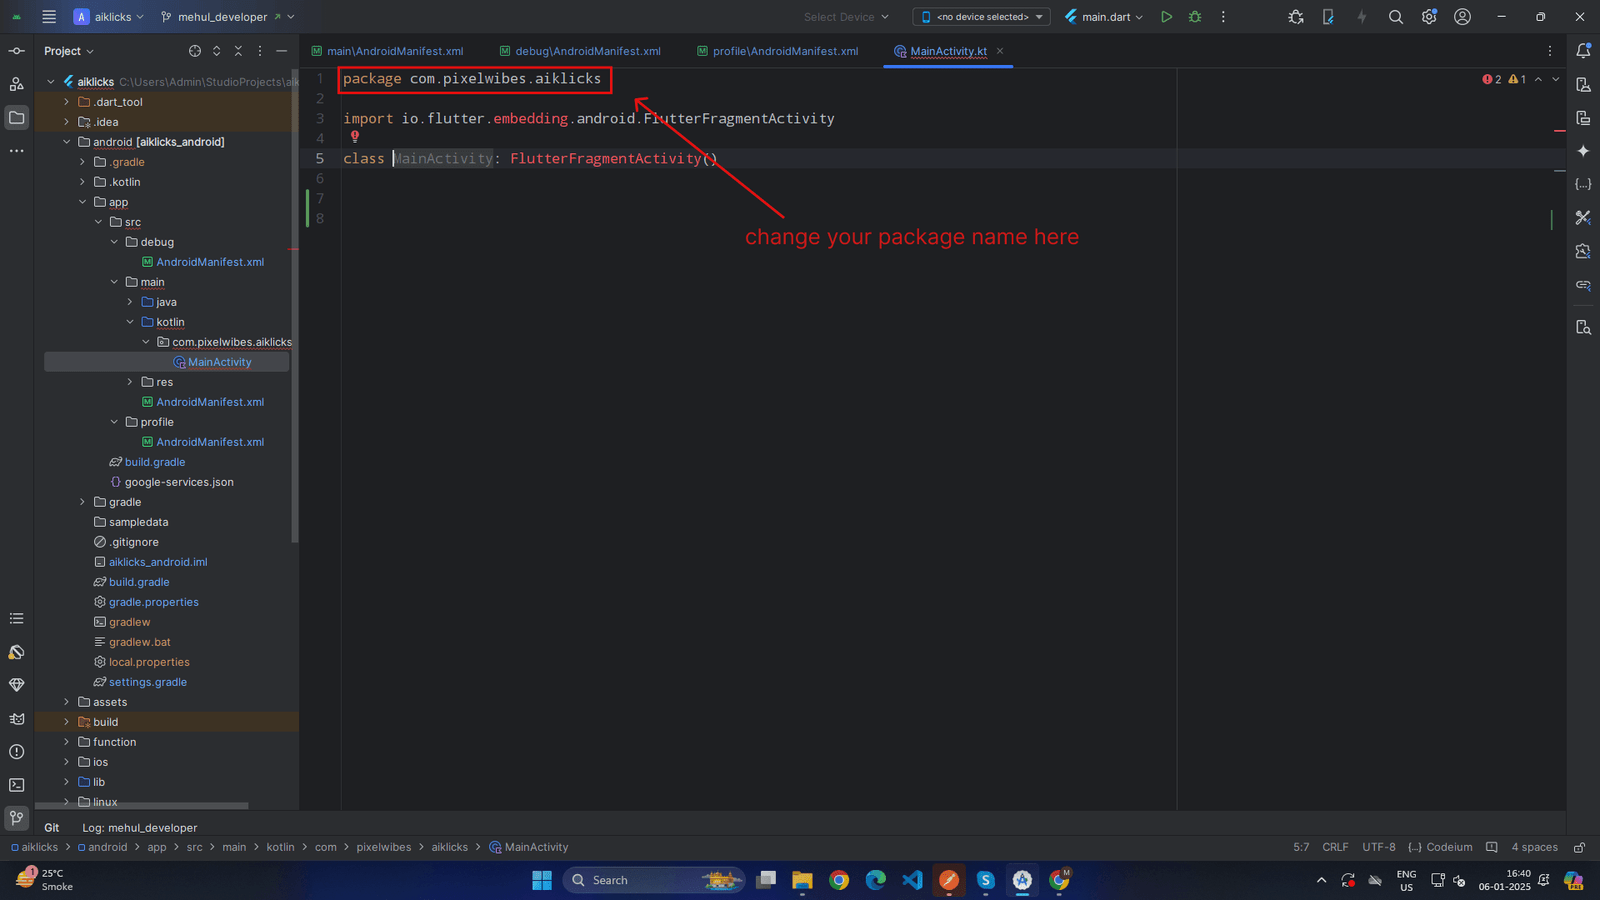
android/app/src/main/kotlin/com/pixelwibes/aiklicks/MainActivity.kt
-
 X
X
-
-
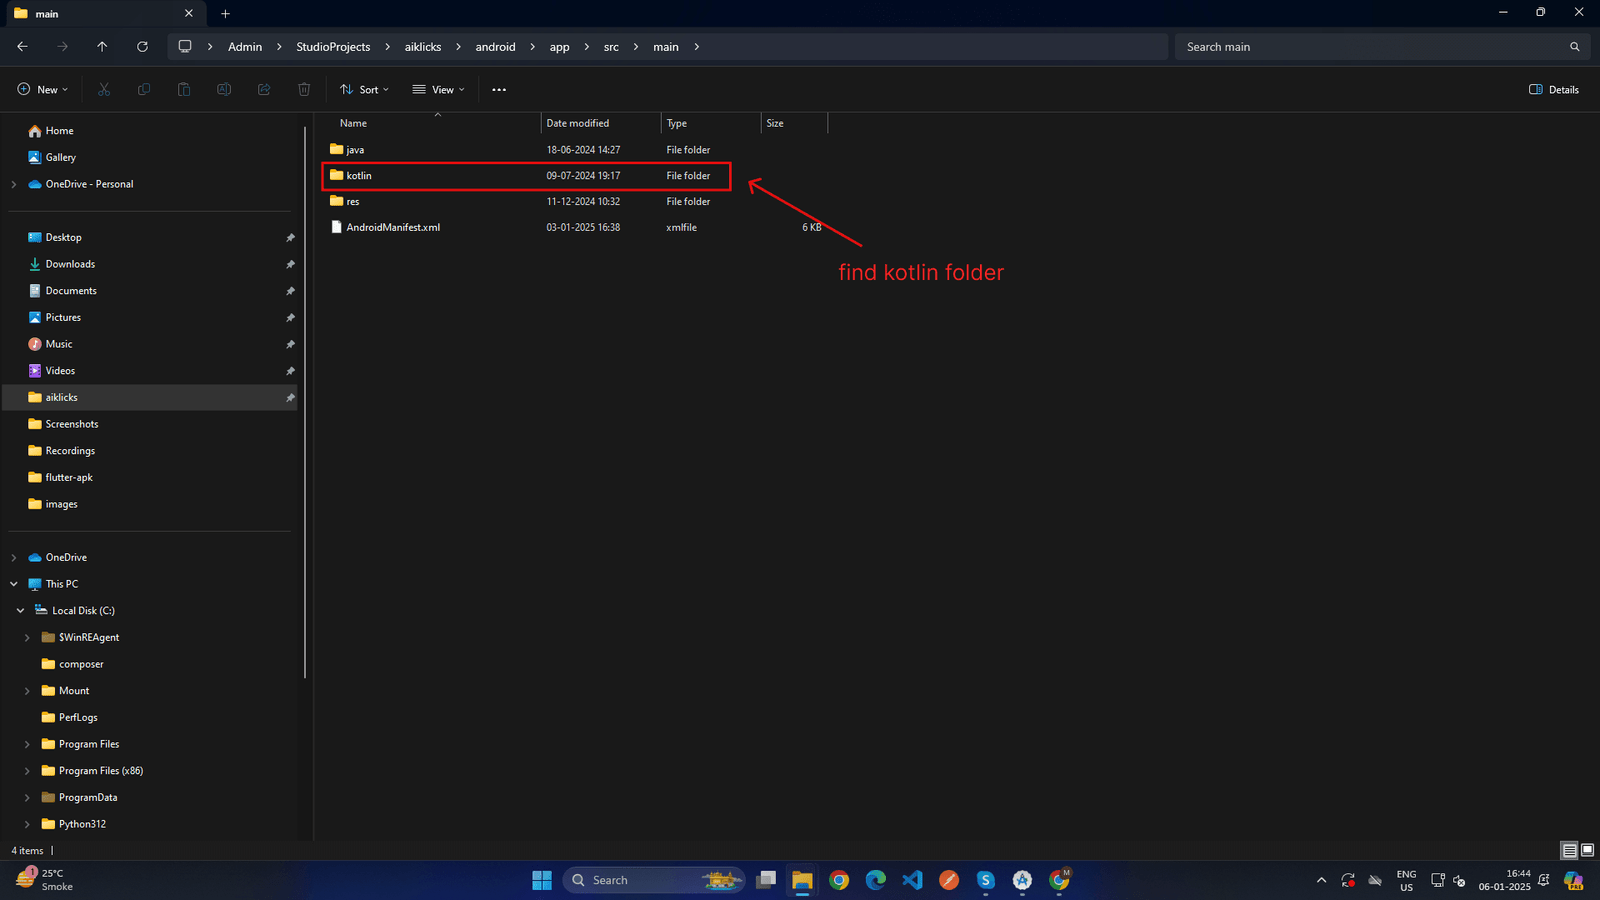
When You are changing package name the you also need change name of folders according to your package name in
(android/app/src/main/kotlin/)
location in project. For Example if Package name is
"com.pixelwibes.aiklicks"
Then inside kotlin folder folder stucture are
com/pixelwibes/aiklicks.
now this folder structure will change as per your package name if your package name is
"pwteam.pixelwibes.aiklicks"
then new folder structure is
pwteam/ pixelwibes/aiklicks.
for change name of this folders just open your project folder navigate inside the kotlin folder just rename the folders according to your package name . Note :
(Sometime you got issue dou to this reason.)
-
 X
X
-
-
Some Doubt regarding package name change
-
 X
X
-
what if my package name is like this
aiklicks.pwteam.pixelwibes.user
, so how can i make folder structure ?
Ans. => in this situation you have to add one folder according to your package name , now you have 4 folder inside the Kotlin
folder like this / aiklicks/ pwteam/pixelwibes/user/
-
-
android/app/src/main/AndroidManifest.xml
-
 X
X
-
-
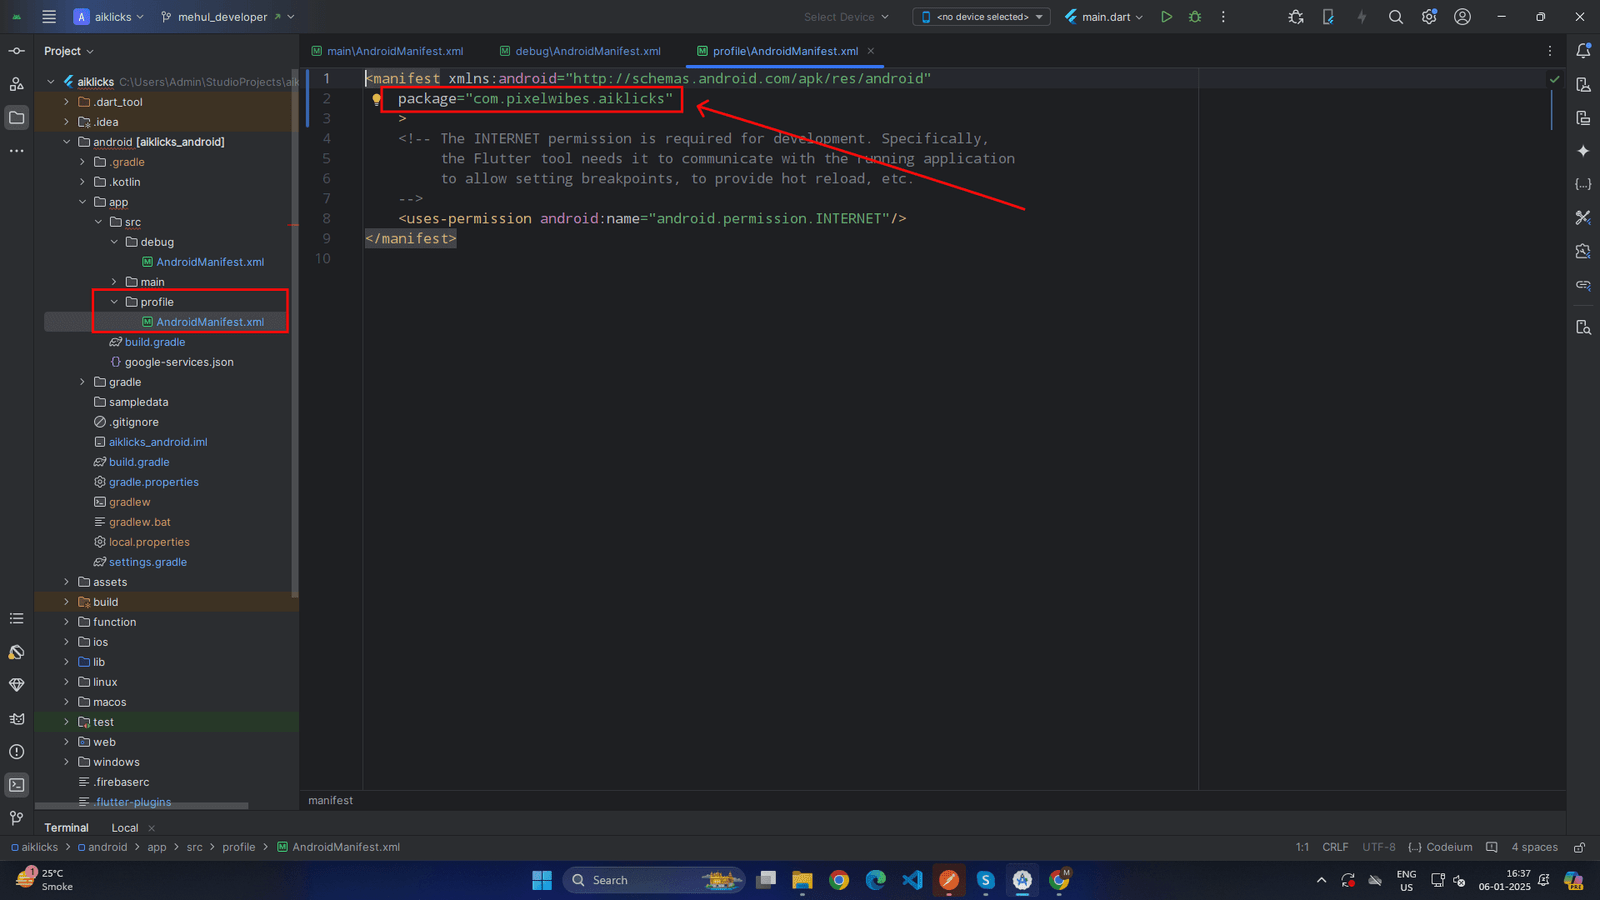
android/app/src/profile/AndroidManifest.xml
-
 X
X
-
-
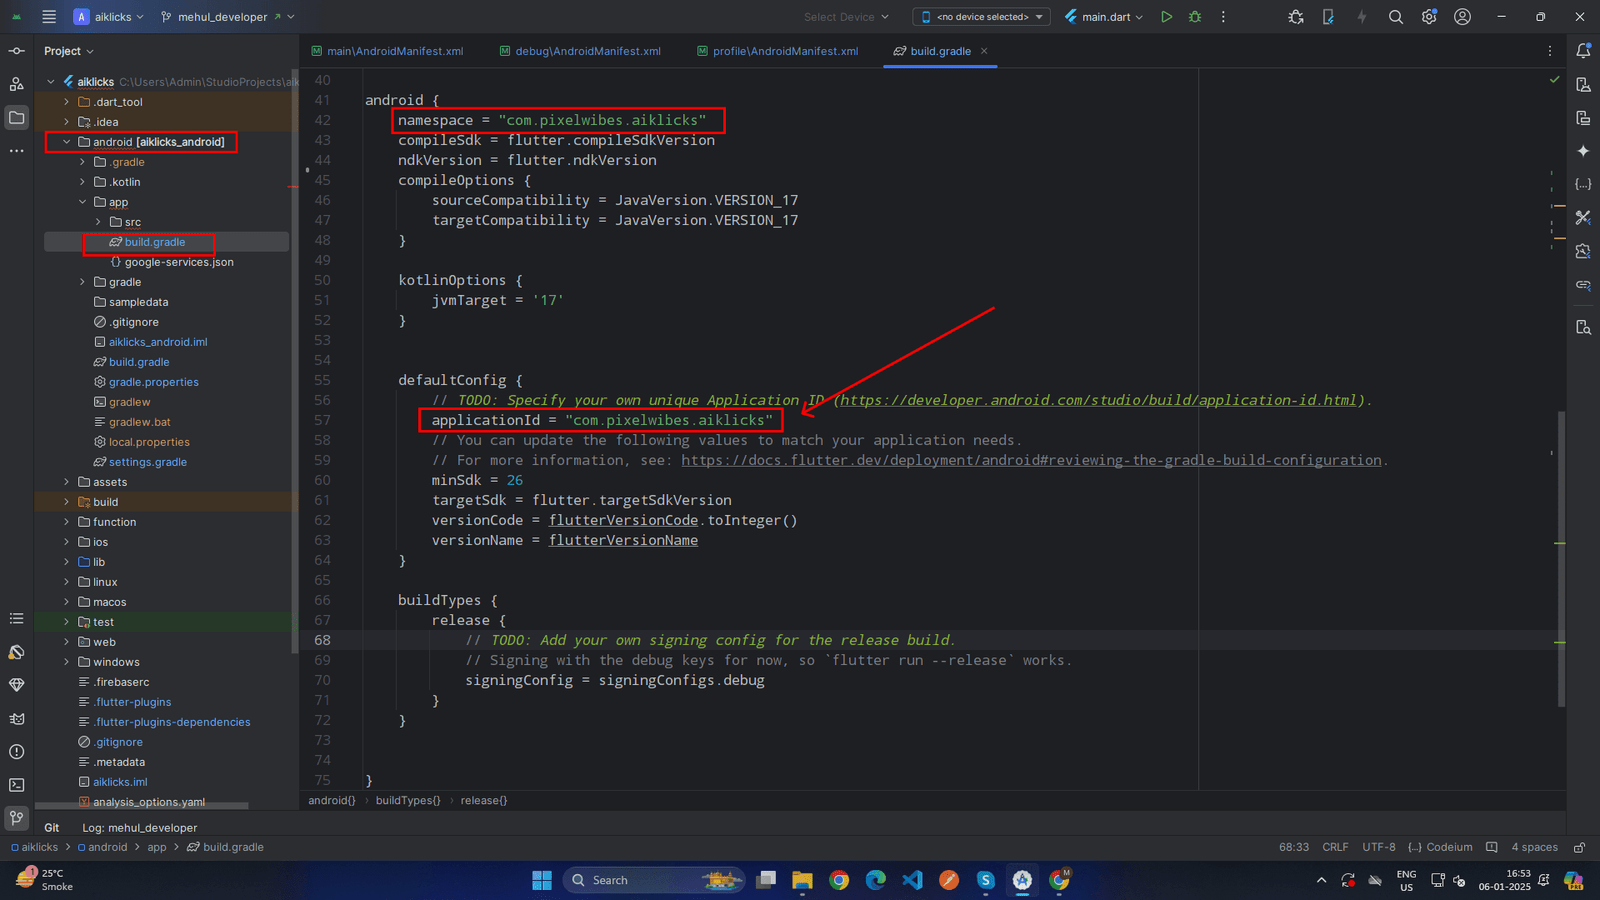
android/app/build.gradle
-
 X
X
-
-
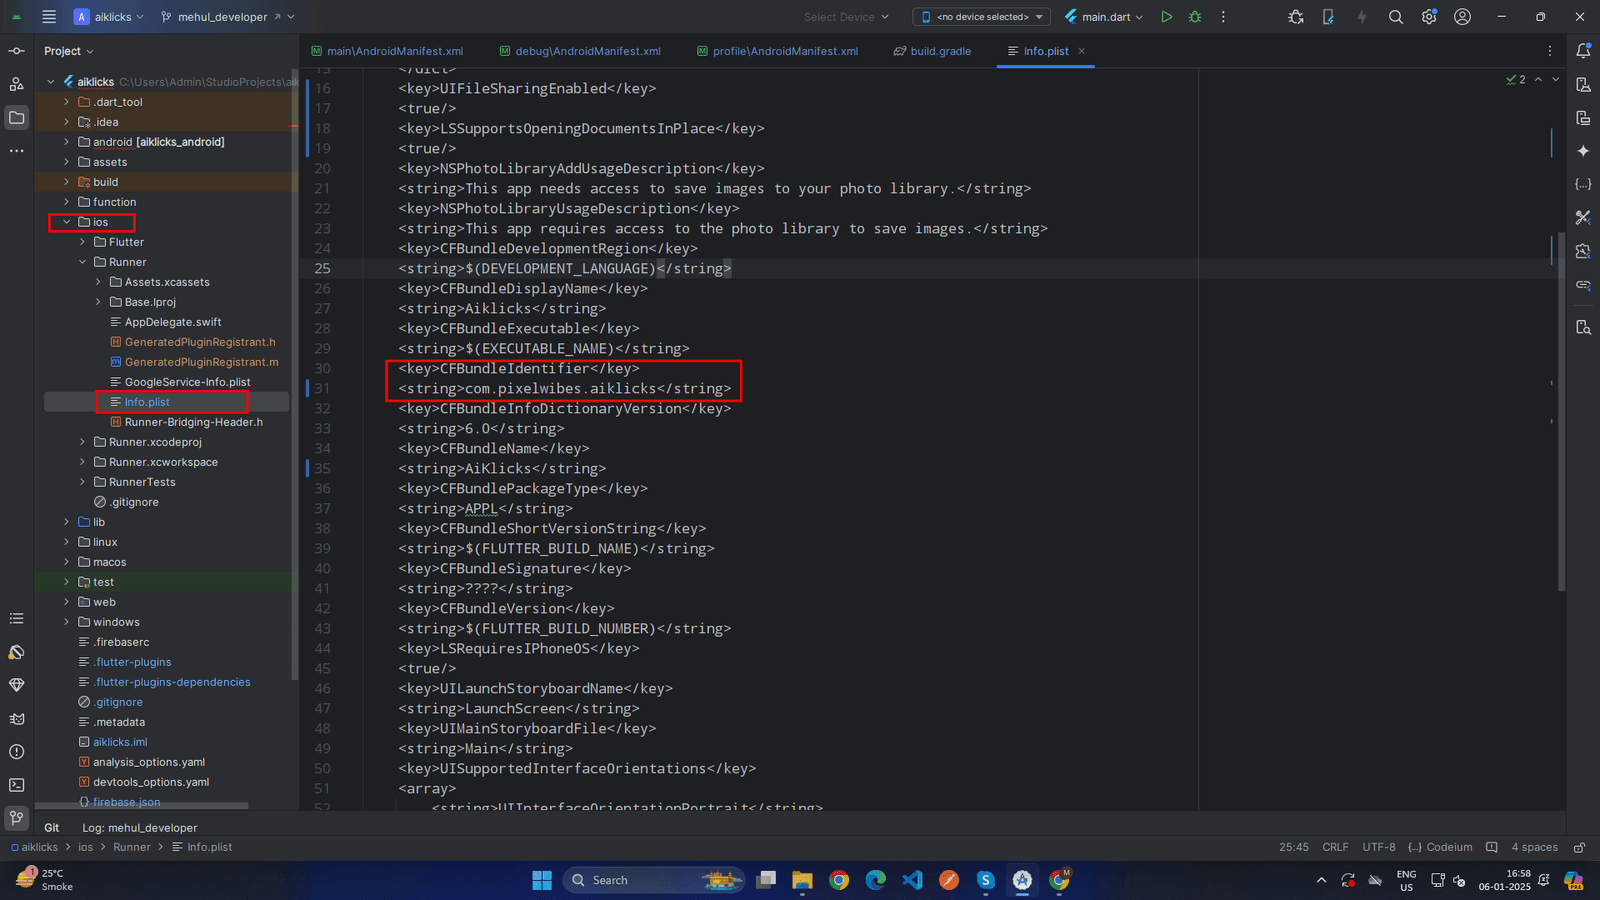
.For ios open
ios > Runner > info.plist >
there is the key
CFBundleIdentifier
change the string value for that as shown in below
-
 X
X
-
-
Update Firebase Integration
-
Add New App in Firebase Console
- Go to the Firebase Console: Firebase Console
- Select the existing project.
-
Add a new app:
- For Android: Add an Android app with the updated package name.
- For iOS: Update or add the new bundle identifier.
-
Download the updated configuration files:
- For Android: google-services.json.
- For iOS: GoogleService-Info.plist.
-
Replace Configuration Files
- Android: Replace the old google-services.json in the android/app/ directory with the new one.
- iOS: Replace the old GoogleService-Info.plist in the ios/Runner/ directory with the new one.
-
Update SHA Keys (For Android)
-
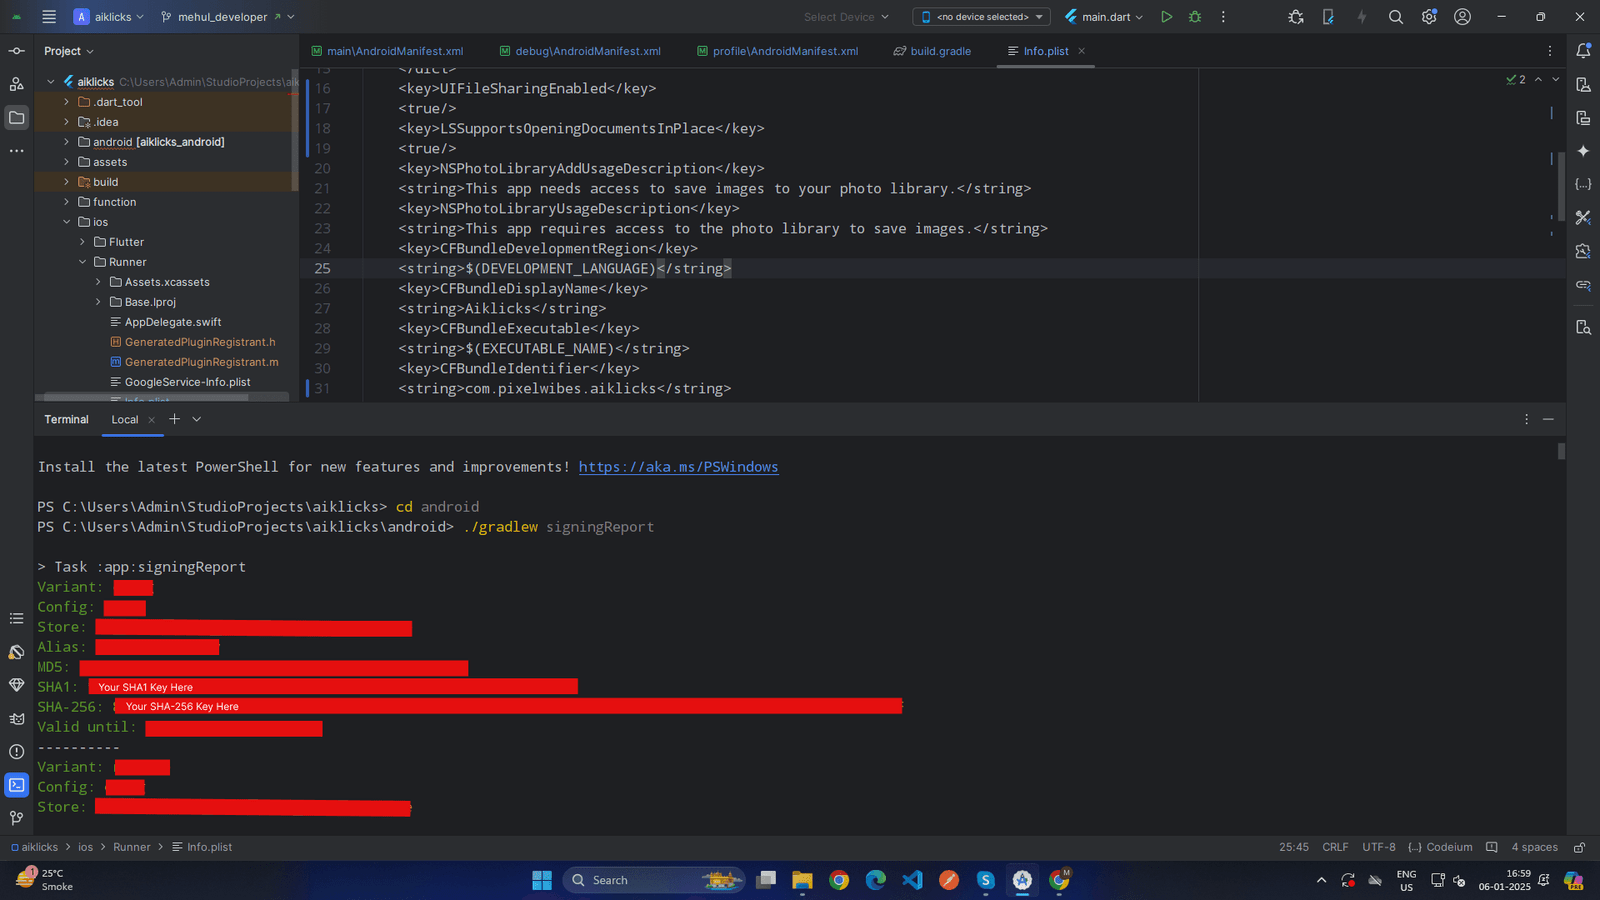
Open a Terminal/Command Prompt:
- Open your terminal or command prompt.
- If you're using Android Studio, you can open the terminal directly in the IDE.
-
Navigate to the Android Directory:
- Go to your Flutter project directory in the terminal.
- Navigate to the android folder: cd android
-
Run the Gradle Command:
- Execute the signingReport task: ./gradlew signingReport
-
View the Output:
- The command will generate a detailed report showing SHA-1 and SHA-256 keys for all build variants (debug, release, etc.).
-
 X
X
-
Open a Terminal/Command Prompt:
-
Add New App in Firebase Console
Setup Firebase for Push Notification
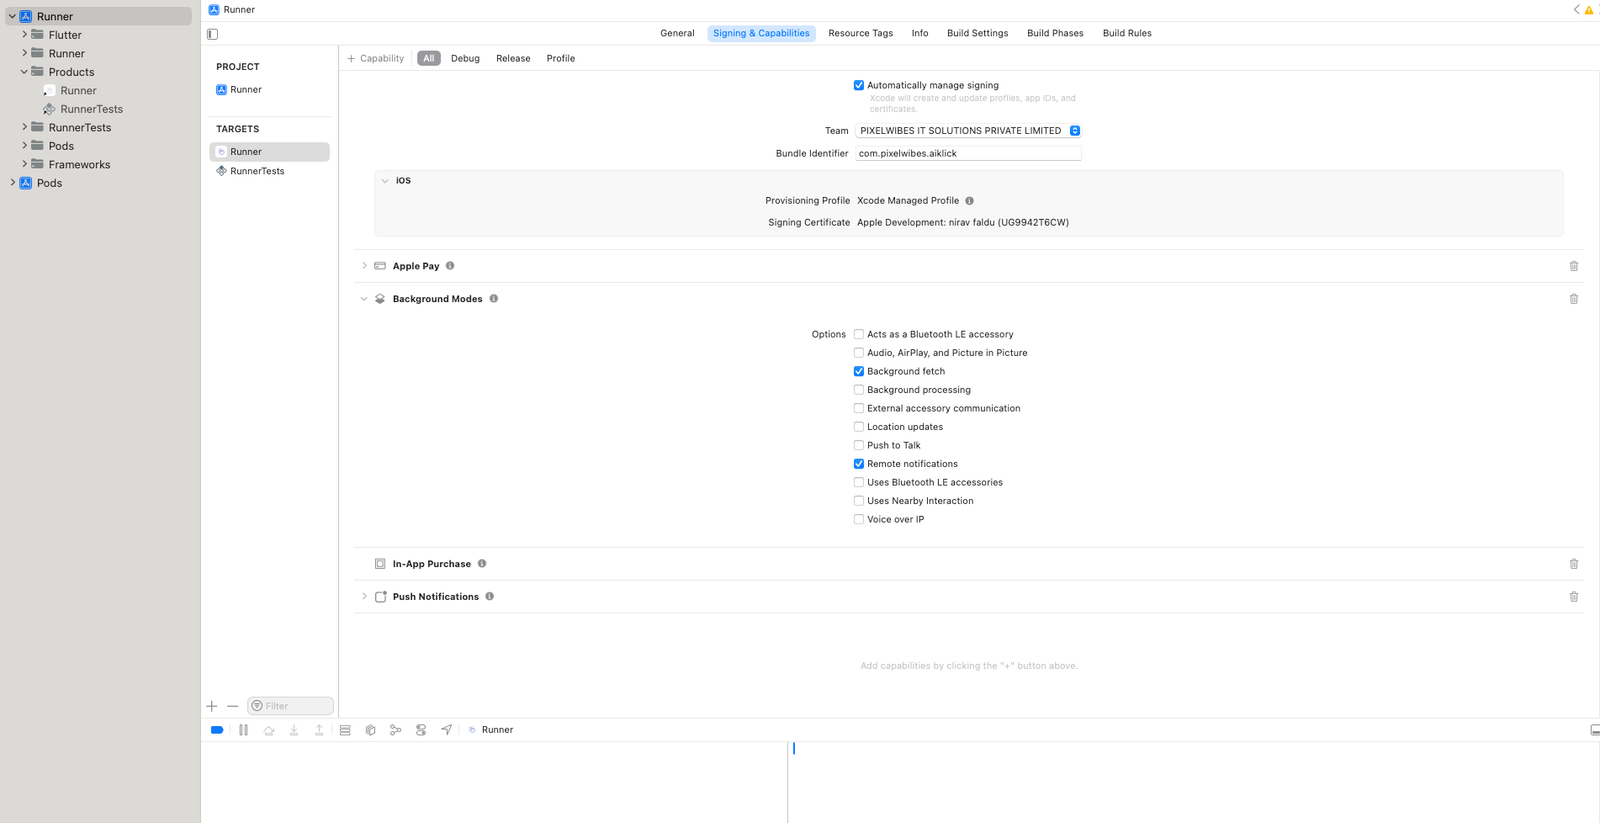
- for ios your need to perform below given step
- In Xcode, open the project
- In the Project Navigator (the left-hand menu), select the project icon that represents your app.
- In the top-left corner of the right-hand pane in Xcode, select your app's target.
- Navigate to the Capabilities tab.
- Enable Push Notifications.
- Check Remote Notifications and Background Fetch from Enabling Background Modes.
-
 X
X
- APNs (Apple's Push Notification service) currently supports two types of connections: token-based (.p8) and certificate-based (.p12).you can follow either one of them
- For Token-based (.p8)
- Log in to the Apple Developer Portal
- .Navigate to Certificates, IDs & Profiles > Identifiers > App IDs and click the App ID associated with your app.
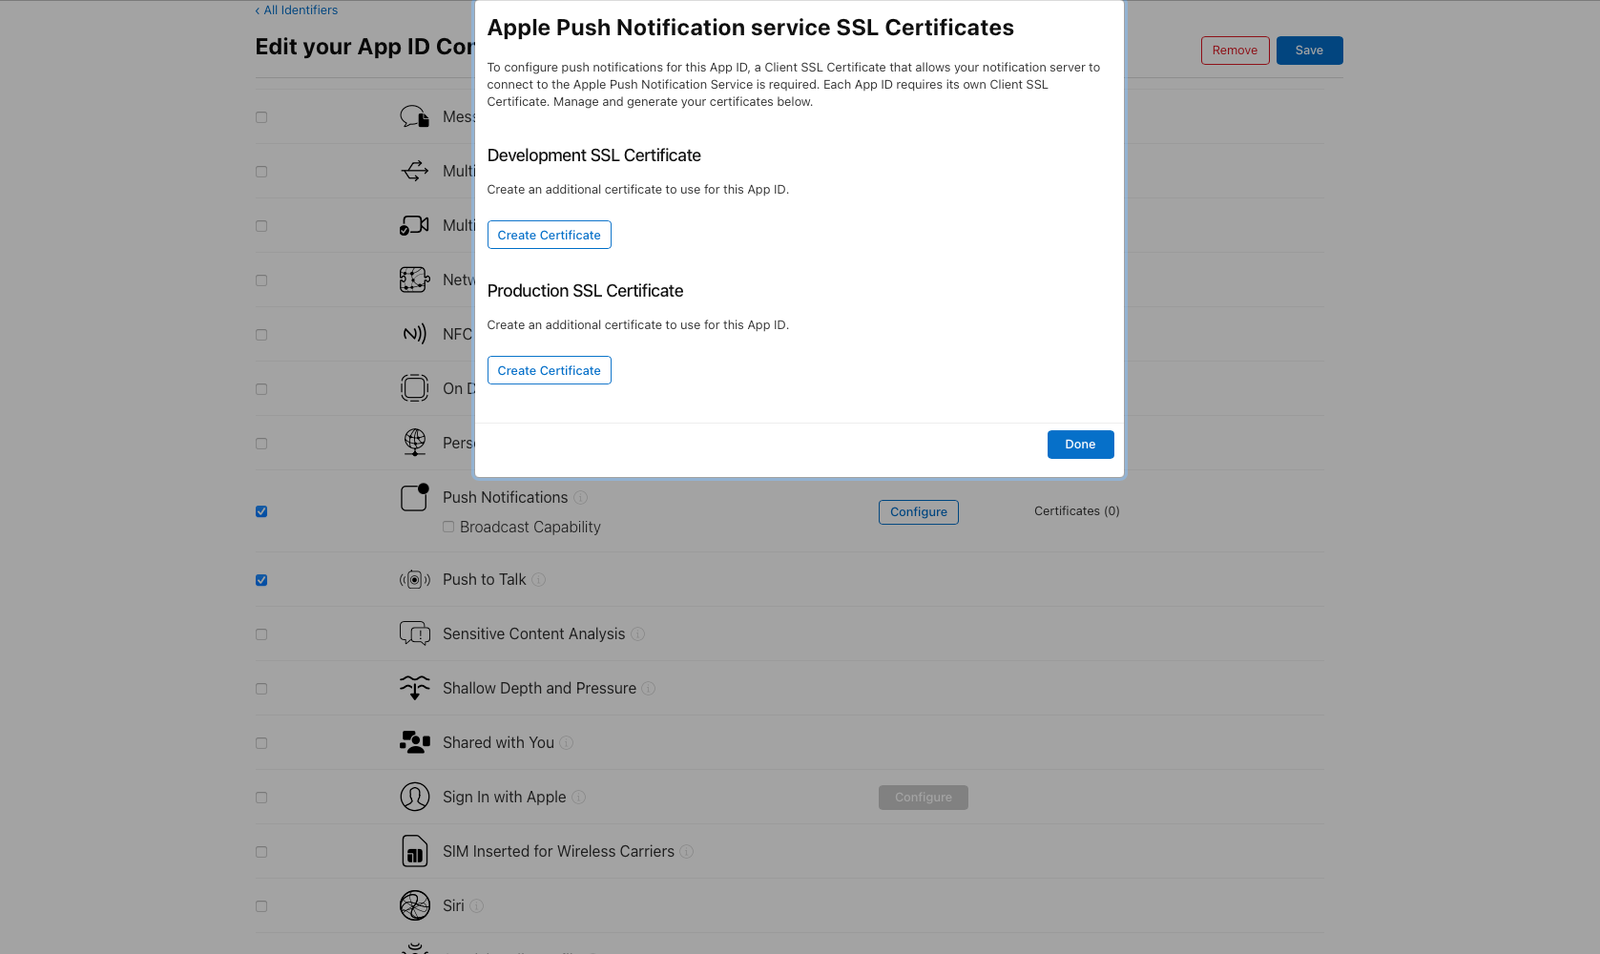
- On the screen for your App ID, check Capabilities > Push Notifications
-
 X
X
-
 X
X
- Select App ID in next page & click continue.
- And then create Development SSL Certificate & Production SSL Certificate by adding CSR certificate. follow Apple's Create a certificate signing request instructions
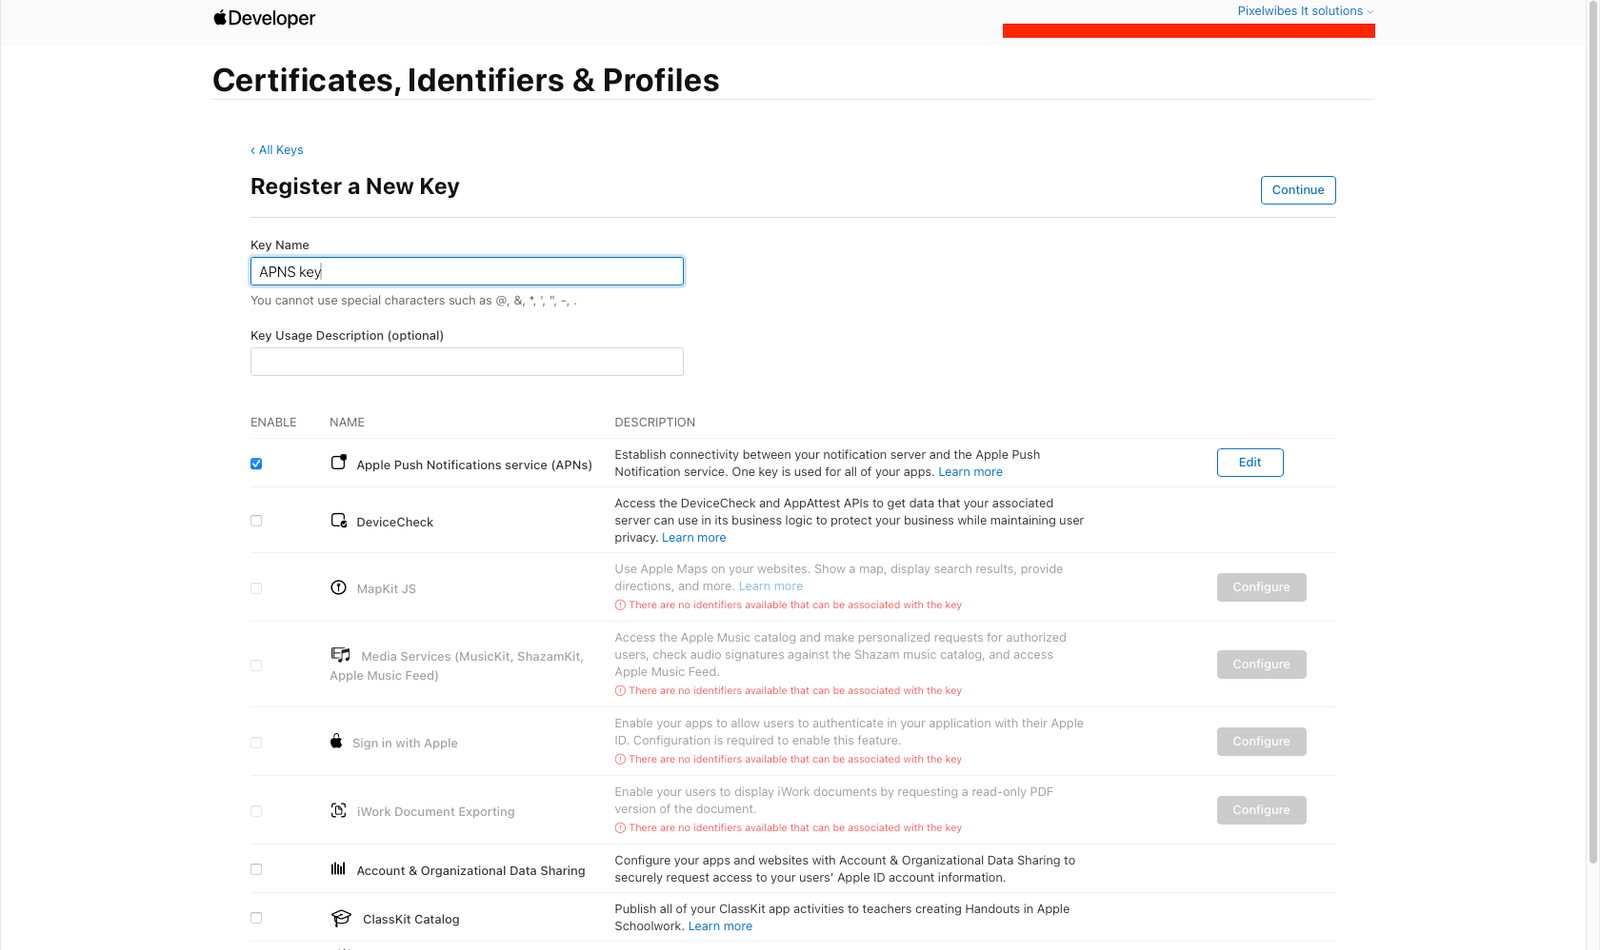
- Navigate to Certificates, IDs & Profiles > Keys Section and add a Universal key for Notifications,which you can use for more than one apps as well
-
 X
X
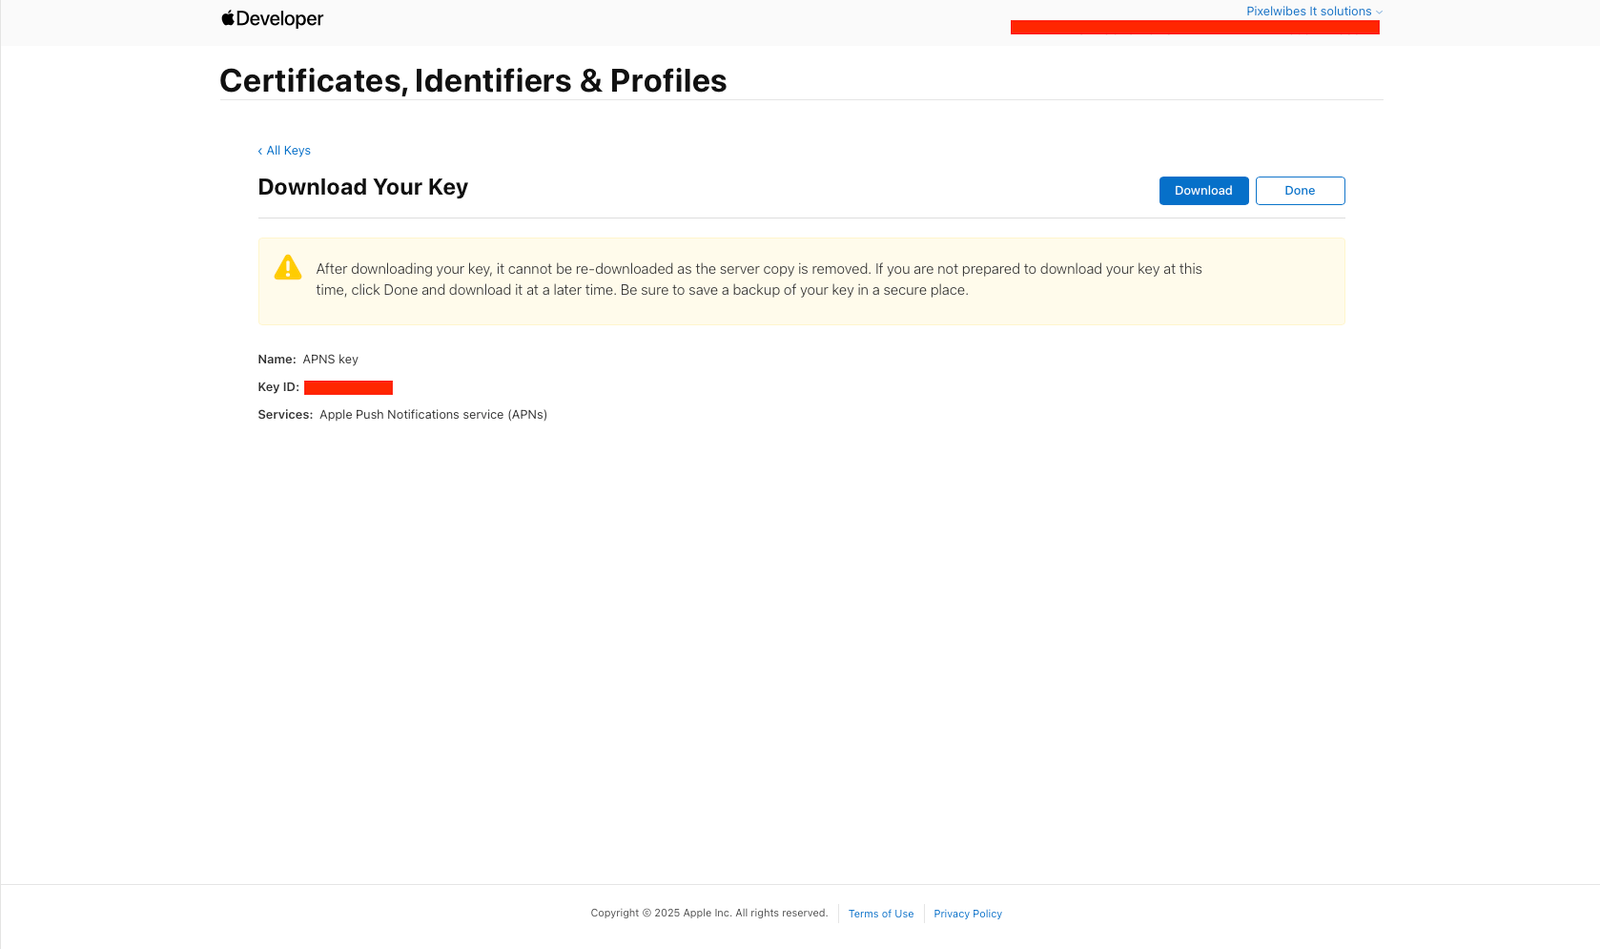
- Just save and Download & keep it safe, as it will be downloaded only once.
-
 X
X
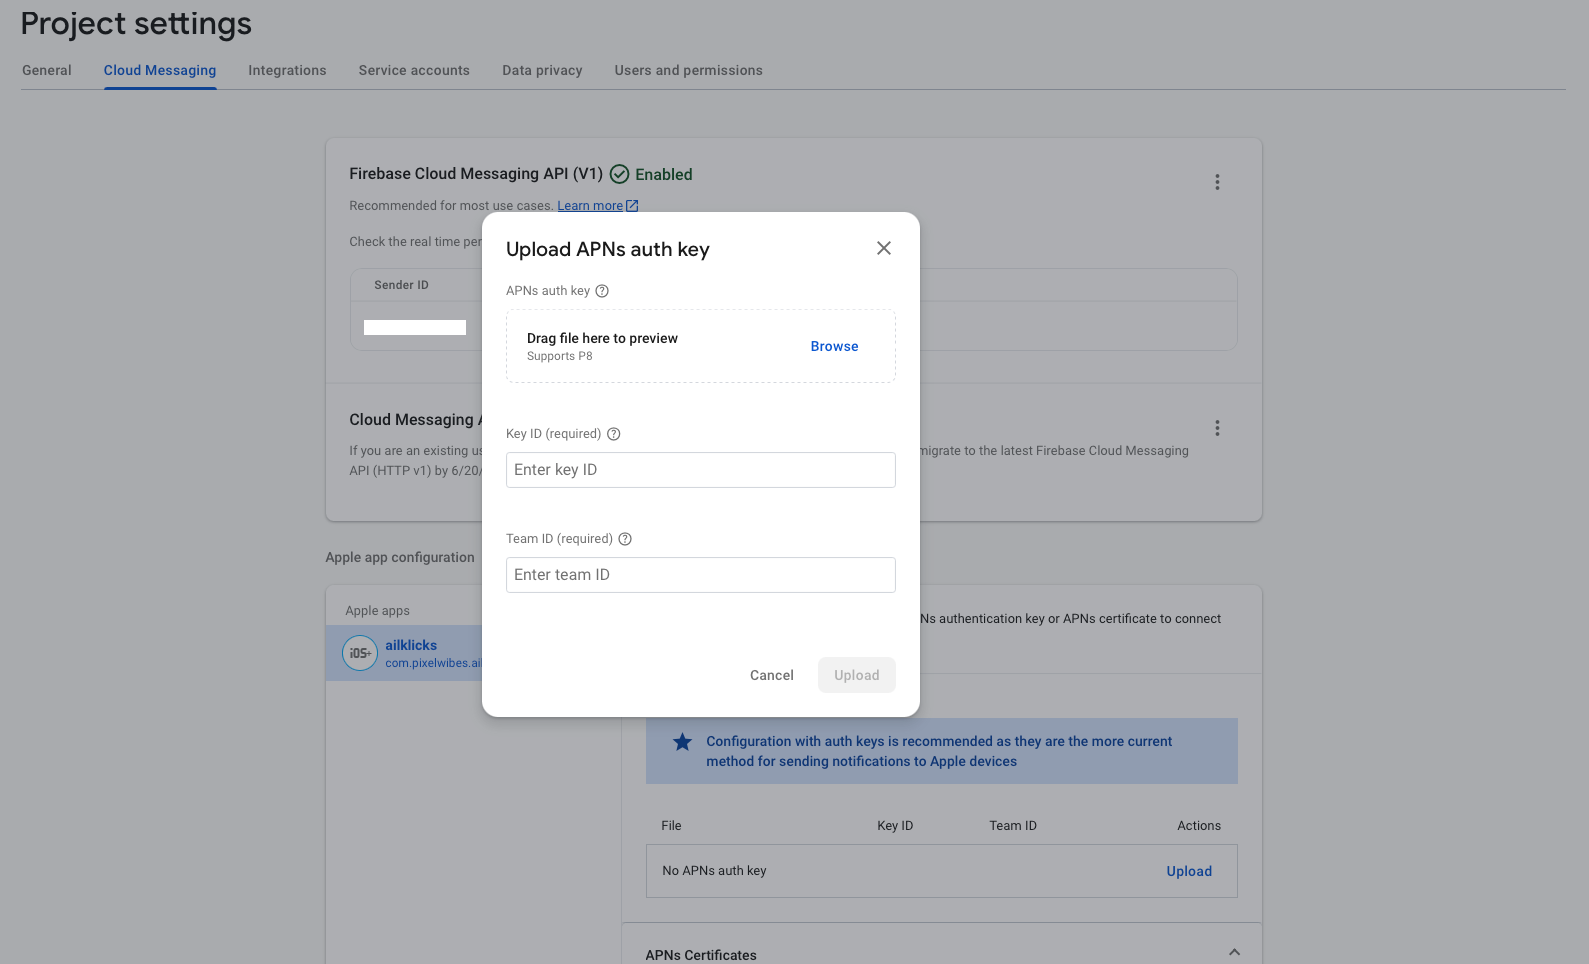
- Then go to Firebase and add this .p8 file along with Your Key ID and Team ID.
-
 X
X
- FOR certificate-based (.p12) :
- Log in to the Apple Developer Portal.
- Navigate to Certificates, IDs & Profiles > Identifiers > App IDs and click the App ID associated with your app.
- On the screen for your App ID, check Capabilities > Push Notifications
- Click Save and respond to the Modify App Capabilities dialog box that appears
-
To create the certificate, we will use to communicate with Apple when sending push notifications:
- In a new browser tab, follow Apple's Create a certificate signing request instructions.
- In the Apple Developer Portal, navigate back to your App ID.
- Click Capabilities > Push Notifications > Configure
-
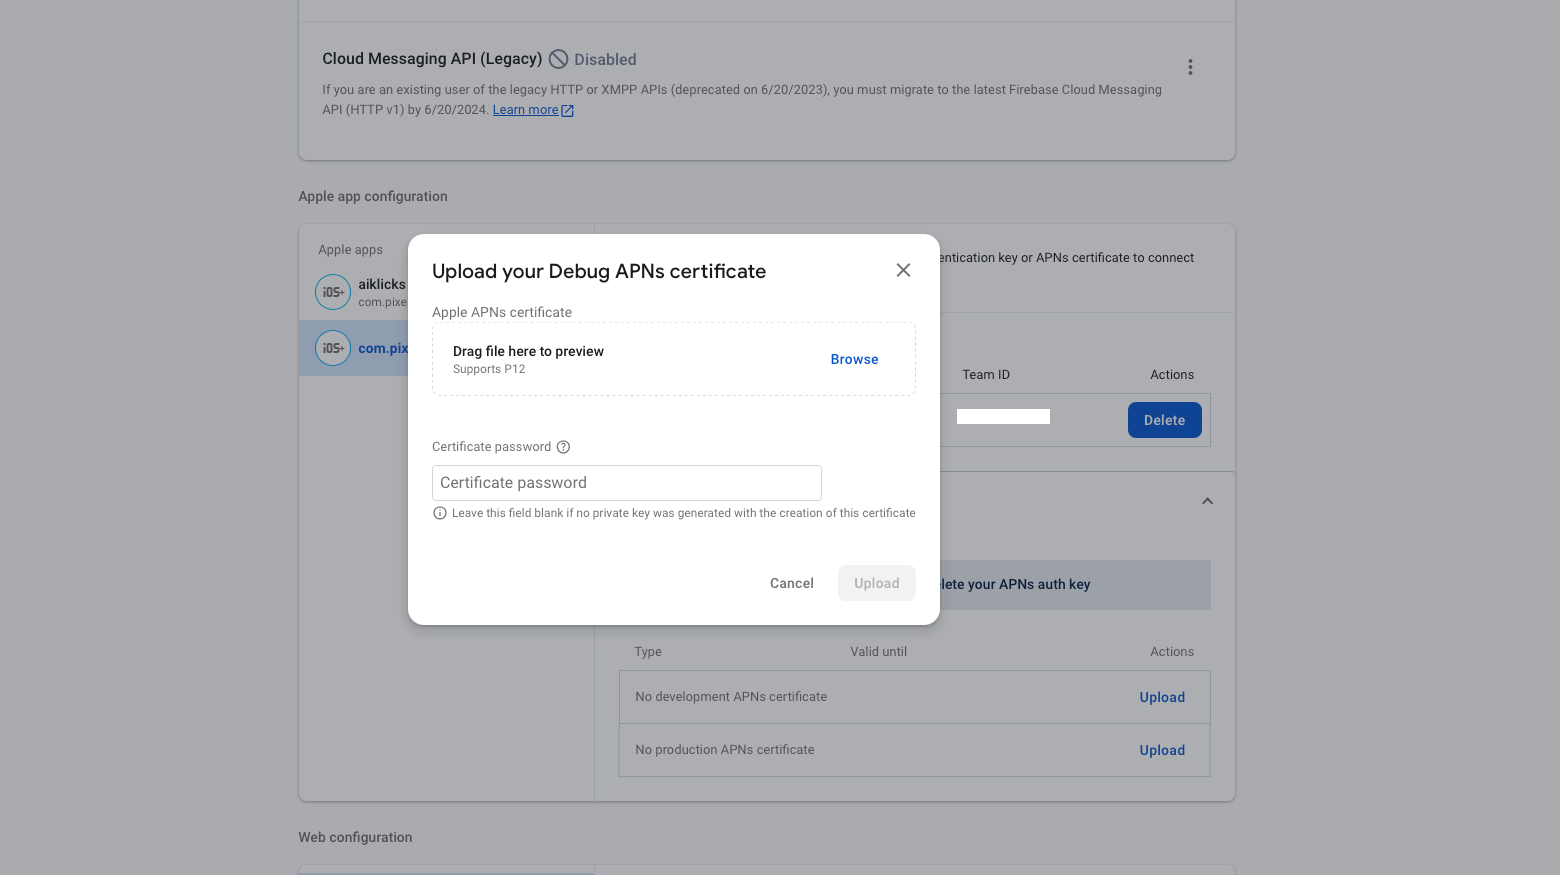
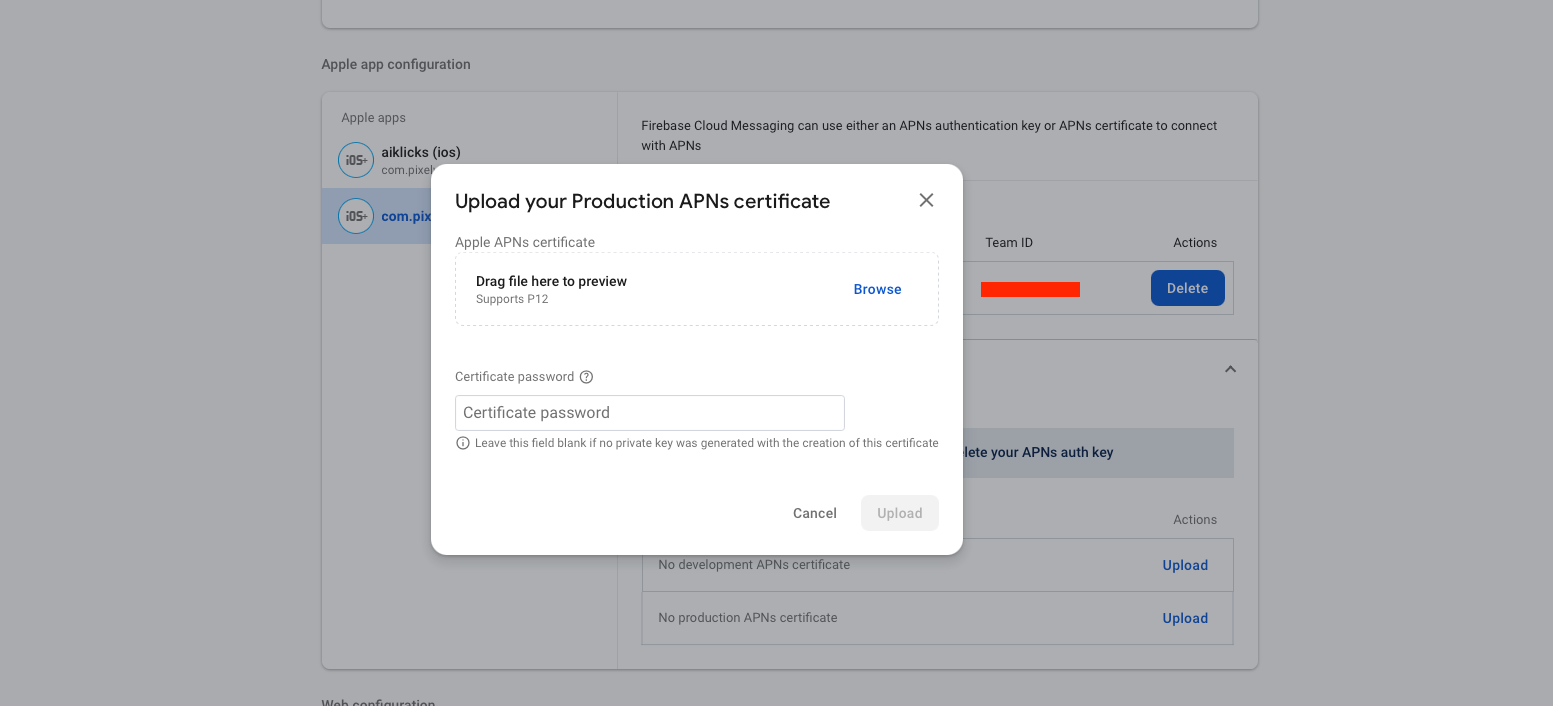
Click one of the following buttons:
- Development SSL Certificate > Create Certificate (for testing push notifications while developing an iOS app)
- Production SSL Certificate > Create Certificate (for sending push notifications in production)
- Click Choose File and select the certificate signing request you created above.
- Click Continue
- Click Download to download the certificate
- Use this file to export a .p12 file in the next step
- Navigate in the Apple Developer Portal to Certificates, IDs & Profiles > Provisioning Profiles
- Click the provisioning profile you'd like to edit.
- Edit the provisioning profile as necessary, and click Save.
- Click Download, and double-click the downloaded provisioning profile to install it
-
Make sure your Xcode project is configured to use the provisioning profile as necessary.Next, export the downloaded certificate (.cer file) as a .p12 file that can be uploaded to firebase:
- On your Mac, double-click the .cer file to open it in Keychain Access.
- In Keychain Access, in the lower-left corner, select Category > Certificates.
- Select the certificate to export.
- Choose File > Export Items
- Enter a name in the Save As field
- Accept the default .p12 file format and click Save. Respond to the prompts, and enter a password for the file if necessary
- Keep track of this file, since you'll upload it to firebase in a later step.
-
 X
X
-
 X
X
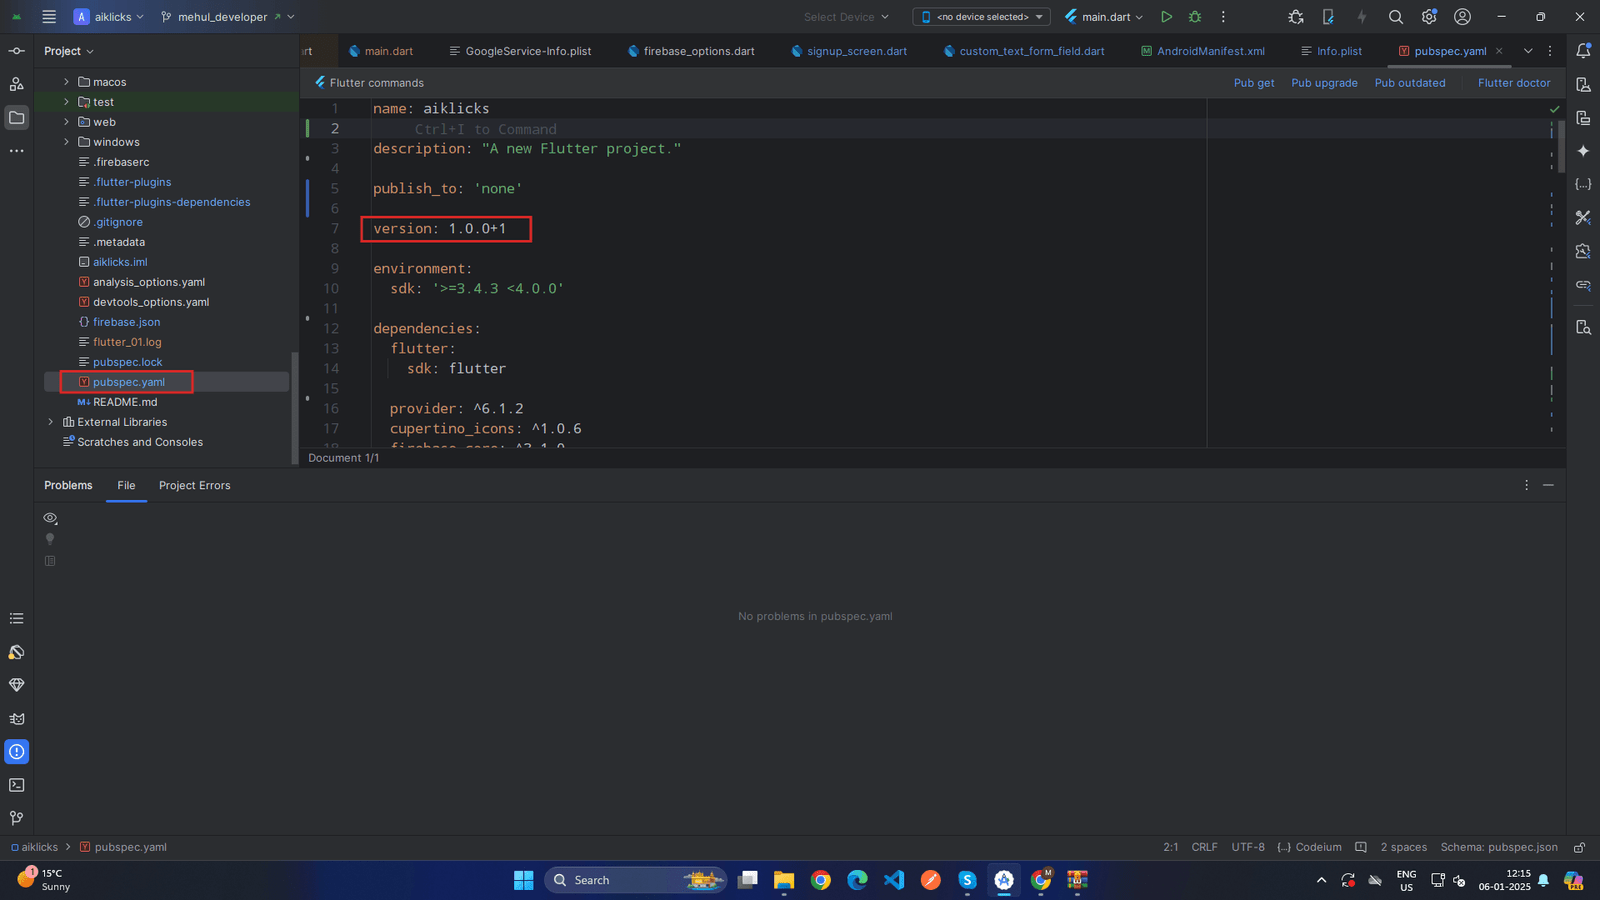
How To Change App Version
- Go to pubspec.yaml
- EX.Update version:A.B.C+X in pubspec.yaml.
-
For Android:
- A.B.C represents the versionName such as 1.0.0. X (the number after the +) represents the versionCode such as 1, 2, 3, etc.
- Do not forget to execute flutter packages get, flutter build or flutter run after this step
-
For iOS
- A.B.C represents the CFBundleShortVersionString such as 1.0.0. X (the number after the +) represents the CFBundleVersion such as 1, 2, 3, etc.
- Do not forget to execute flutter packages get, flutter build or flutter run after this step
-
 X
X
Prerequisite
AIklicks is dependent on PHP version 8.2 or higher and MySQL version 5.7 or later. Additionally, the following server configurations and PHP extensions are necessary:
- Mod_rewrite for Apache
- Mod_rewrite for Apache
- Mod_rewrite for Apache
- Mod_rewrite for Apache
- Mod_rewrite for Apache
- Mod_rewrite for Apache
- Mod_rewrite for Apache
- Mod_rewrite for Apache
- Mod_rewrite for Apache
- Mod_rewrite for Apache
Typically, these extensions are enabled by default on most servers. However, it is advisable to verify the configuration with your hosting provider to ensure compatibility with the project
Environment Setup
Windows
How to Setup latest Java jdk
- If your System already have latest Java jdk installed then you can skip this step.
- Download Java JDK Version 22.0.1
- Please prefer video tutorials, we recommend this playlist for set environment variable for java in Windows 10
- Please prefer video tutorials, we recommend this playlist for set environment variable for java in Windows 11
Install Android Studio
-
Download Android Studio
- Visit the official Android Studio download page and download Android Studio for Windows.
- Ensure that you are using JDK 22.0.1 for your Android projects for optimal compatibility and performance.
-
Run the Installer
- Run the downloaded installer executable (e.g., android-studio-ide-<version>-windows.exe).
-
Follow Installation Wizard
- Follow the instructions in the installation wizard.
- Choose a custom installation location if needed.
- Select the components you want to install (Android Studio, Android Virtual Device, etc.).
-
Start Android Studio
- Once the installation is complete, launch Android Studio.
-
Install SDK Components
- Android Studio will prompt you to install additional SDK components and tools. Allow it to download and install them.
-
Set up Emulator (Optional)
- If you plan to use an emulator, you can create one through the AVD (Android Virtual Device) Manager in Android Studio.
Install Flutter SDK
- Download Flutter SDK
- Visit the official Flutter download the page for the 3.27.1 version for Windows .
- Extract Flutter Archive
-
Extract the downloaded Flutter zip file to a location on your machine. For example,
‘C:\flutter’
-
Add Flutter to System Path
-
Add the
flutter\bin
directory to your system’s PATH variable
- Right-click on “This PC” or “Computer” on your desktop or in File Explorer
- Select “Properties” →“Advanced system settings” → “Environment Variables.”
- In the “System variables” section, find and select the “Path” variable, then click “Edit.”
- Click “New” and add the path to the bin directory inside the Flutter directory.”
-
Add the
flutter\bin
directory to your system’s PATH variable
-
Verify Flutter Installation
- Open a new Command Prompt and run ‘flutter doctor’ to check for any dependencies that need to be installed or configured.
-
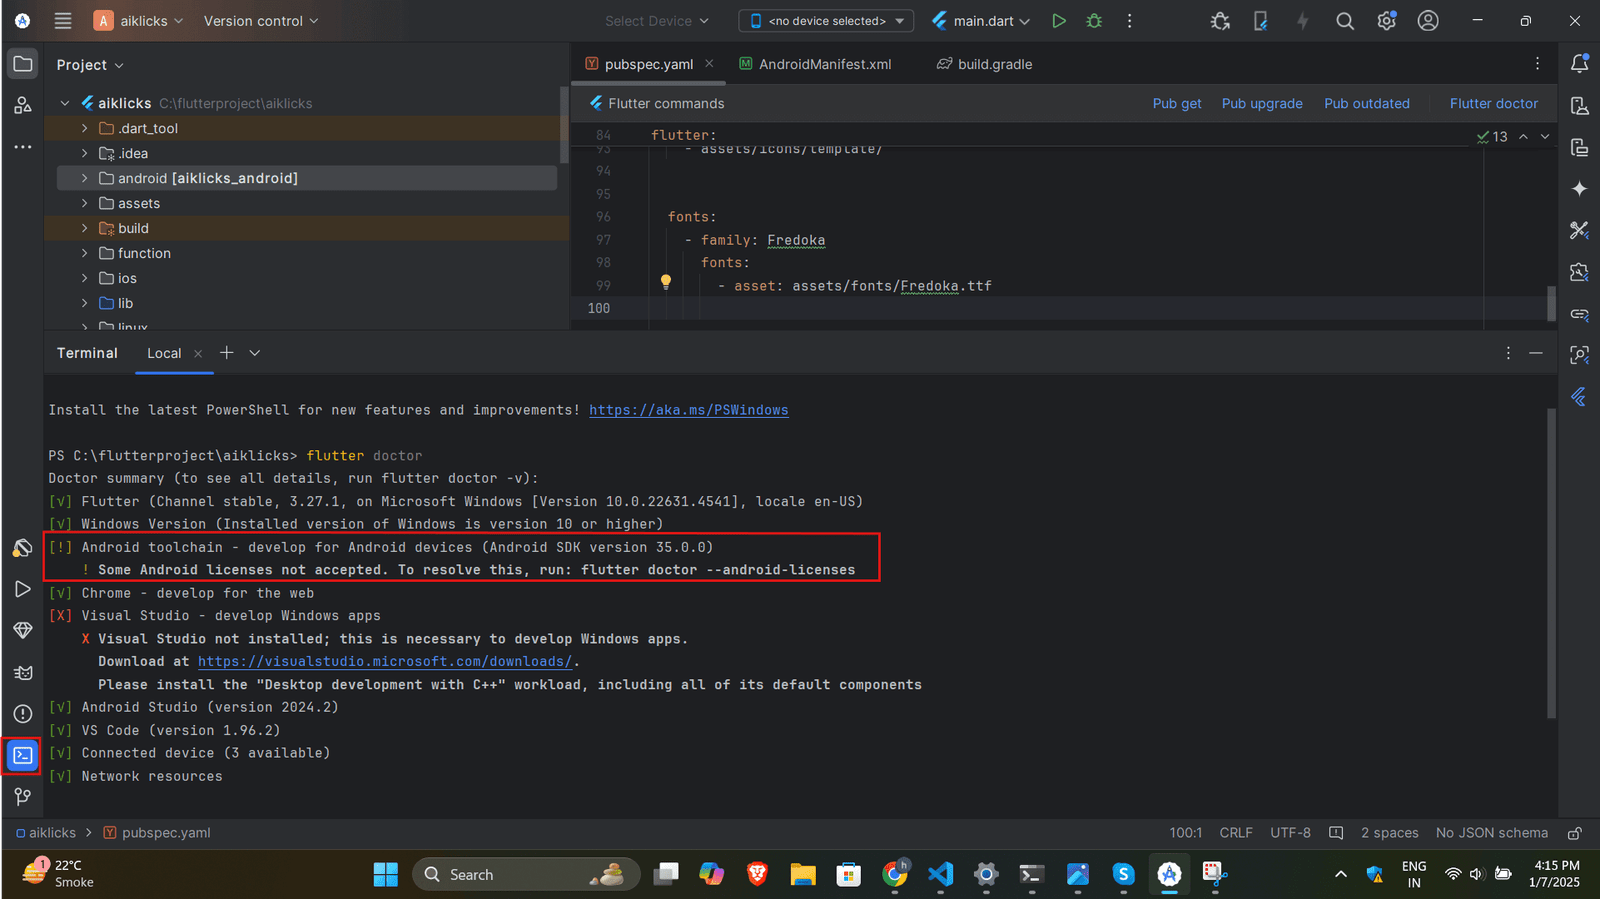
Flutter Doctor Output Error
- If you have run flutter doctor. and in flutter doctor if you see below error like licence status unknown.
-
 x
x
- If the issue is related to Android SDK licenses, run the following command in your terminal: flutter doctor --android-licenses
- Accept all the licenses by typing y when prompted. Then, check the status using: flutter doctor
- then go to sdk manager from upar right corner then go to android sdk inside that sdk tools and then uncheck hide obsolute package then check android sdk command line tool latest then apply and then ok. it will download latest version as shown in below fig
-
 x
x
-
Add Flutter to System Path
- now run flutter doctor again your error will be removed
-
Install Flutter Plugins for Android Studio
- Open Android Studio
- Install the Flutter and Dart plugins through “File” -> “Settings” -> “Plugins” -> “Marketplace.”
-
Restart Android Studio
- Restart Android Studio to apply the changes.
Mac
Install Android Studio
-
Download Android Studio
- Visit the Visit the official Android Studio download page and download Android Studio for macOS.
- Ensure that you are using JDK 22.0.1 for your Android projects for optimal compatibility and performance.
-
Open the DMG file
- Open the downloaded DMG file.
- Drag and drop Android Studio into the “Applications” folder.
-
Run Android Studio
- Open the “Applications” folder and launch Android Studio.
-
Set up Android Studio
- Complete the Android Studio Setup Wizard.
- Android Studio may prompt you to install additional components and SDKs. Follow the instructions to install them
Install Flutter SDK
- Download Flutter SDK
-
Extract Flutter Archive
- Open a terminal and navigate to the directory where the archive was downloaded
- Extract the archive using the following command tar xf flutter_macos_<version>.tar.xz (replace flutter_macos_<version>.tar.xz with the actual filename)
-
Move to Installation LocationArchive
- Move the extracted folder to a location of your choice. For example : sudo mv flutter /YOUR_DIRECTORY
-
Add Flutter to System Path
- Add the flutter/bin directory to your system’s PATH variable
-
Verify Flutter Installation
- Open a new terminal and run: flutter doctor
-
Flutter Doctor Output Error
- If you have run flutter doctor. and in flutter doctor if you see below error like licence status unknown.
-
x
- If the issue is related to Android SDK licenses, run the following command in your terminal: flutter doctor --android-licenses
- Accept all the licenses by typing y when prompted. Then, check the status using: flutter doctor
- then go to sdk manager from upar right corner then go to android sdk inside that sdk tools and then uncheck hide obsolute package then check android sdk command line tool latest then apply and then ok. it will download latest version as shown in below fig
-
x
- now run flutter doctor again your error will be removed
-
Install Flutter Plugins for Android Studio
- Open Android Studio.
- Install the Flutter and Dart plugins through “Preferences” -> “Plugins” -> “Marketplace.”
-
Restart Android Studio
- Restart Android Studio to apply the changes.
Firebase configuration
How to install Firebase CLI on windows
-
Install Node.js
Firebase CLI requires Node.js to be installed.
-
Download Node.js:
- Go to the Node.js official website.
- Download the LTS version (recommended for most users).
-
Install Node.js:
- Run the downloaded installer.
- Follow the installation steps, ensuring the option "Add to PATH" is selected.
-
Verify Node.js Installation:
- Open Command Prompt or PowerShell.
-
Run the following commands to verify Node.js and npm are installed:
- node -v
- npm-v
-
Download Node.js:
-
Install Firebase CLI
-
Open a Terminal as Administrator:
- Press Win + S, type Command Prompt or PowerShell, right-click, and select Run as Administrator.
-
Install Firebase CLI Globally:
-
Run the following command to install Firebase CLI using npm:
- npm install -g firebase-tools
-
Run the following command to install Firebase CLI using npm:
-
Verify Firebase CLI Installation:
-
Run this command to check if Firebase CLI is installed successfully:
- firebase --version
- This should return the version number of Firebase CLI.
-
Run this command to check if Firebase CLI is installed successfully:
-
Open a Terminal as Administrator:
-
Authenticate Firebase CLI
-
Log In to Firebase:
-
Run the following command:
- firebase login
- This will open a browser window prompting you to log in with your Google account. Ensure you use the same Google account associated with your Firebase project.
- Once authenticated, return to the terminal to see the success message.
-
Run the following command:
-
Log In to Firebase:
How to Configure firebase project
-
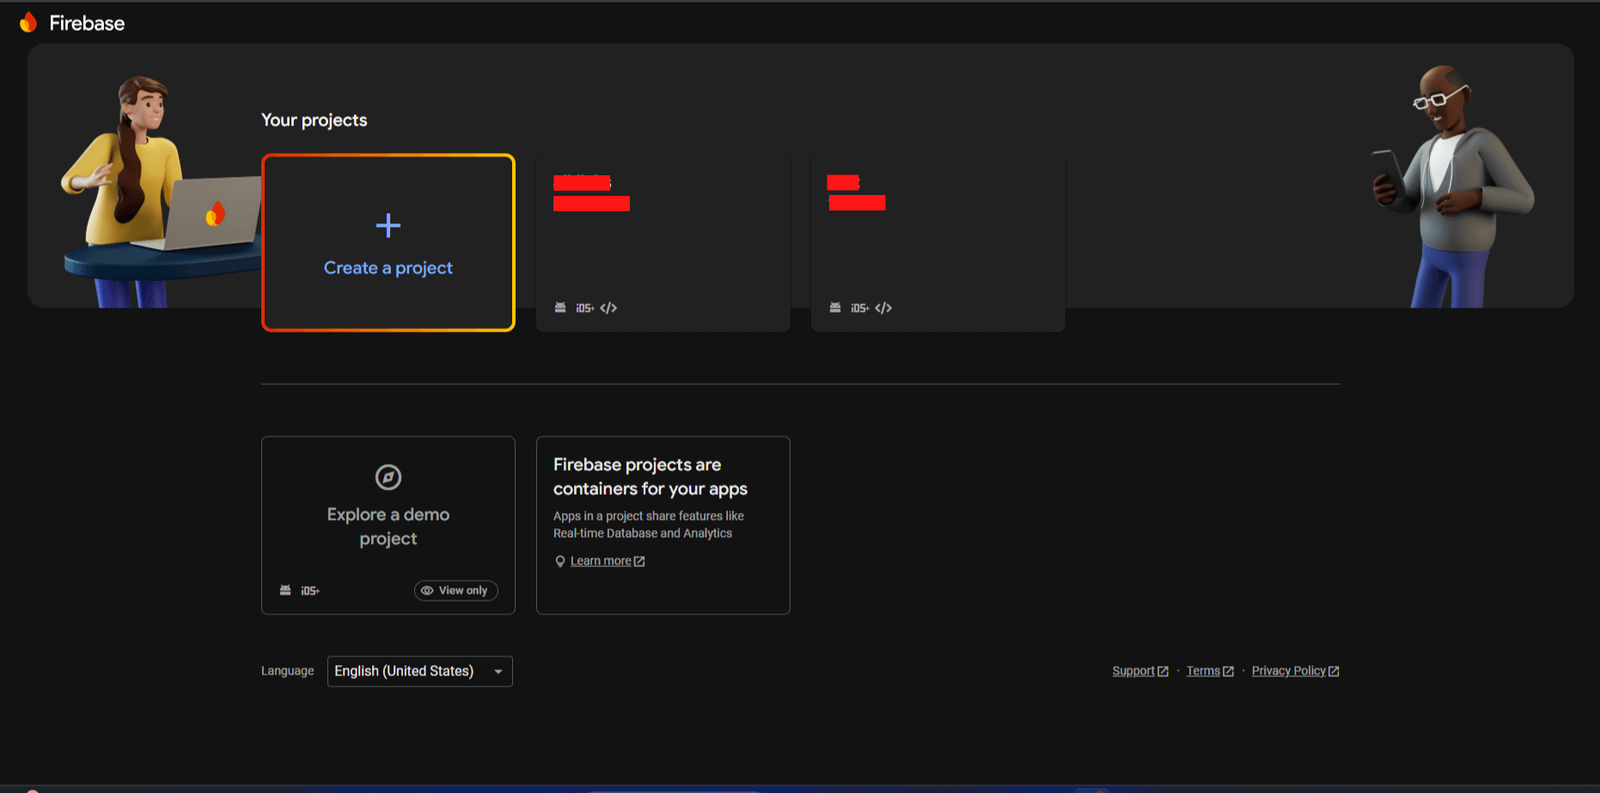
Go to
firebase console
and then click on add project.
-
 x
x
-
-
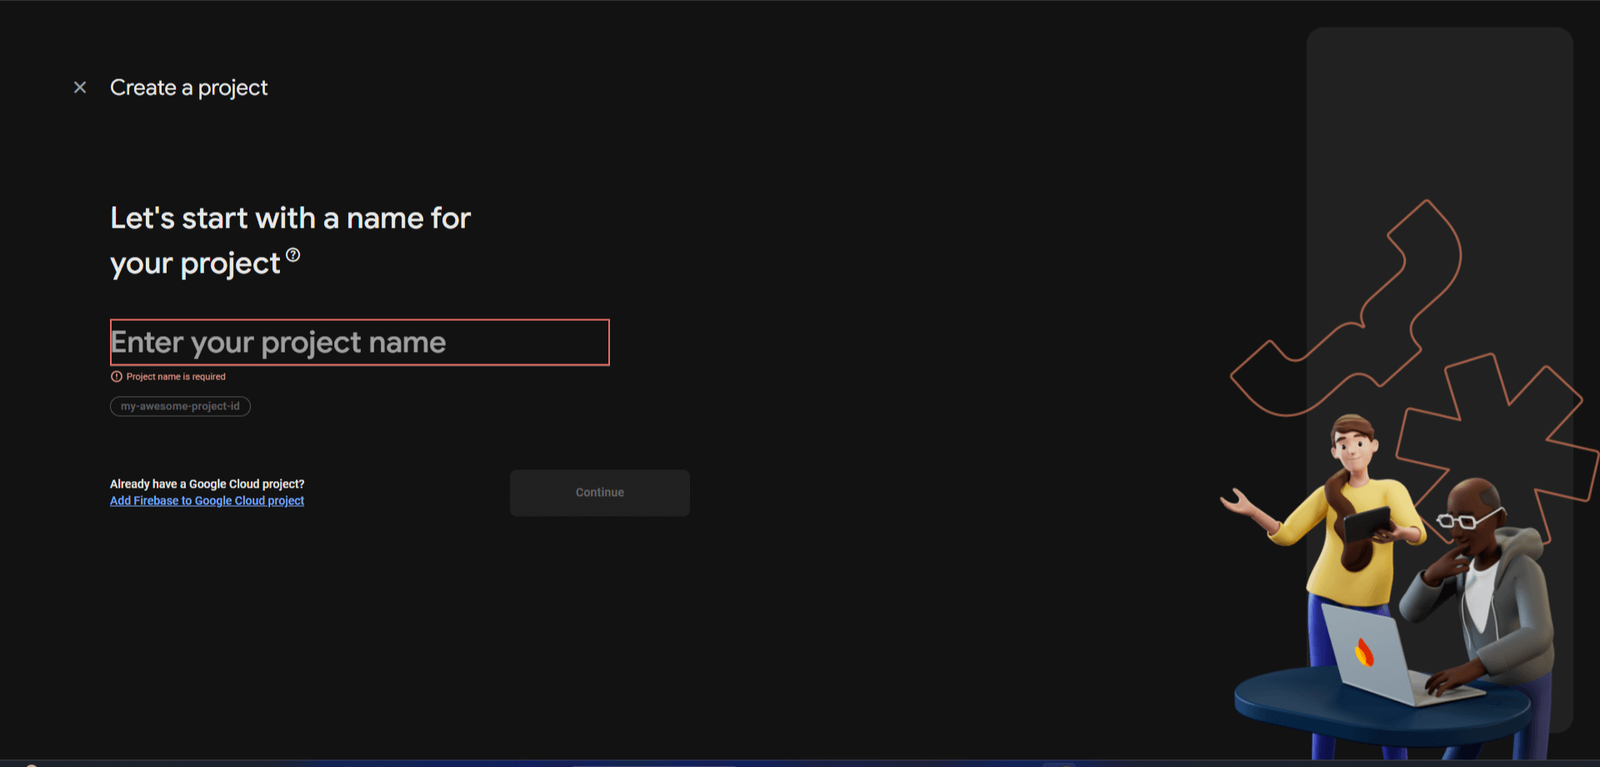
after that below given step will come. here you have to enter your project details
Enter your project name
and then press on continue then
select email
and then press continue.
-
 x
x
-
-
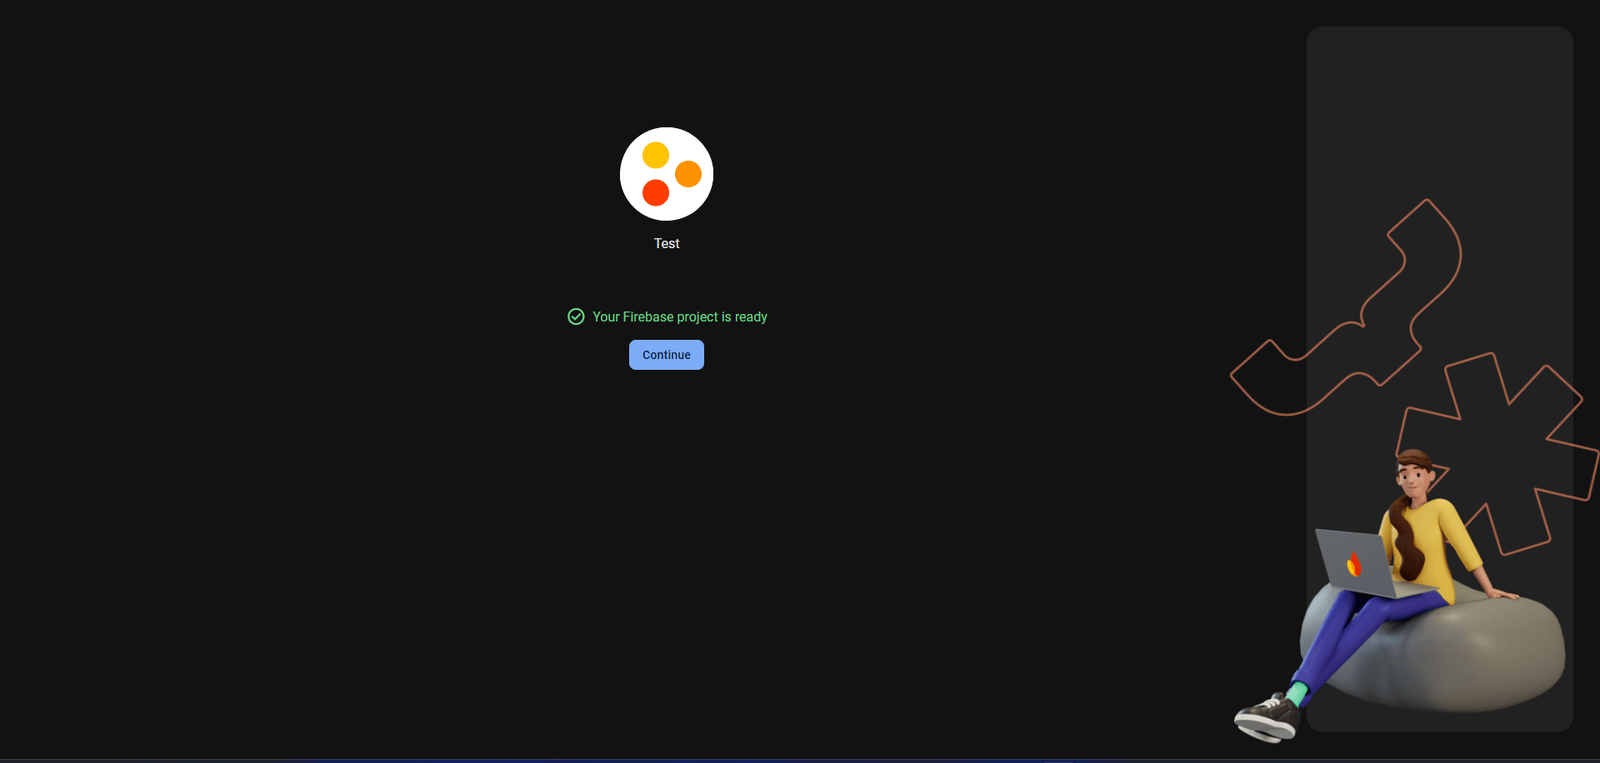
after that your project is created
-
 x
x
-
-
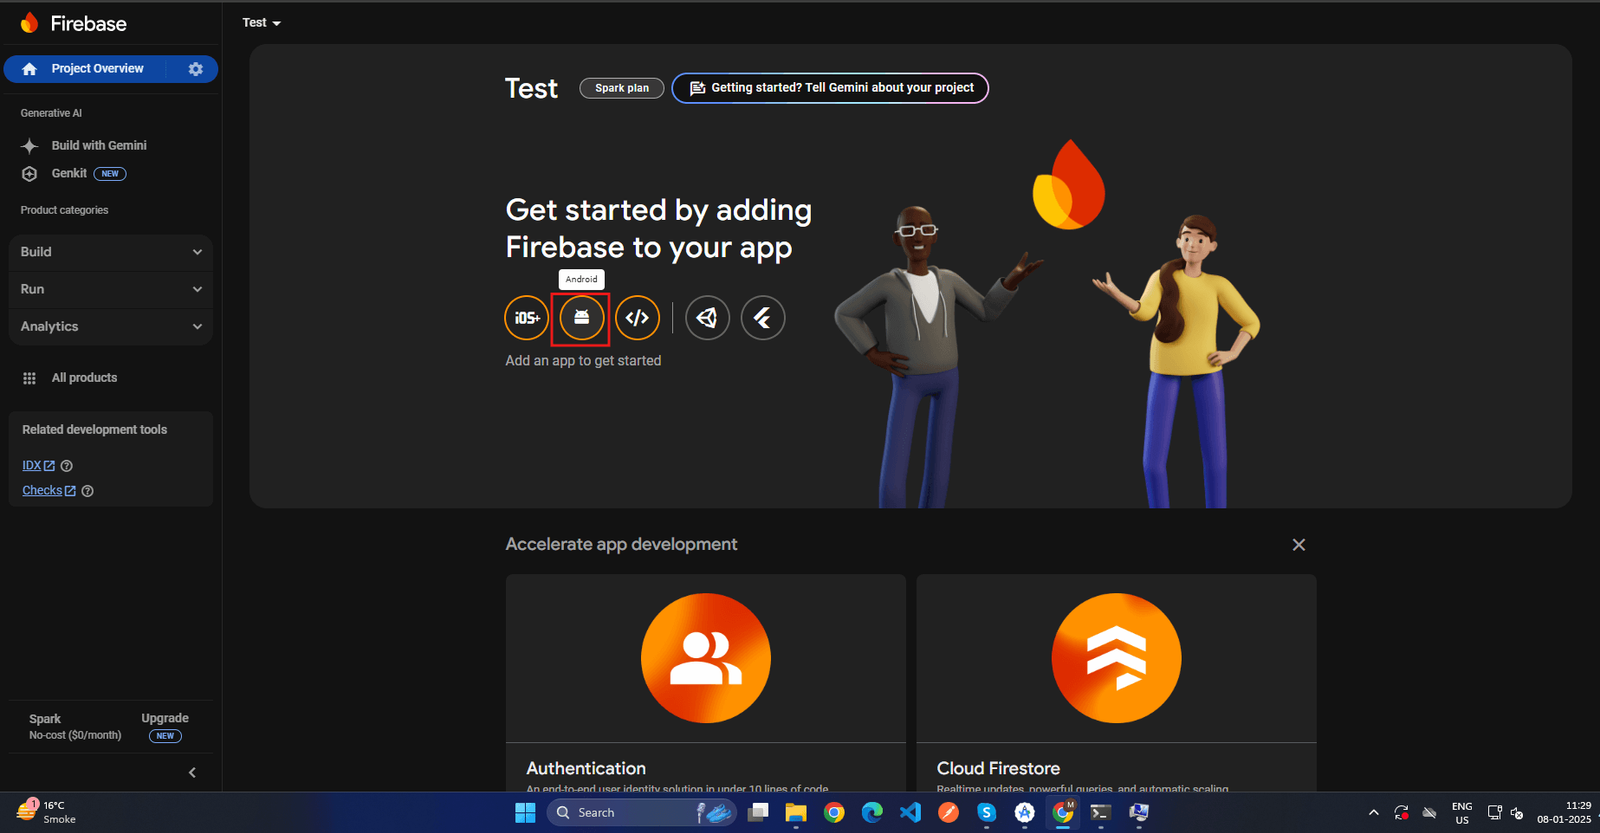
For android,now first click on
android
-
 x
x
-
-
after that below given screen will appear, in that you have to enter your
packagename
and
appname
and then click
register app.
-
 x
x
-
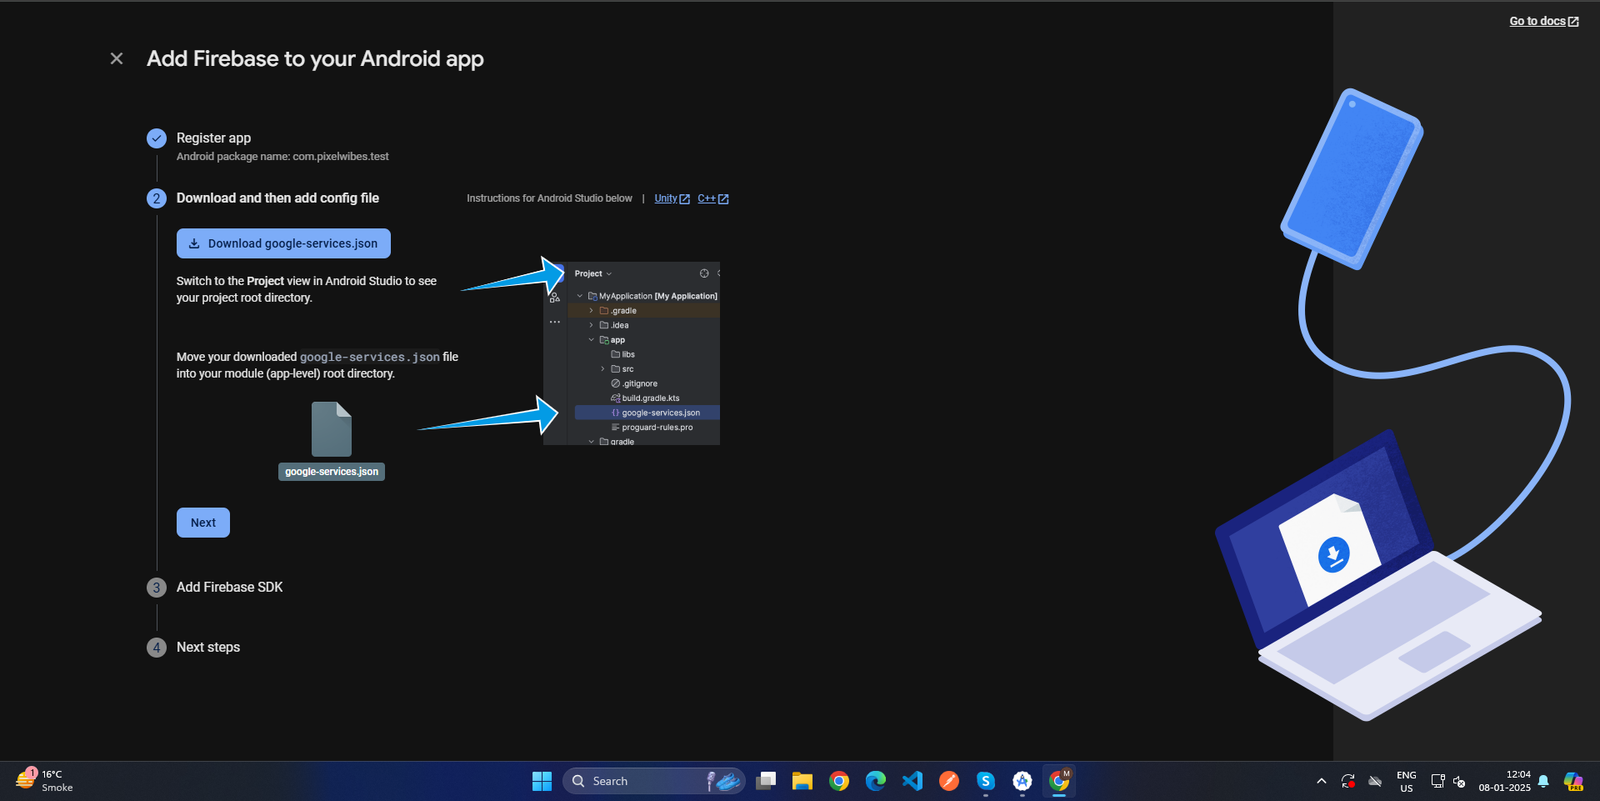
-
After that below given screen will appear, now click on download
google-services.json
-
 x
x
-
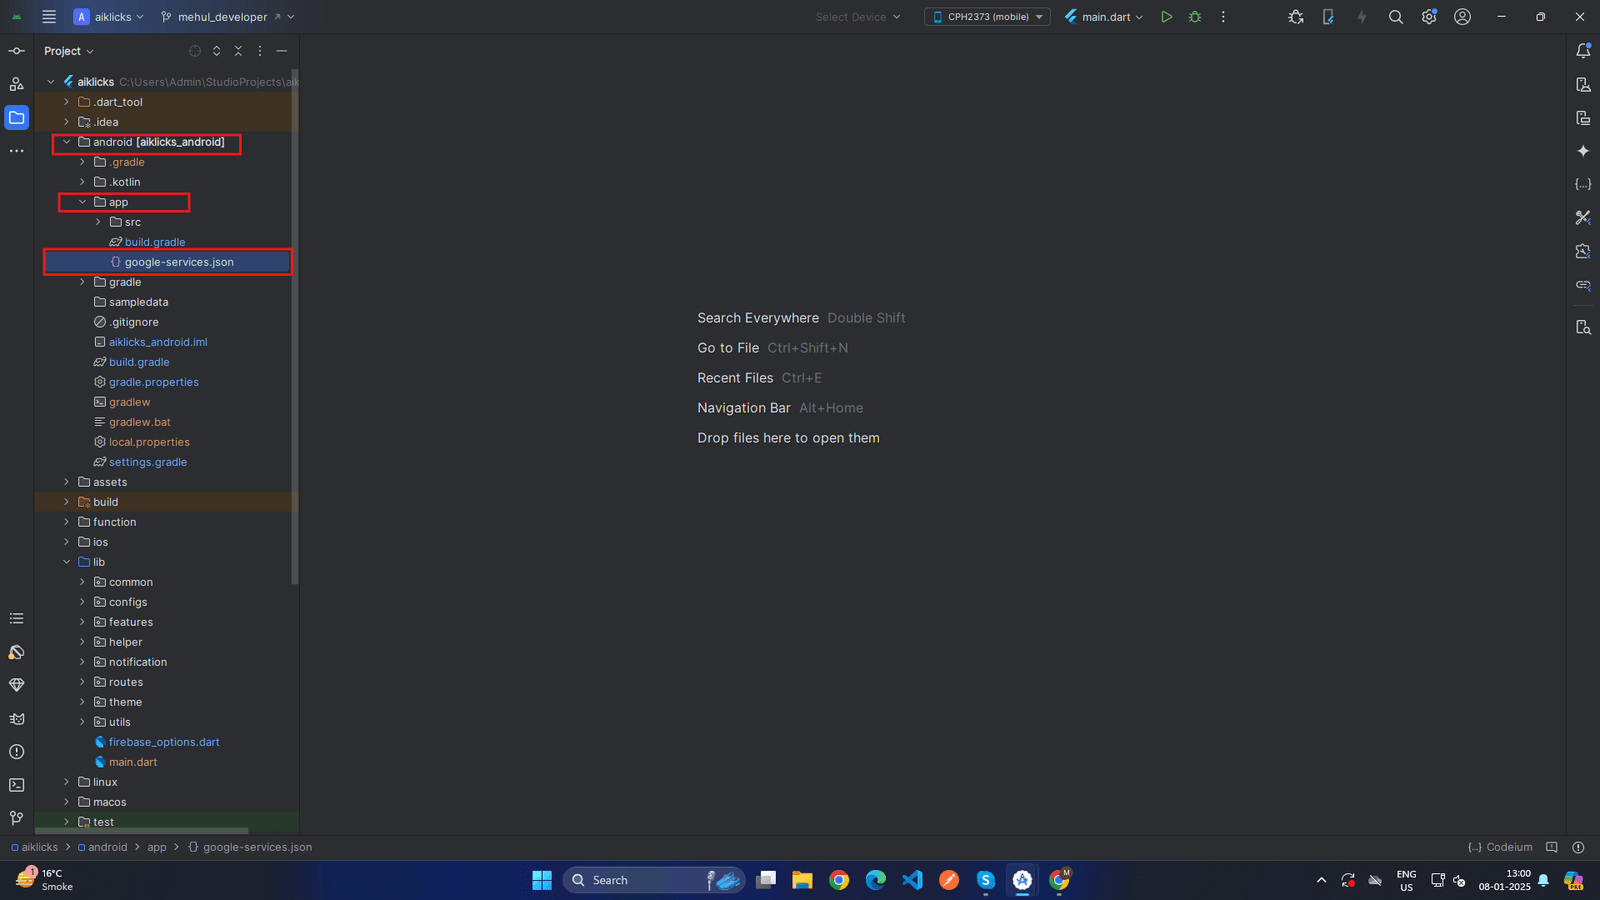
-
After that open the file and copy content of file and replace in
android > app > google-service.son
-
 x
x
-
- now click on next next and in last step press continue navigate to project dashboard.
-
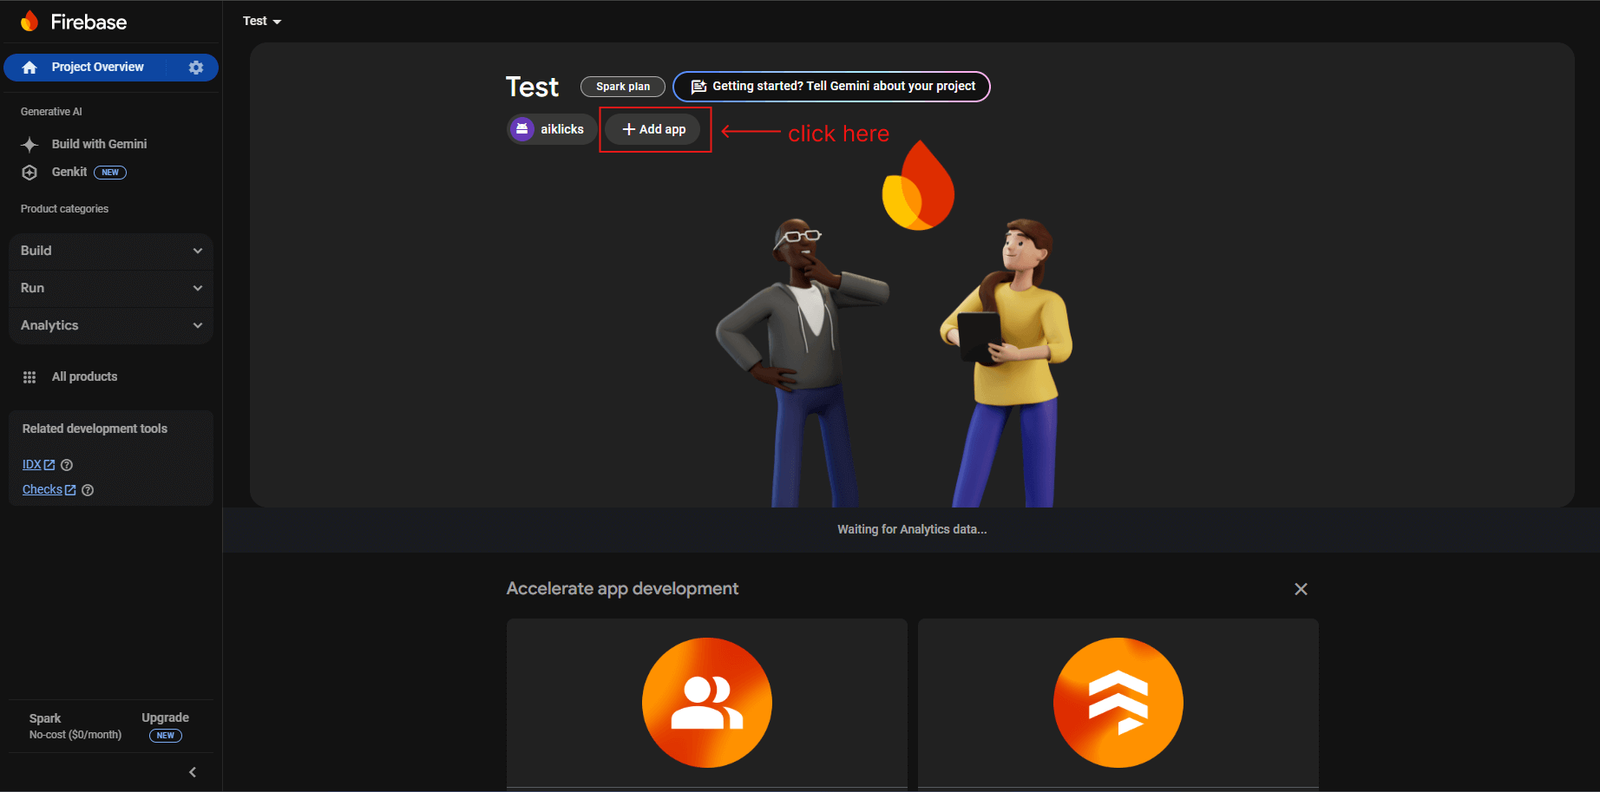
for
ios
,perform below step. now click on add app.
-
 x
x
-
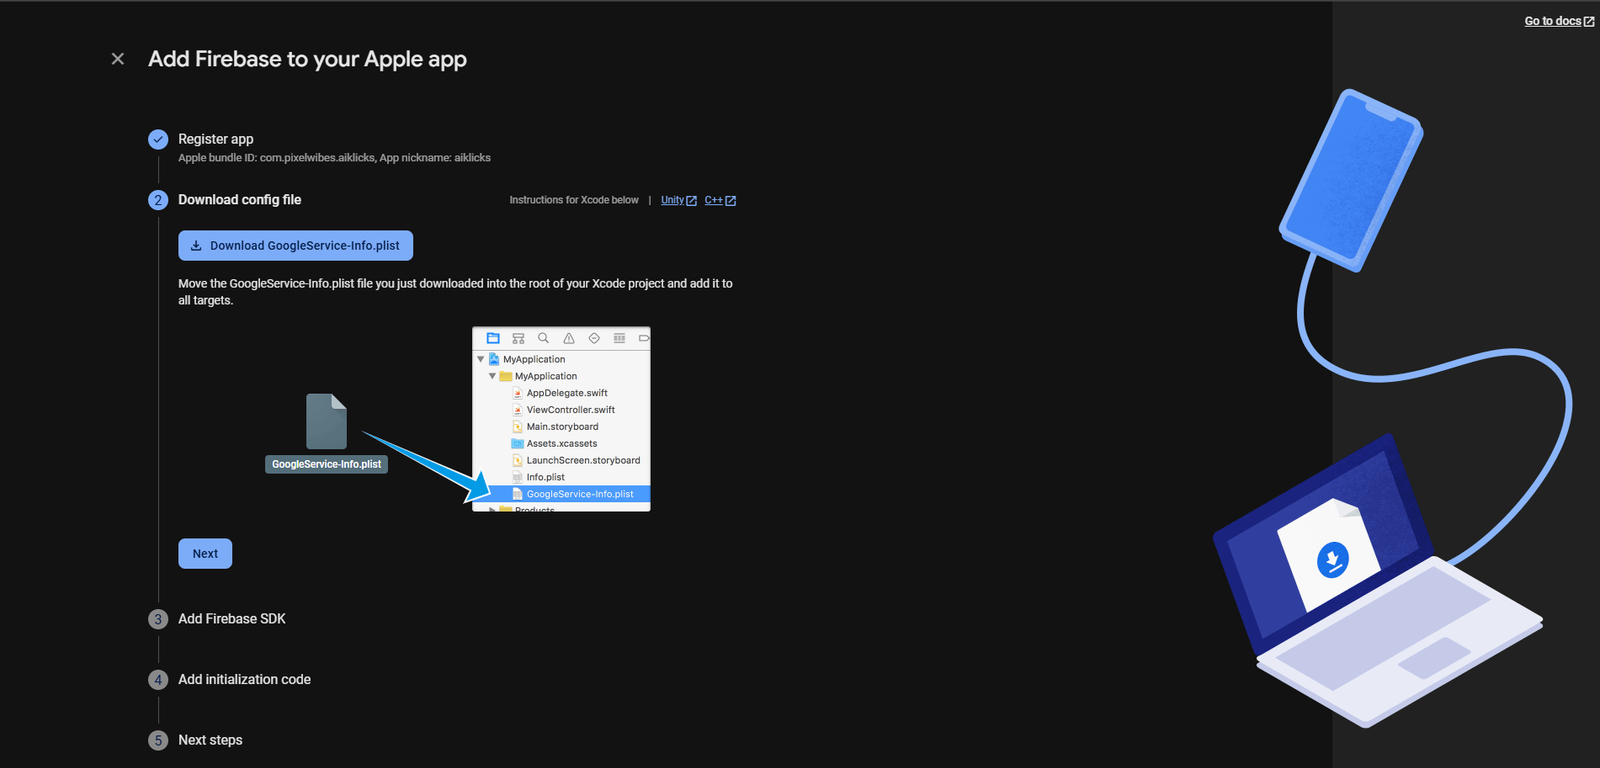
-
and then click on ios button in this same as android step will be come here you have to enter your
appname
then next and on next screen download google service
info.plist
file
-
 x
x
-
-
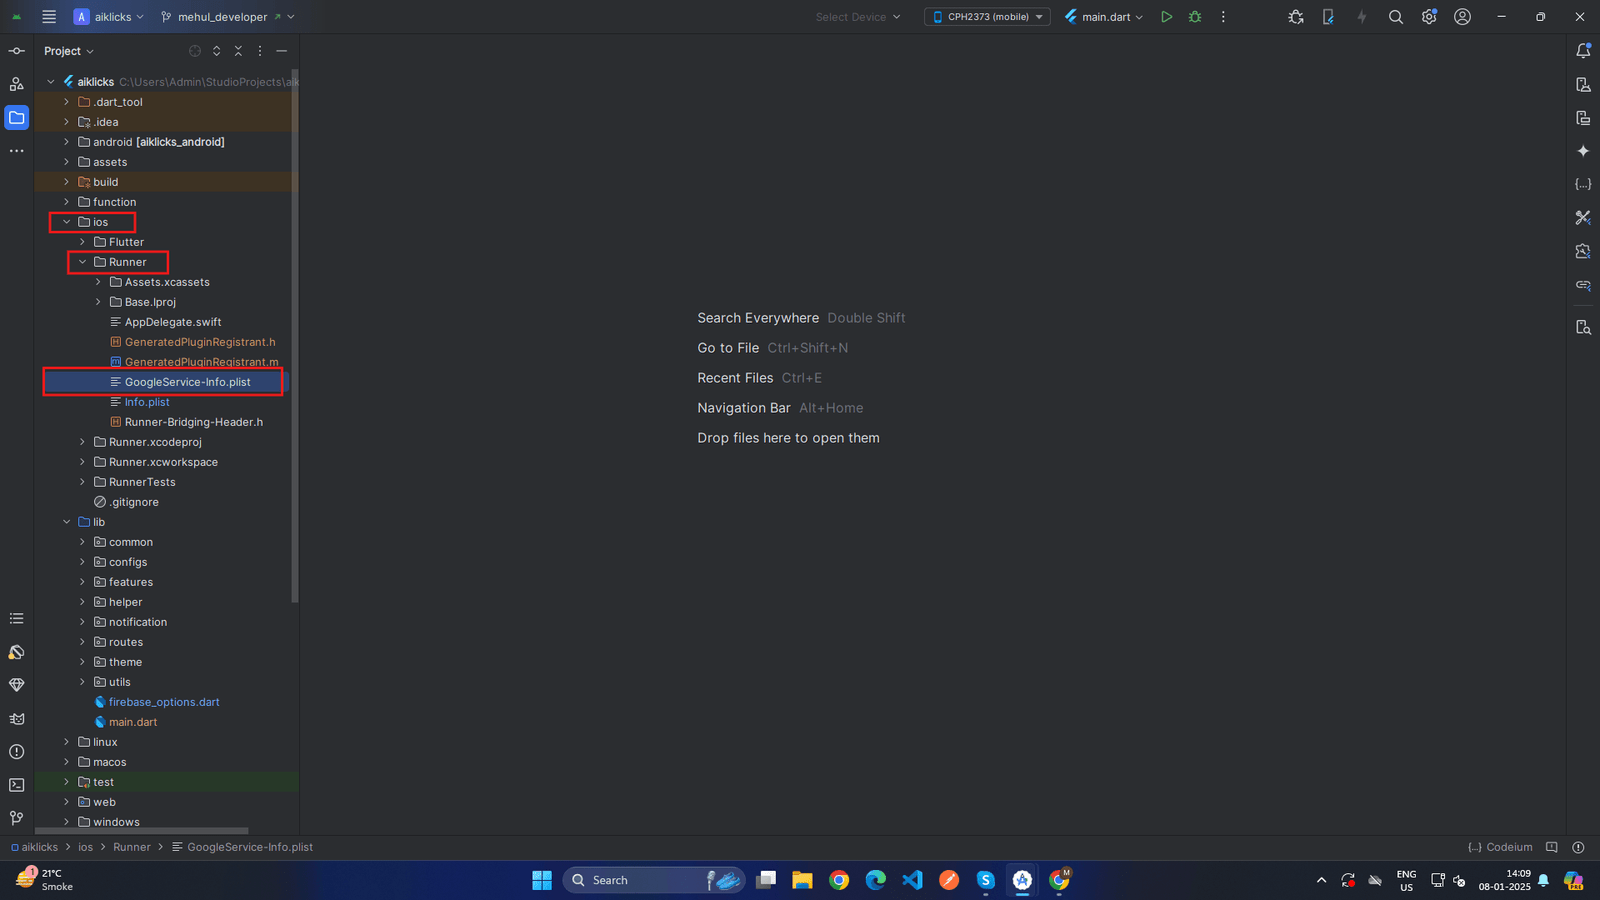
now
copy
the content of that file and replace in
ios > Runner > GoogleServie-info.plist
-
 x
x
-
- now press next next on firebase console and that's it your project is created on ios.
-
Add SHA Keys (For Android)
-
Open a
Terminal/Command
Prompt:
- Open your terminal or command prompt.
- If you're using Android Studio, you can open the terminal directly in the IDE.
-
Navigate to the Android Directory:
- Go to your Flutter project directory in the terminal.
- Navigate to the android folder: cd android
-
Run the Gradle Command:
- Execute the signingReport task: ./gradlew signingReport
-
View the Output:
- The command will generate a detailed report showing SHA-1 and SHA-256 keys for all build variants (debug, release, etc.).
-
X
-
Open a
Terminal/Command
Prompt:
-
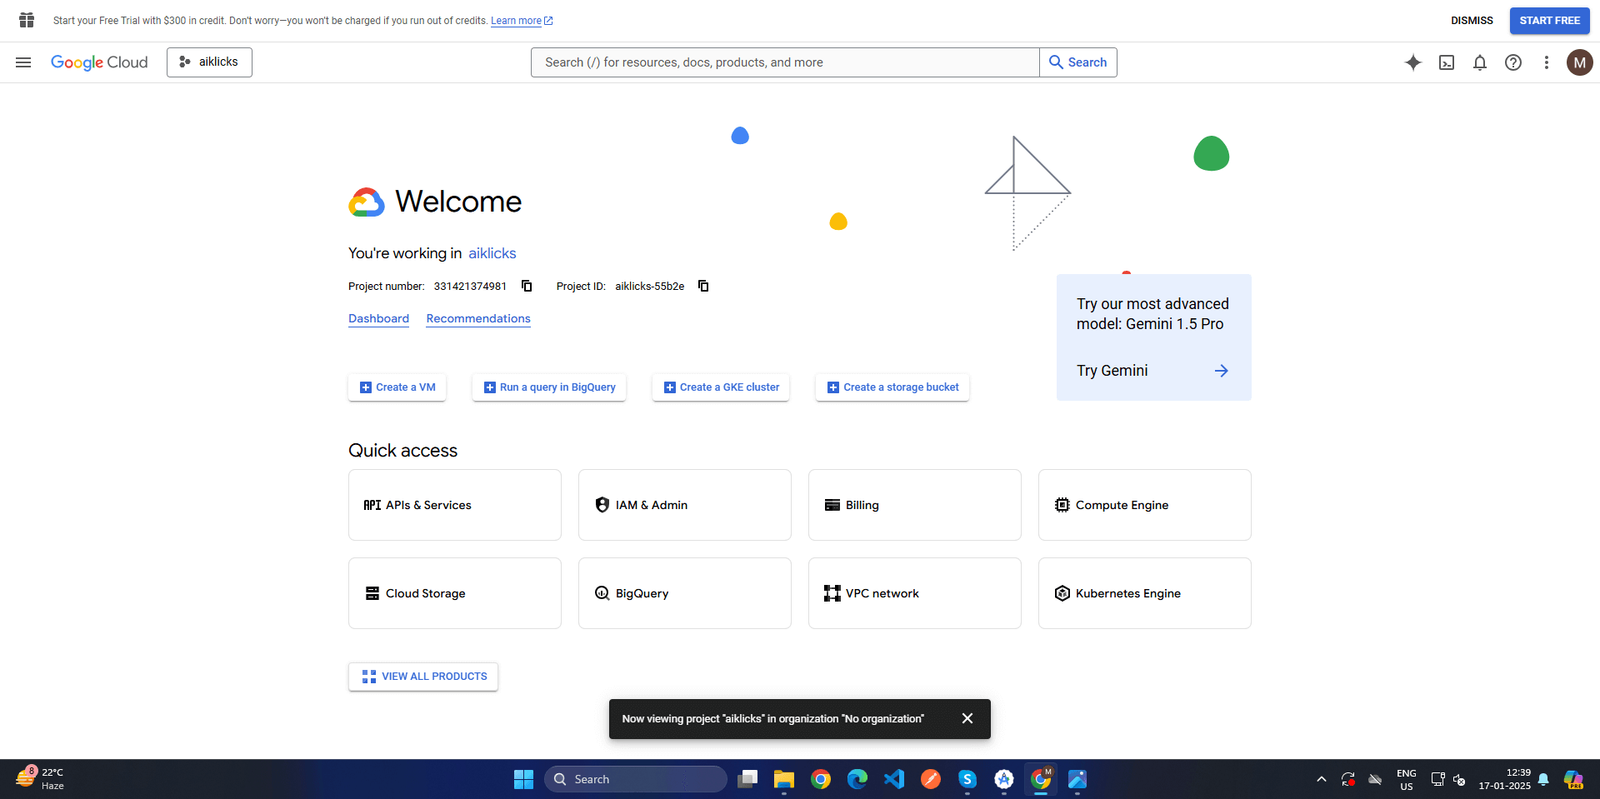
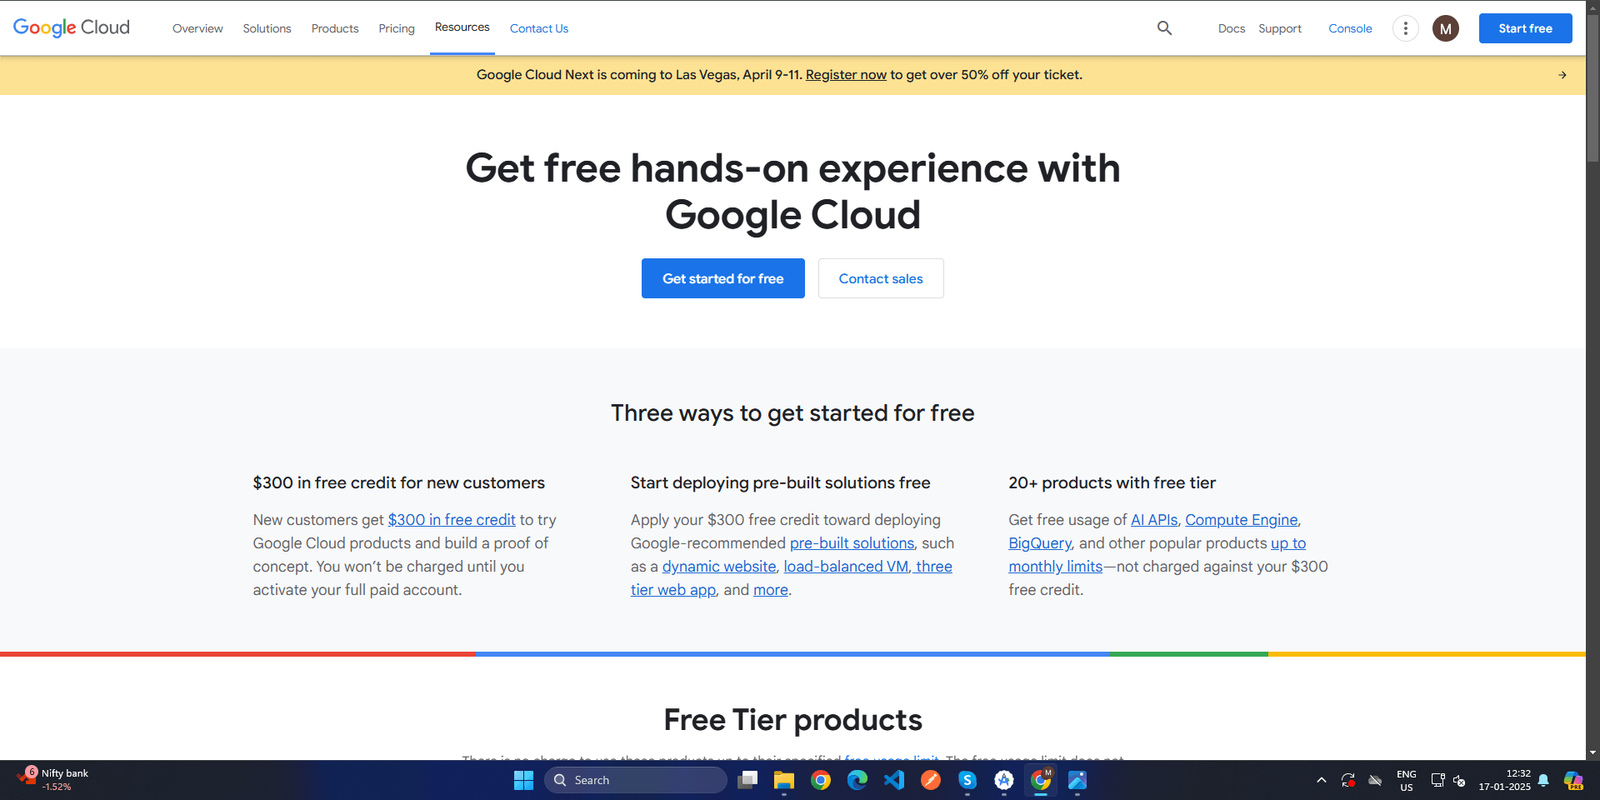
Access
Google Cloud
Console
- Open your browser and navigate to Google Cloud Console.
-
Log in using the account associated with your Firebase project
-
 x
x
-
-
Navigate to API & Services
-
On the left-hand menu, click on
API
&
Services
-
 x
x
-
- From the dropdown, select Credentials.
-
On the left-hand menu, click on
API
&
Services
-
Select the Firebase Project
- At the top, ensure you’ve selected the correct Firebase project from the project selector.
-
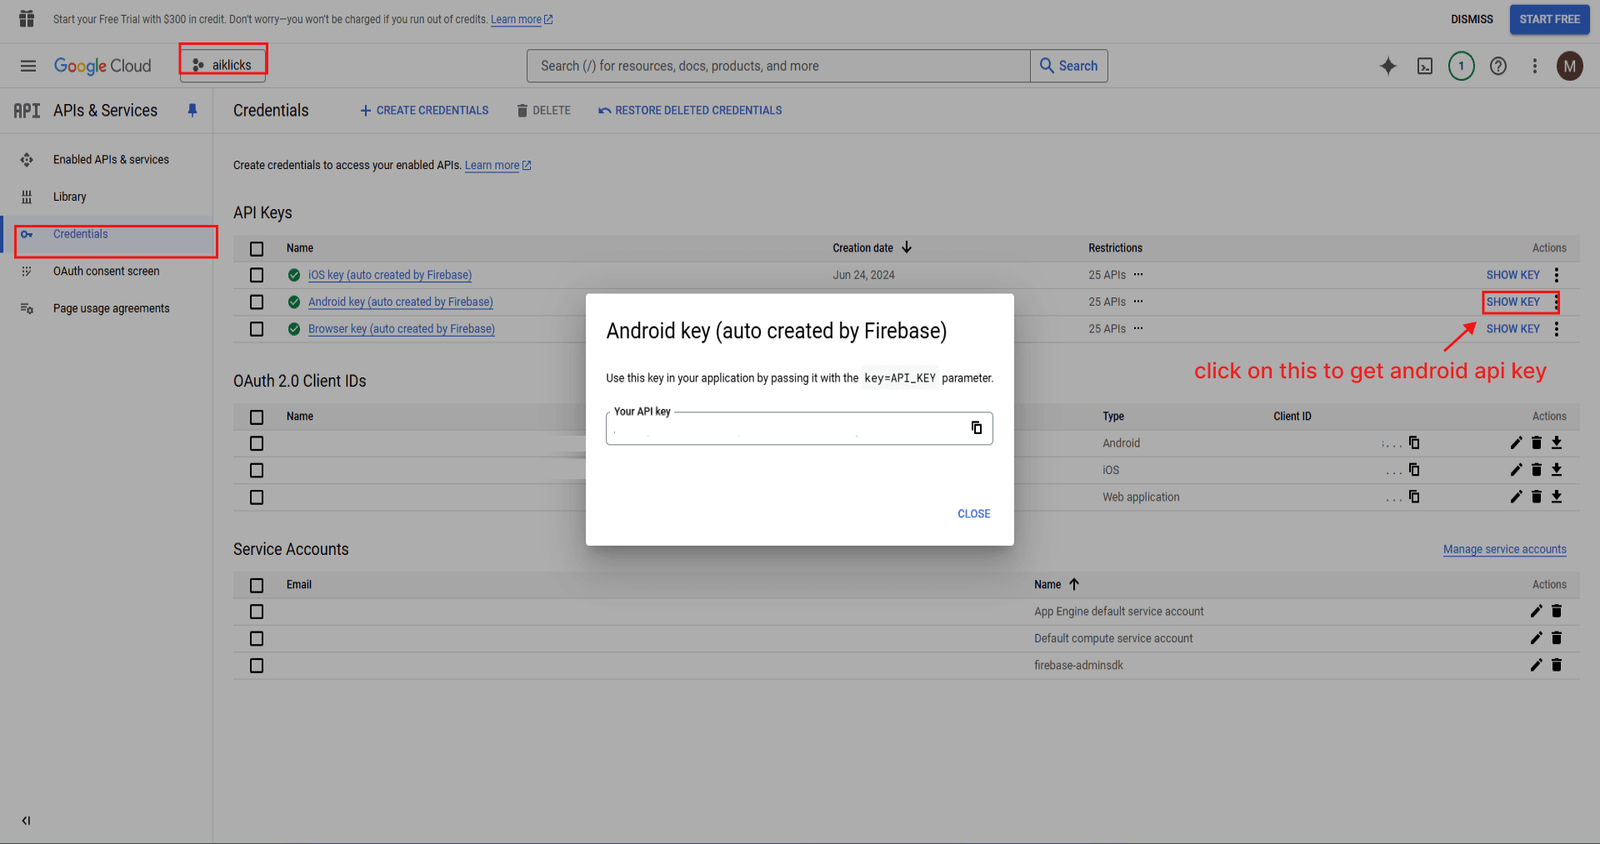
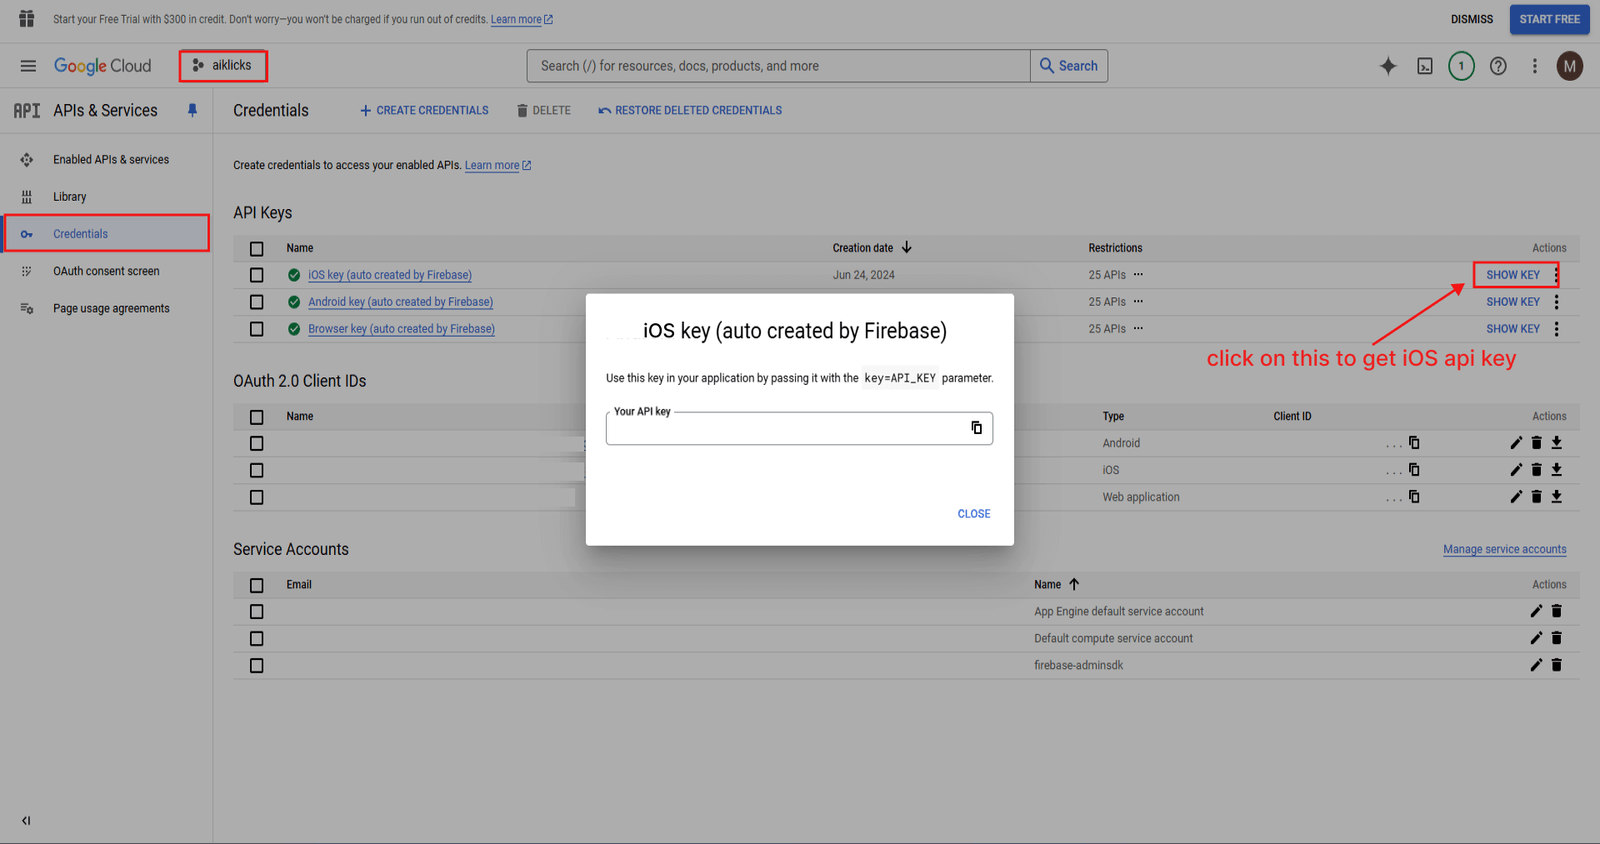
Show and Copy the
API Key
-
For
android
- Click on the Show Key button next to your Android API key.
- The API key will be revealed. Copy the key to your clipboard.
-
 x
x
-
For
ios
- Click on the Show Key button next to your iOS API key.
- The API key will be revealed. Copy the key to your clipboard.
-
 x
x
-
For
android
-
Add a Sign-In Method in Firebase Authentication
-
Open Firebase Console
- Go to the Firebase Console.
- Select your project.
-
Navigate to Authentication
- In the left-hand menu, click on Build.
-
Select Authentication from the dropdown.
-
 x
x
-
-
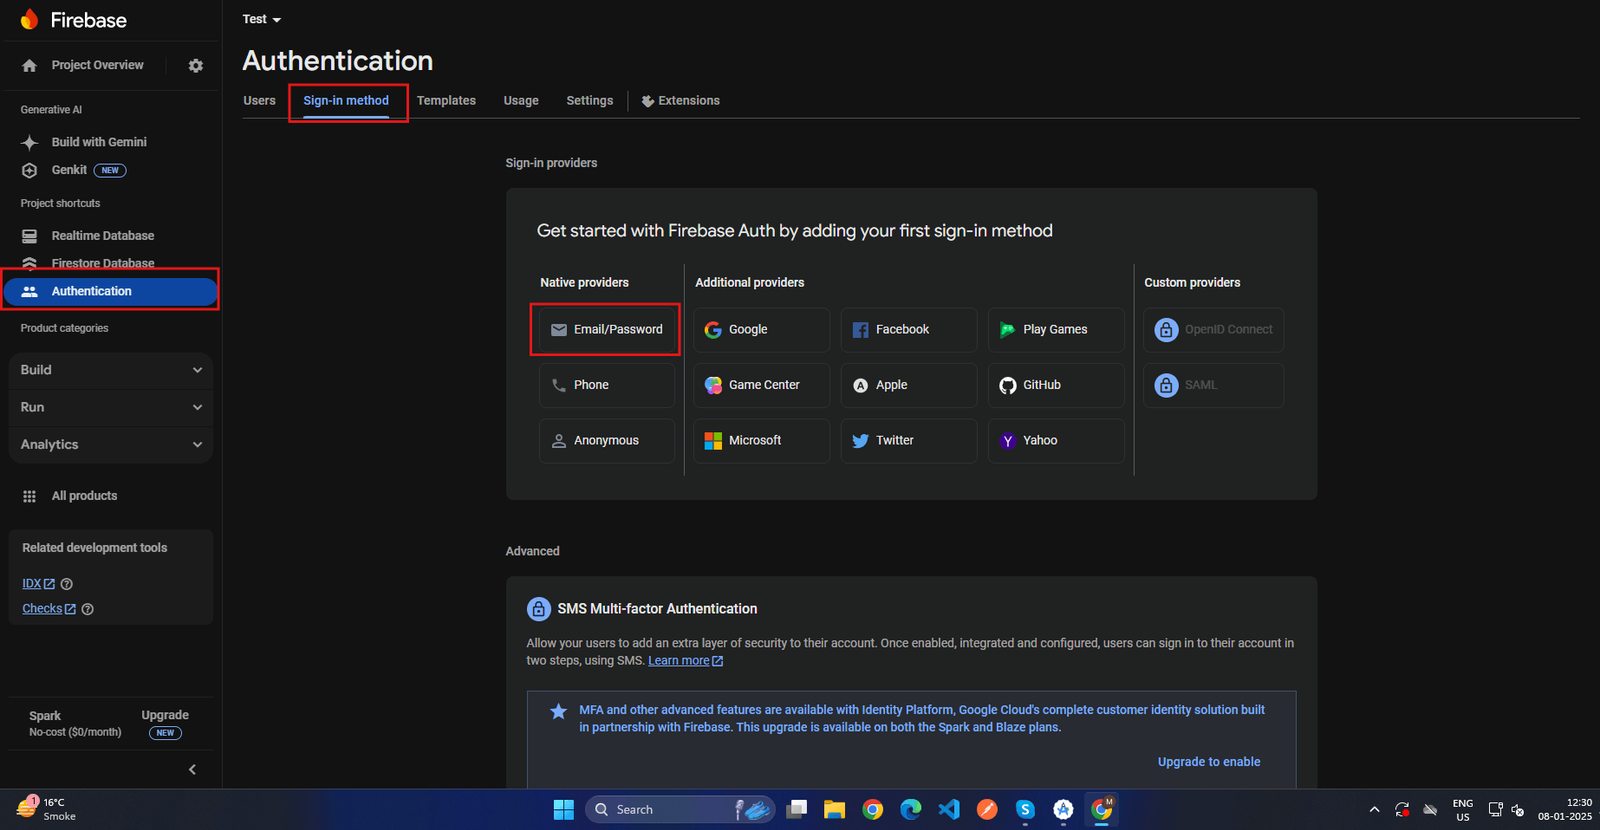
Set Up Sign-In Methods
- Go to the Sign-in method tab.
- You'll see a list of authentication providers available, such as Email/Password, Google, Facebook, etc.
-
Enable a Sign-In Method
- Click on the Email/Password authentication provider.
-
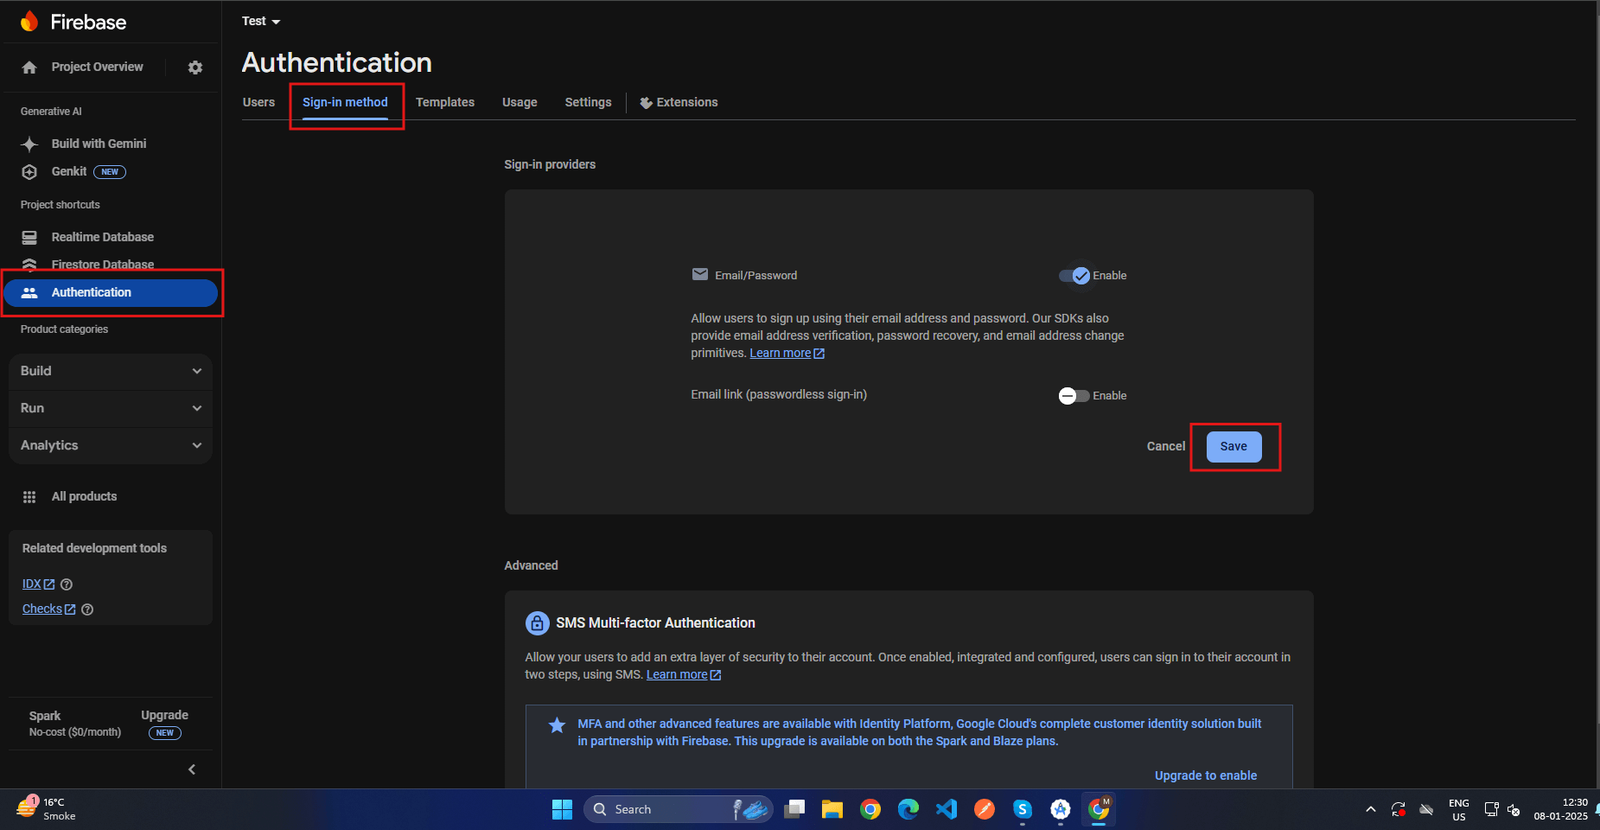
Email/Password:
Toggle the switch to enable and click on save.
-
 x
x
-
-
Open Firebase Console
-
Set Up Storage in Firebase
Follow these steps to set up and configure Firebase Storage:
-
Open Firebase Console
- Go to the Firebase Console.
- Select your project.
-
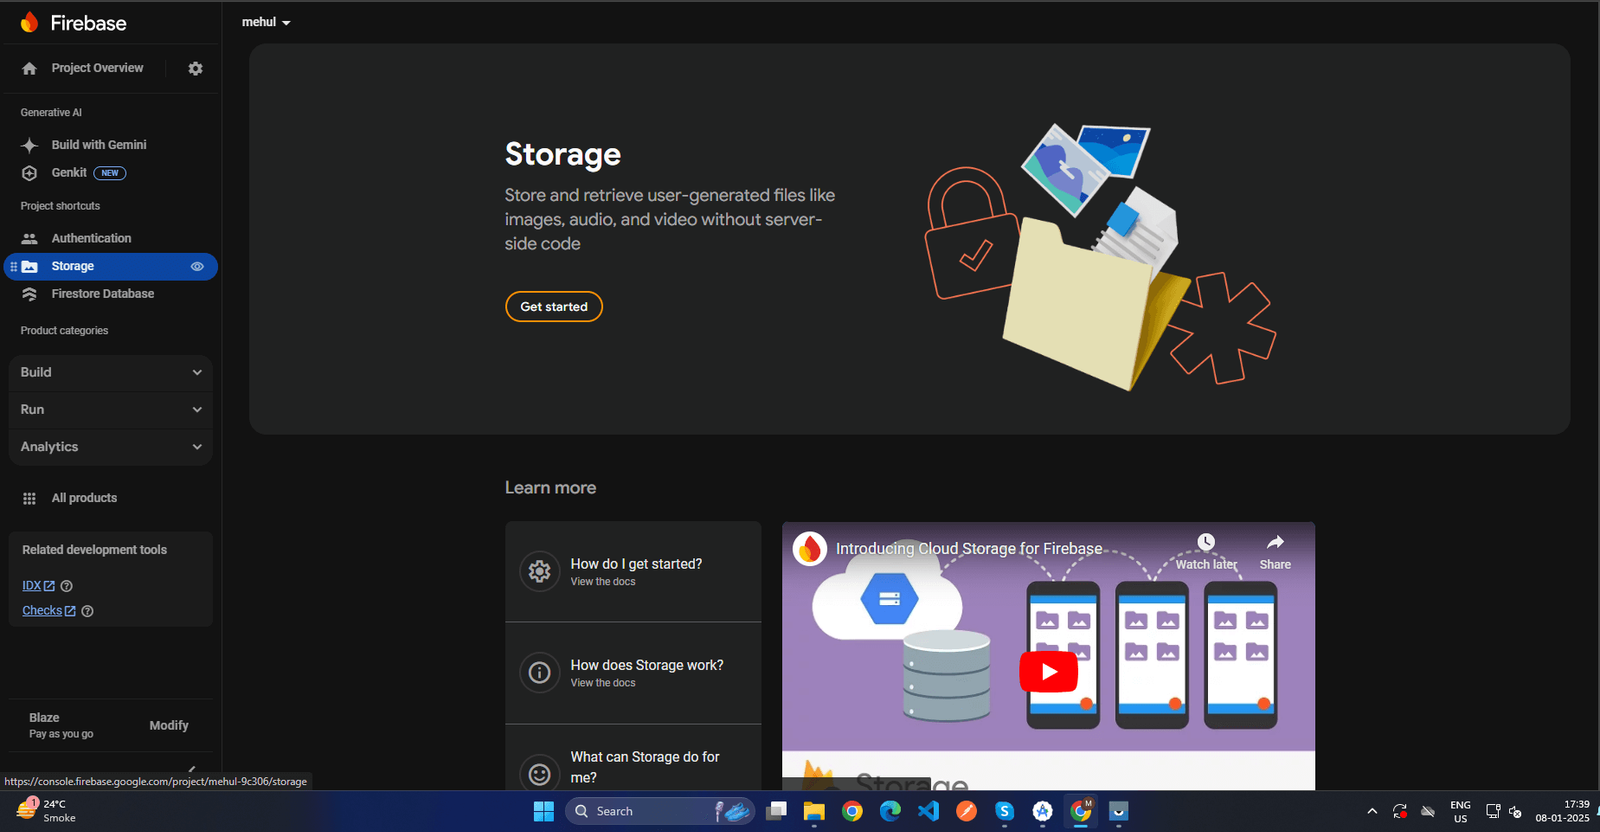
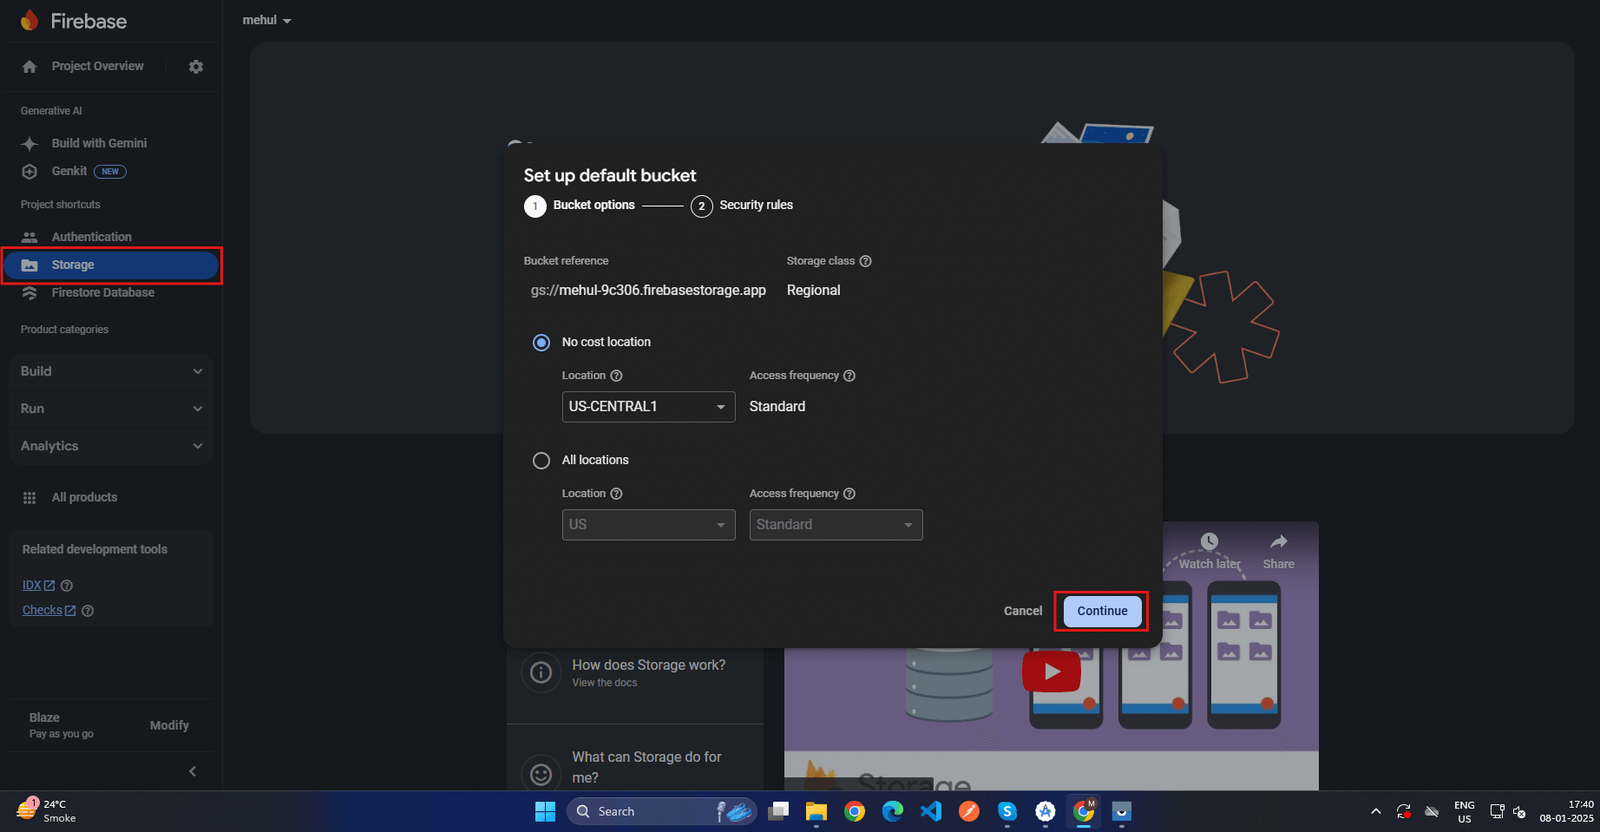
Navigate to Storage
- In the left-hand menu, click on Build.
- Select Storage from the dropdown.
-
Set Up Cloud Storage
If this is your first time setting up Firebase Storage:
-
Click Get Started.
-
 x
x
-
-
Choose your default storage location
(preferably close to your app's primary users).
-
 x
x
-
- Click Done to initialize storage.
-
Click Get Started.
-
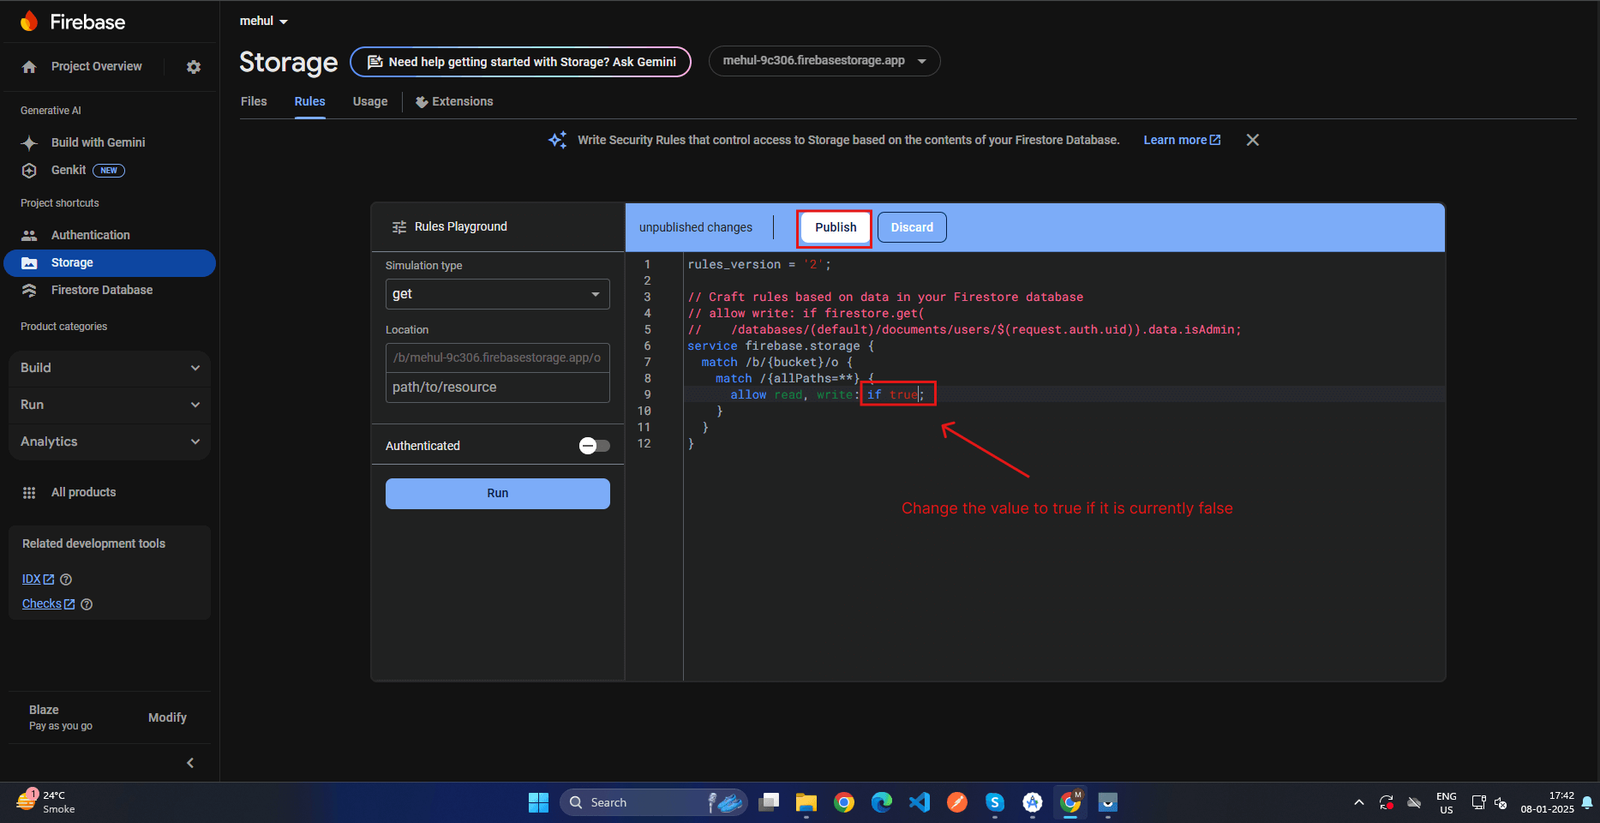
Configure Storage Rules
- By default, Firebase Storage rules are restrictive.
-
Go to the Rules tab to configure read and write access.
-
allow read,
write: if true;
-
 x
x
-
-
allow read,
write: if true;
- Click Publish to save the rules.
-
Open Firebase Console
-
Set Up Cloud Functions in Firebase
Follow these steps to configure and use cloud functions in your Firebase project:
-
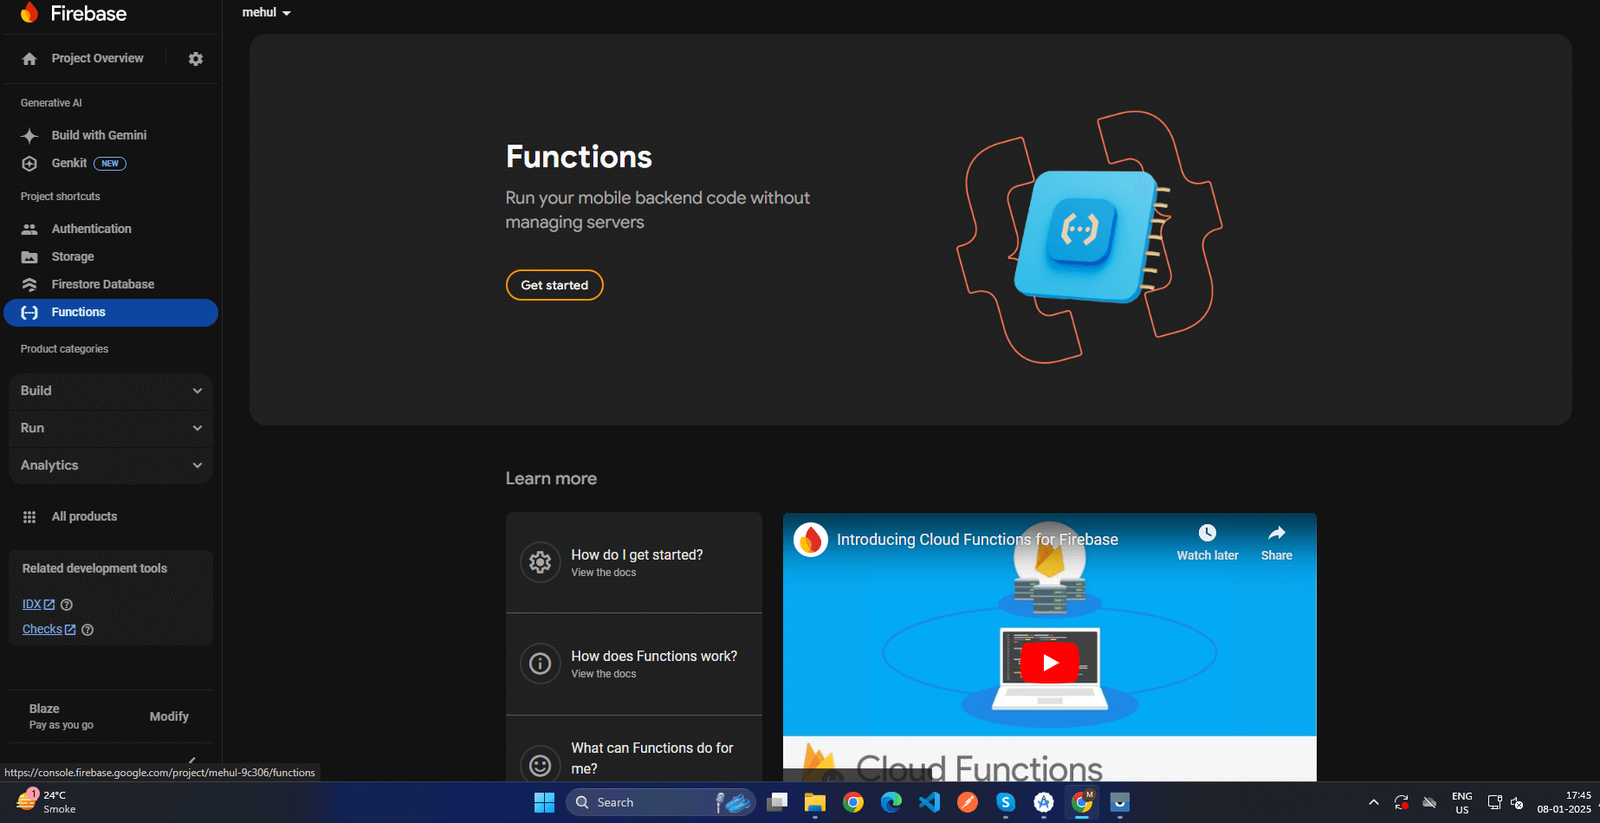
Navigate to Functions
- In the left-hand menu, click on Build.
- Select Functions.
-
Open Firebase Console
- Go to the Firebase Console.
- Select your project.
-
Set Up Billing
(If Required)
Cloud Functions often require a billing account for use.
- If prompted, click Upgrade to link a billing account.
- Select or create a billing account and follow the steps.
-
Set Up Cloud Function
- After enabling, you’ll see the Cloud Functions Dashboard.
-
If this is your first time setting up Firestore:
-
Click Get Started.
-
 x
x
-
-
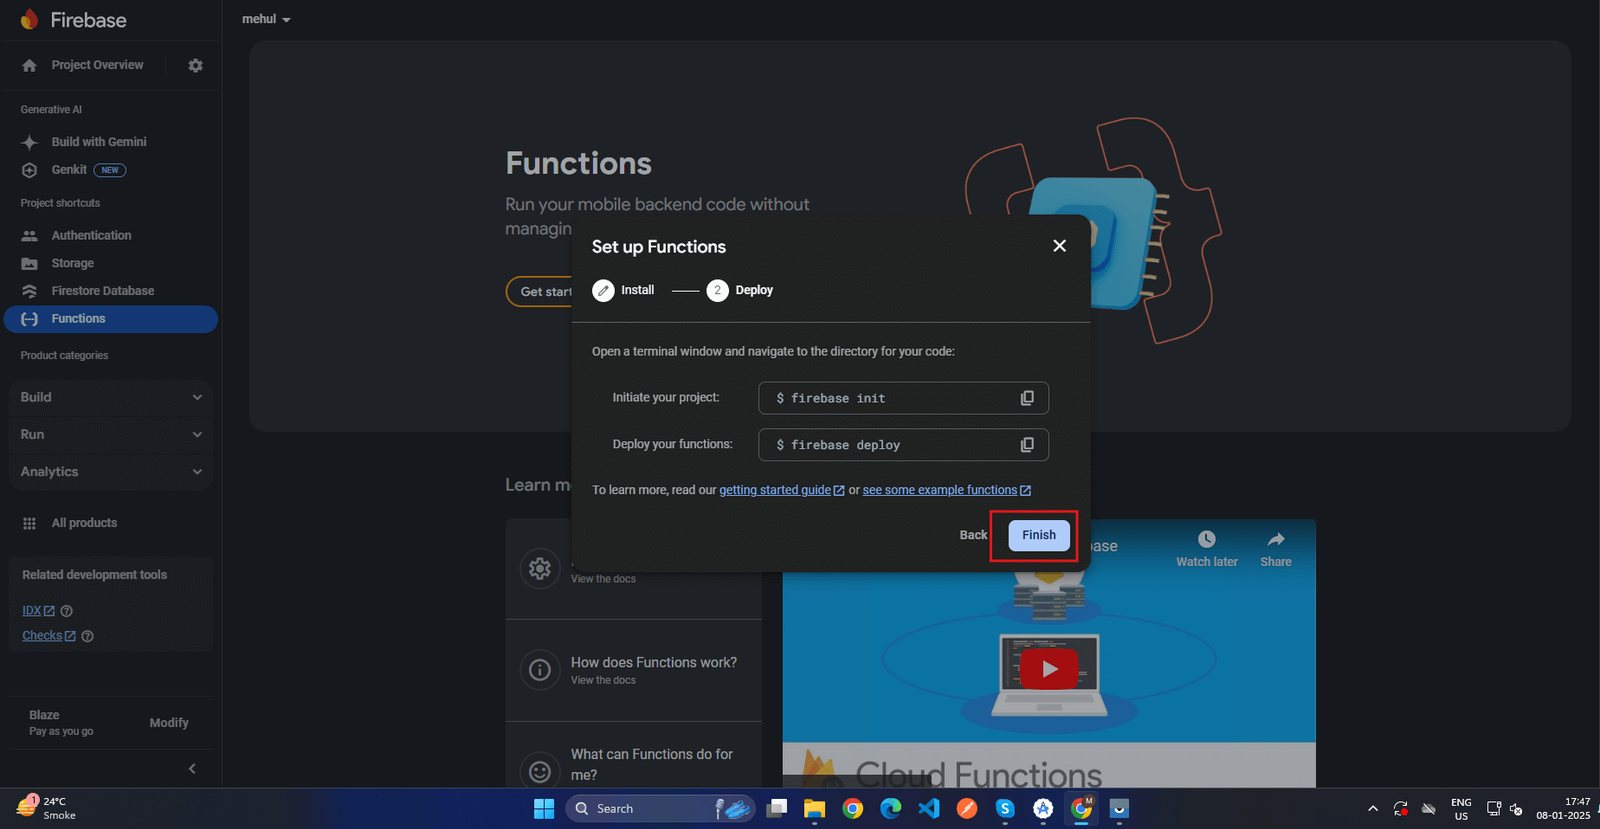
After clicking, you'll see the set up function popup then click on continue button.
-
 x
x
-
-
After that click on Finish button.
-
 x
x
-
-
Click Get Started.
-
Navigate to Functions
-
Set Up Firestore Database in Firebase
Follow these steps to configure and use Firestore in your Firebase project:
-
Open Firebase Console
- Go to the Firebase Console.
- Select your project.
-
Navigate to Firestore
- In the left-hand menu, click on Build.
- Select Firestore Database.
-
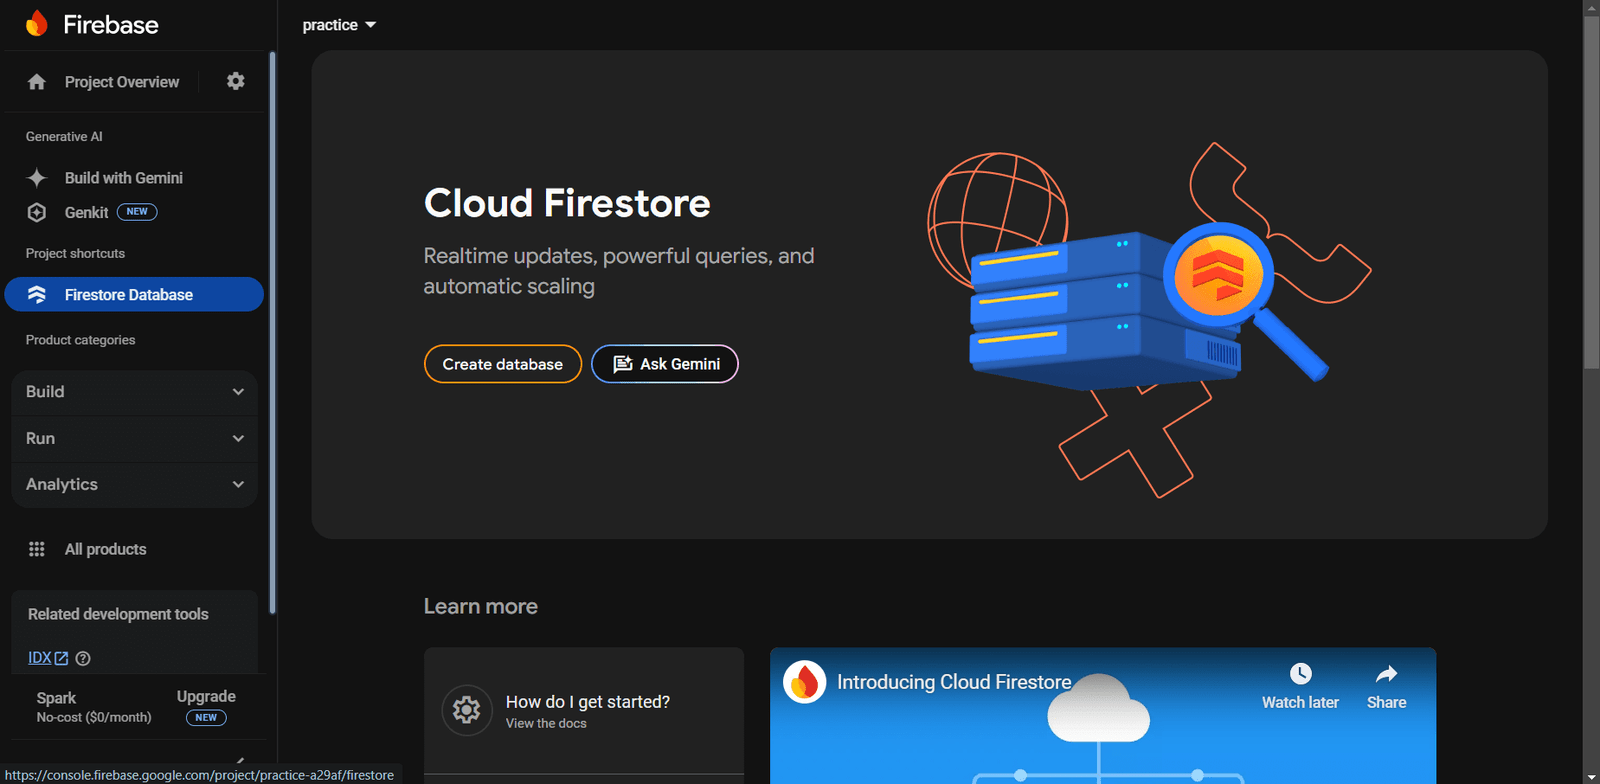
Set Up Firestore
If this is your first time setting up Firestore:
-
Click Create Database.
-
 x
x
-
-
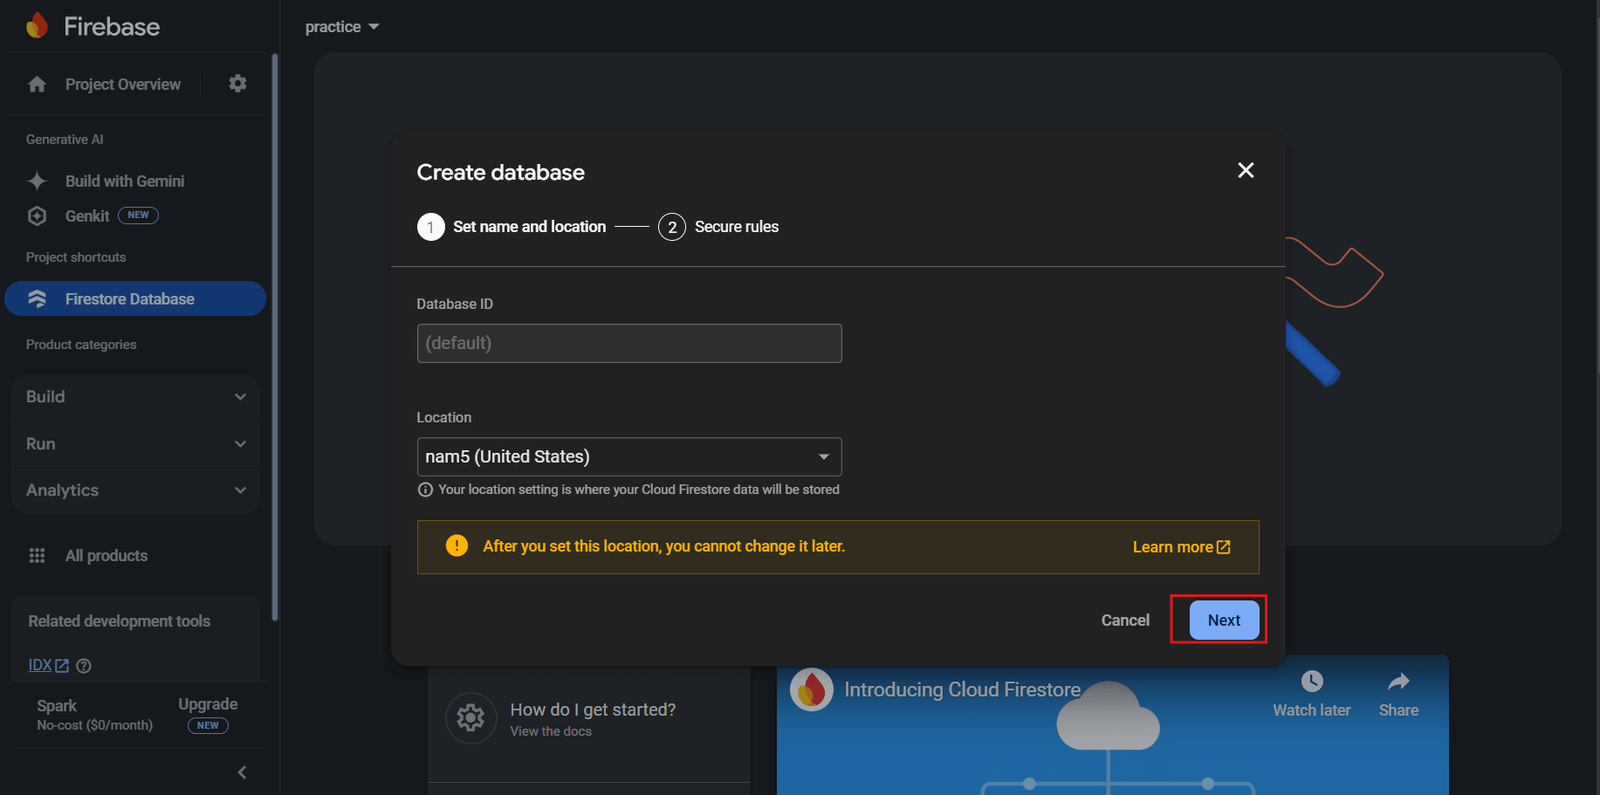
Select your Firestore location
(choose a region close to your app's primary users).
-
 x
x
-
-
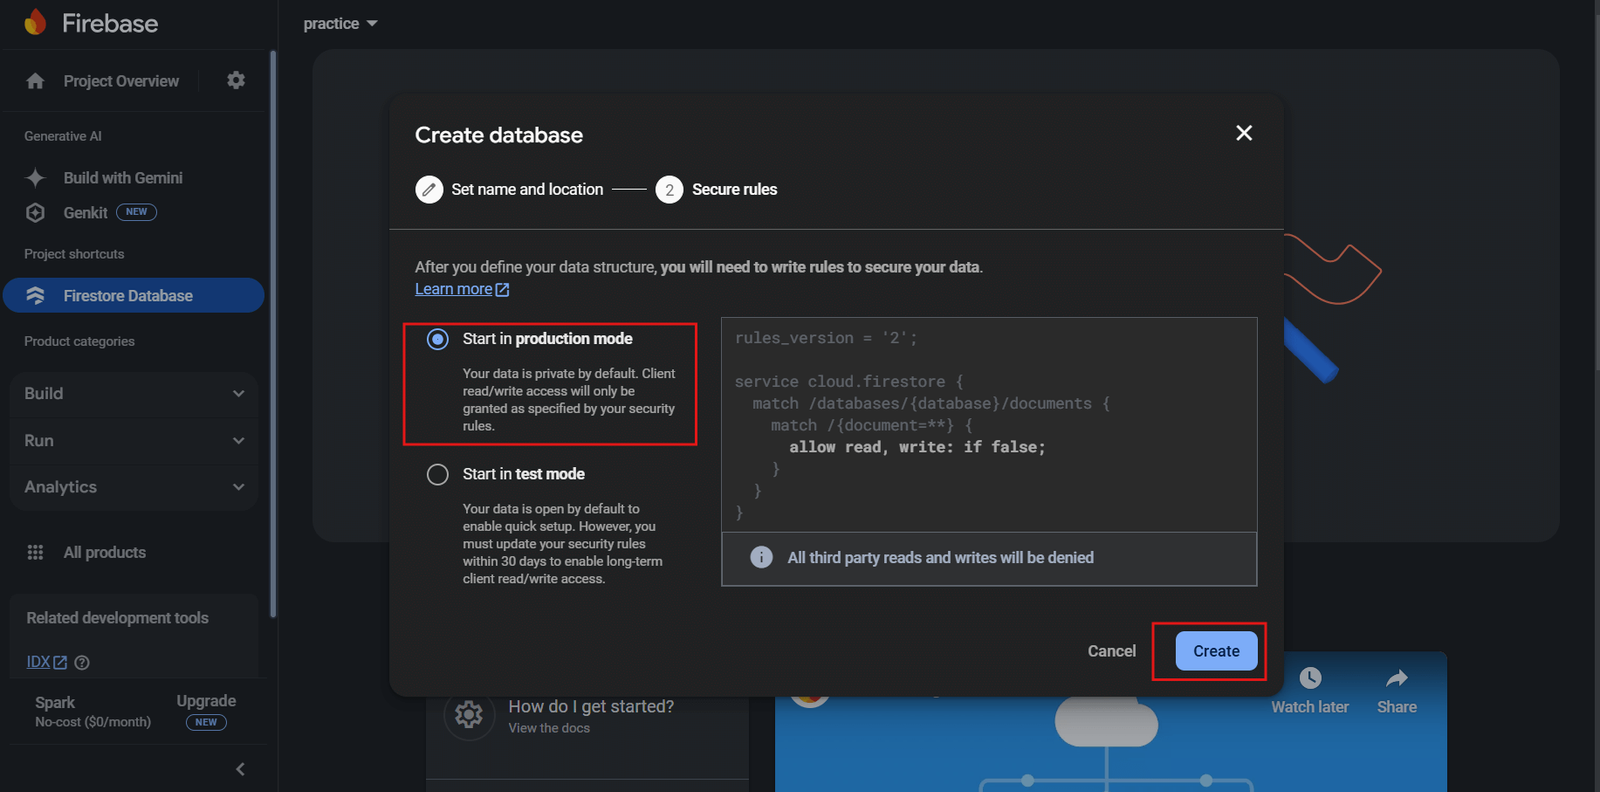
Choose a Start in production mode and click on create button.
-
 x
x
-
-
Click Create Database.
-
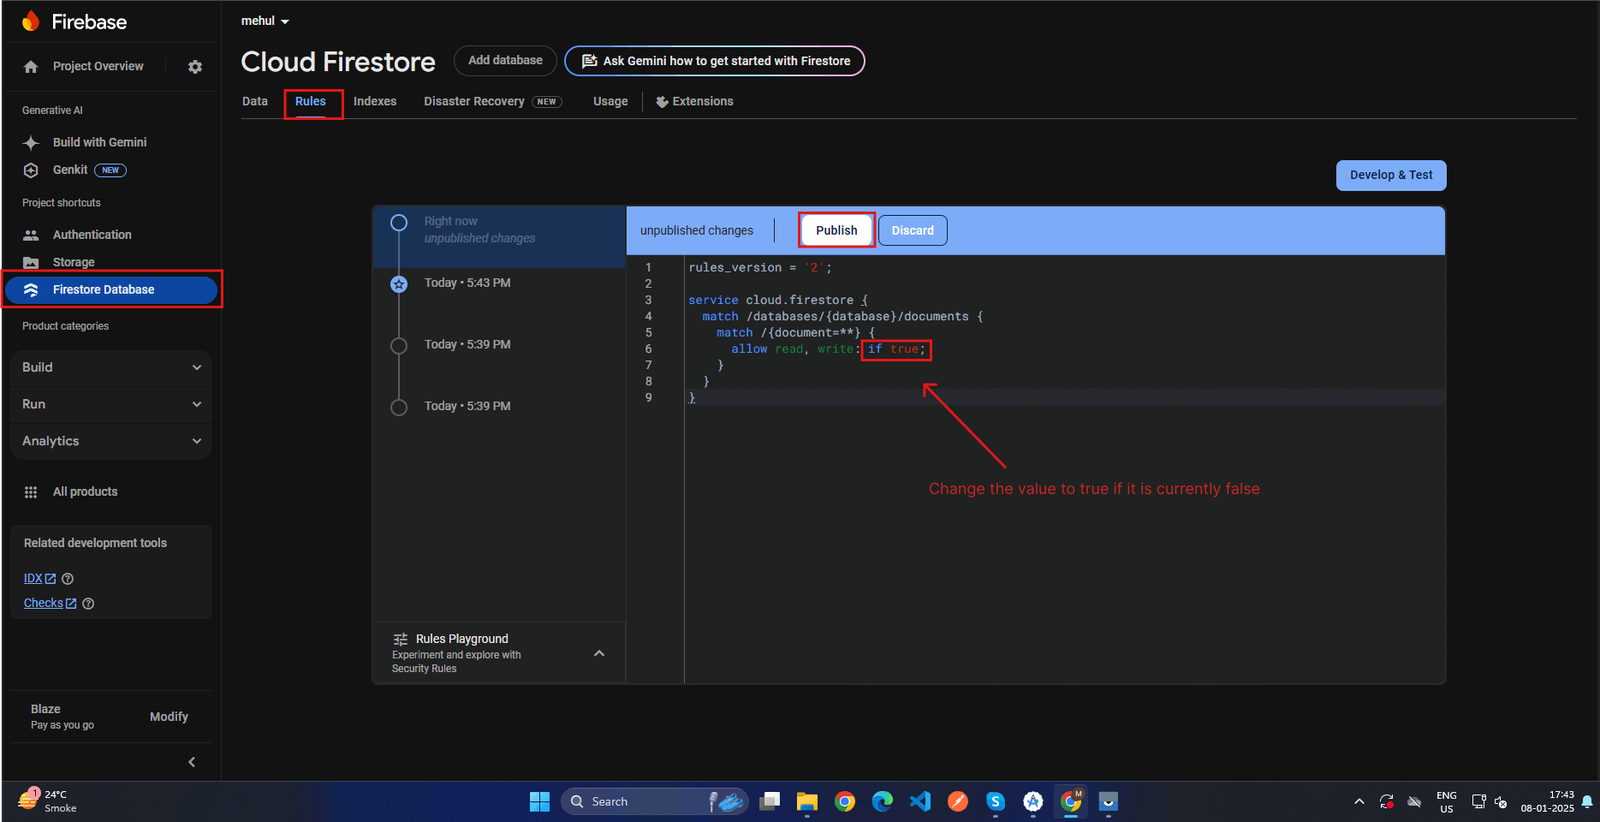
Configure Firestore Rules
- By default, Firestore Database rules are restrictive.
-
Go to the Rules tab to configure read and write access.
-
allow read,
write: if true;
-
 x
x
-
-
allow read,
write: if true;
- Click Publish to save changes.
-
Open Firebase Console
-
Update
firebase_options.dart
-
Update apikey for both android and ios :
-
For Android, Replace copied andriod api key from google cloud console with existing apikey.
-
 x
x
-
-
For iOS, Replace copied iOS api key from google cloud console with existing apikey.
-
 x
x
-
-
For Android, Replace copied andriod api key from google cloud console with existing apikey.
-
After that to update other values
- Go to the Firebase Console and log in using the Google account associated with your Firebase project.
- Select your Firebase project from the dashboard.
-
Navigate to Project Settings:
- Click the Settings (gear icon) in the left-hand menu.
- Select Project Settings from the dropdown.
-
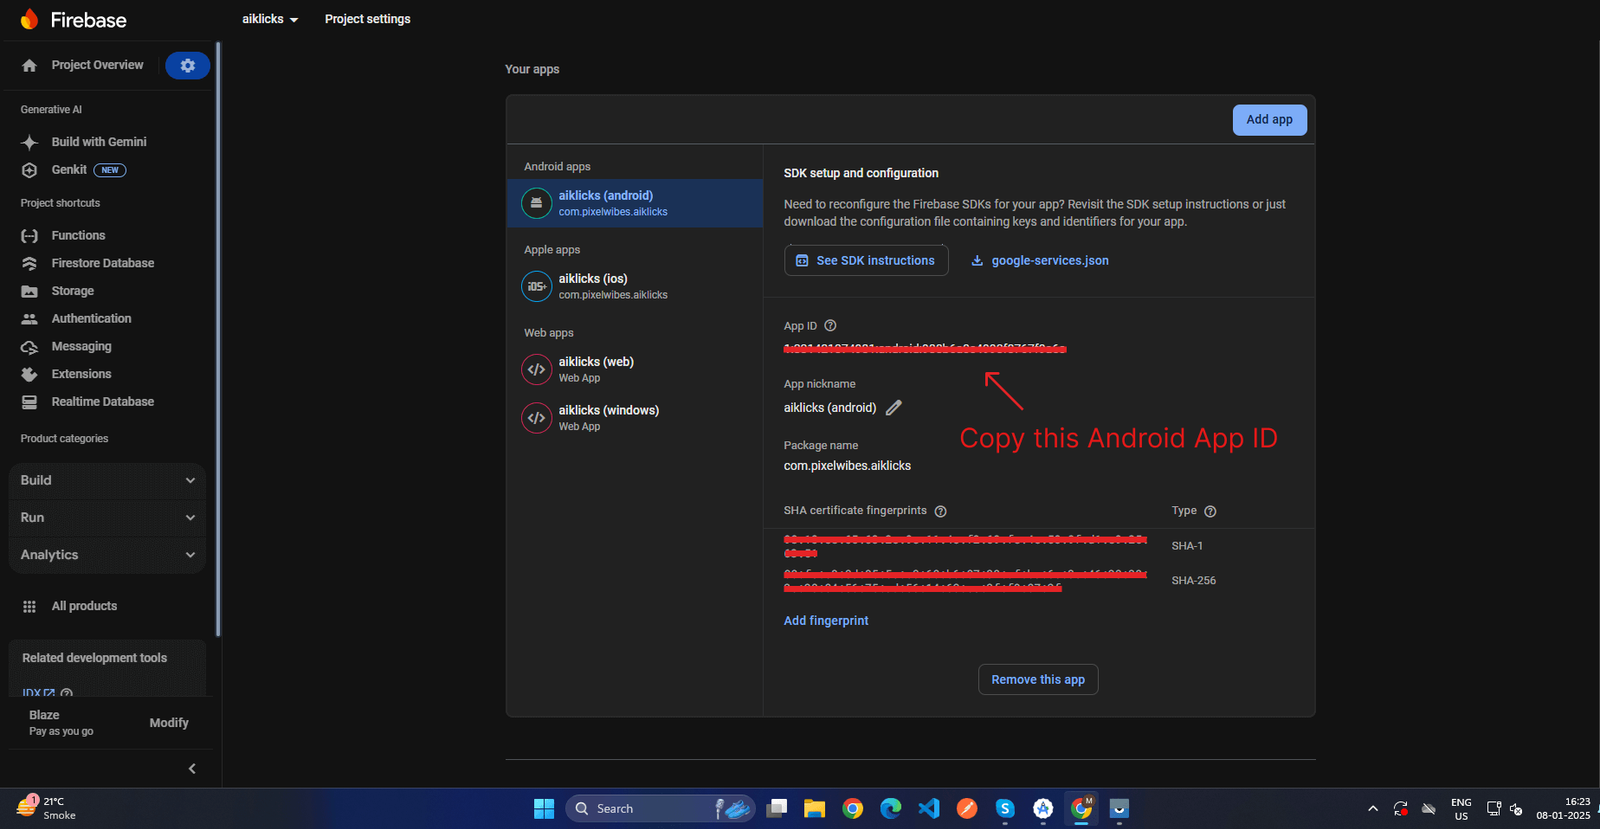
Update appId for both android and ios :
Under the General tab,
-
For Android
- Under the Your Apps section, locate the Android App.
- Click on your Android App to view its details.
-
Locate the App ID field under the app configuration details.
-
 x
x
-
- Copy the App ID to your clipboard.
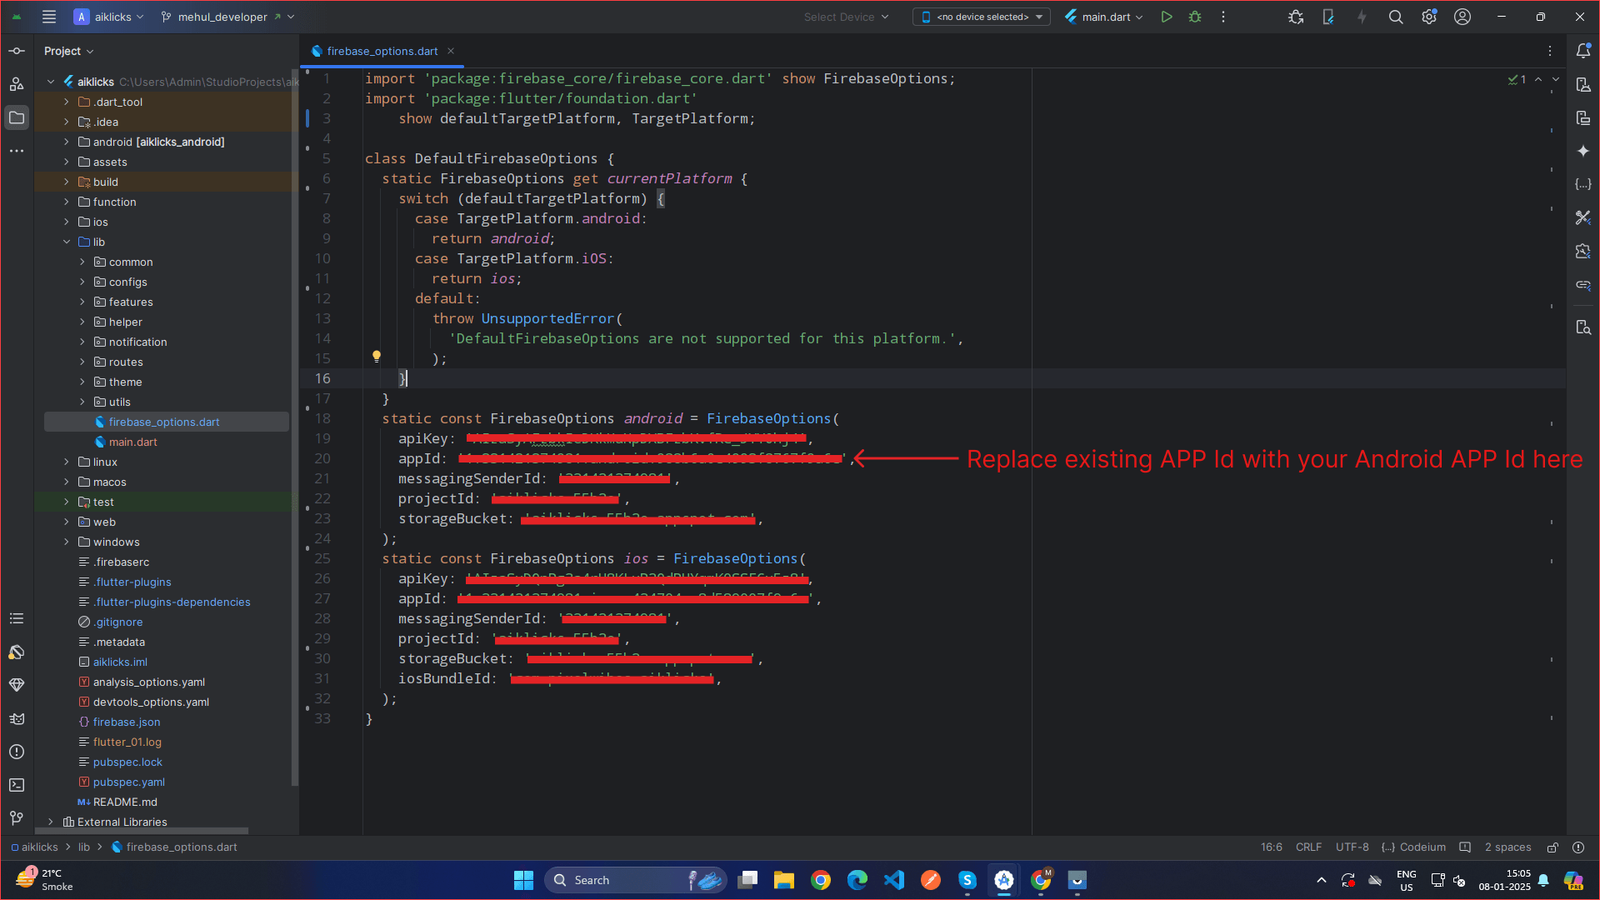
-
Replace copied App ID from firebase console with existing android appid.
-
 x
x
-
-
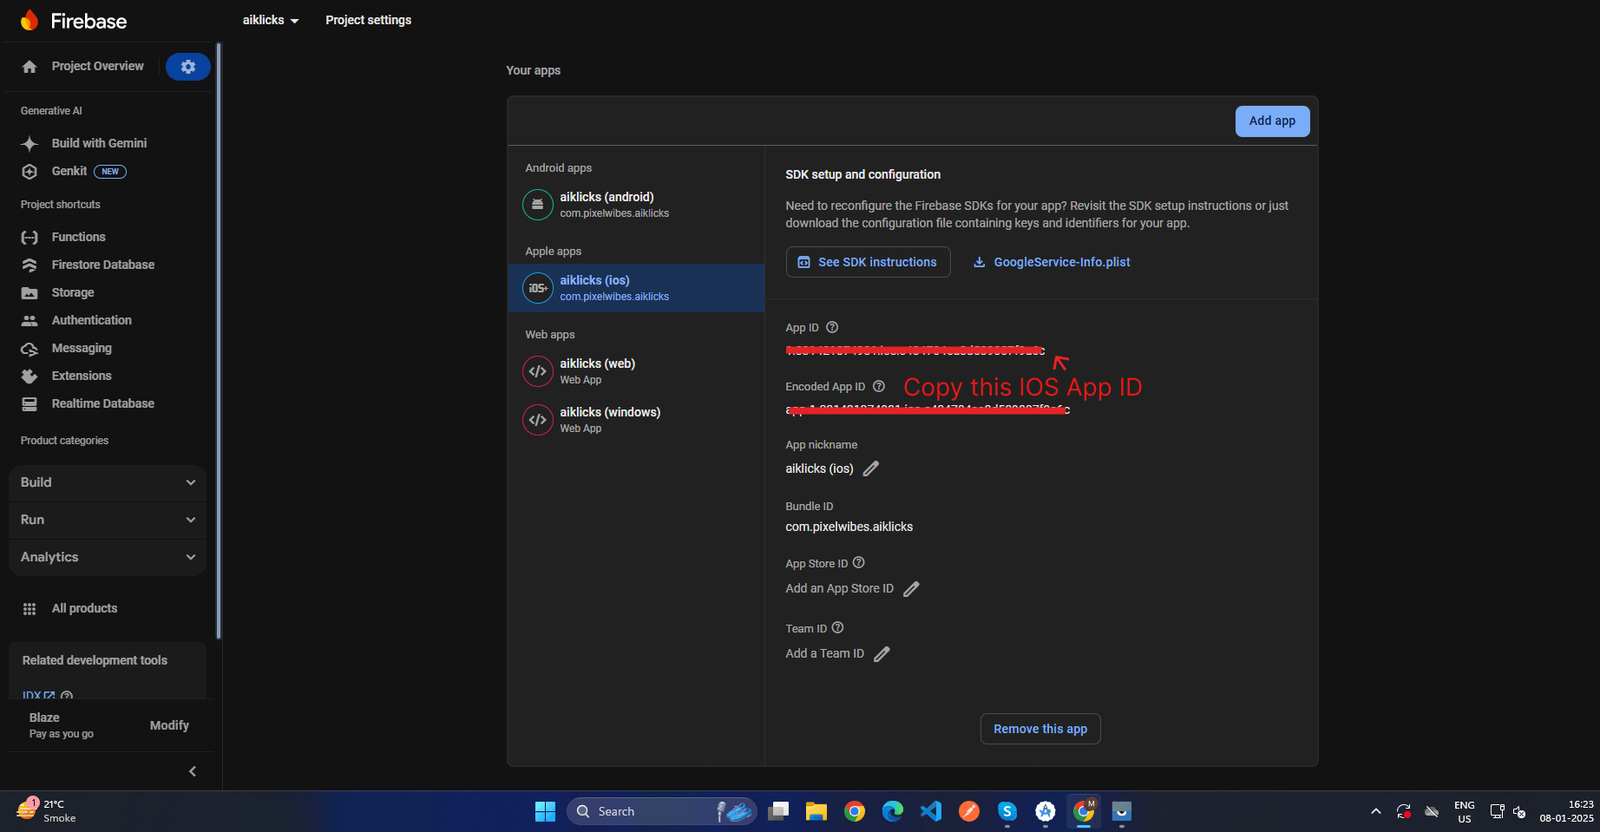
For iOS
- Under the Your Apps section, locate the iOS App..
- Click on your iOS App to view its details.
-
Locate the App ID field under the app configuration details.
-
 x
x
-
- Copy the App ID to your clipboard.
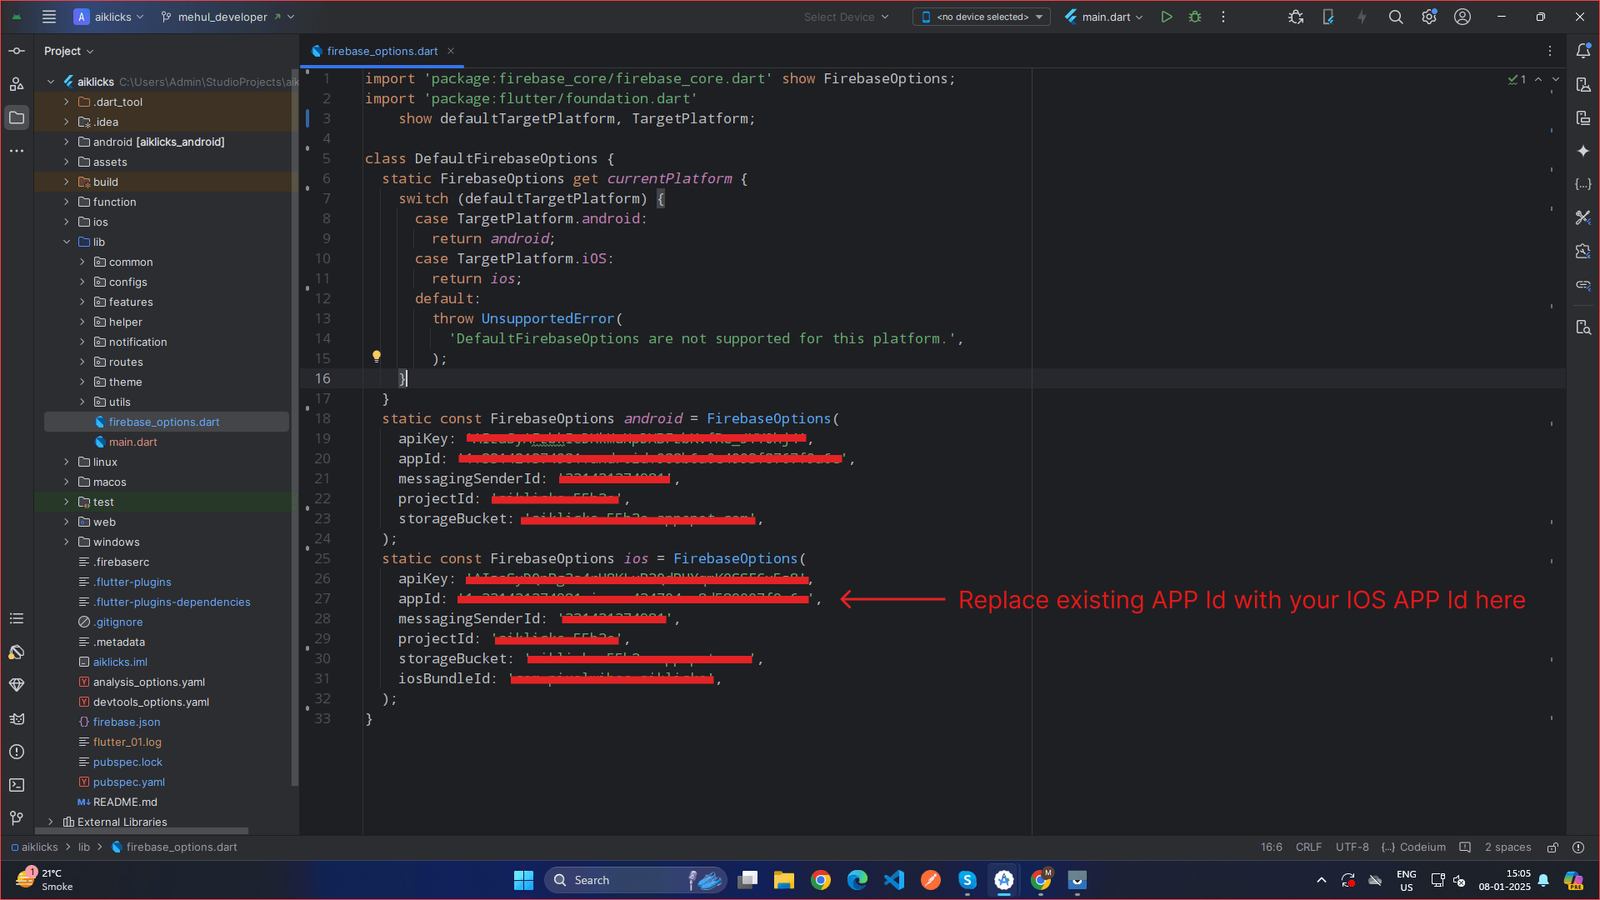
-
Replace copied App ID from firebase console with existing ios appid.
-
 x
x
-
-
For Android
-
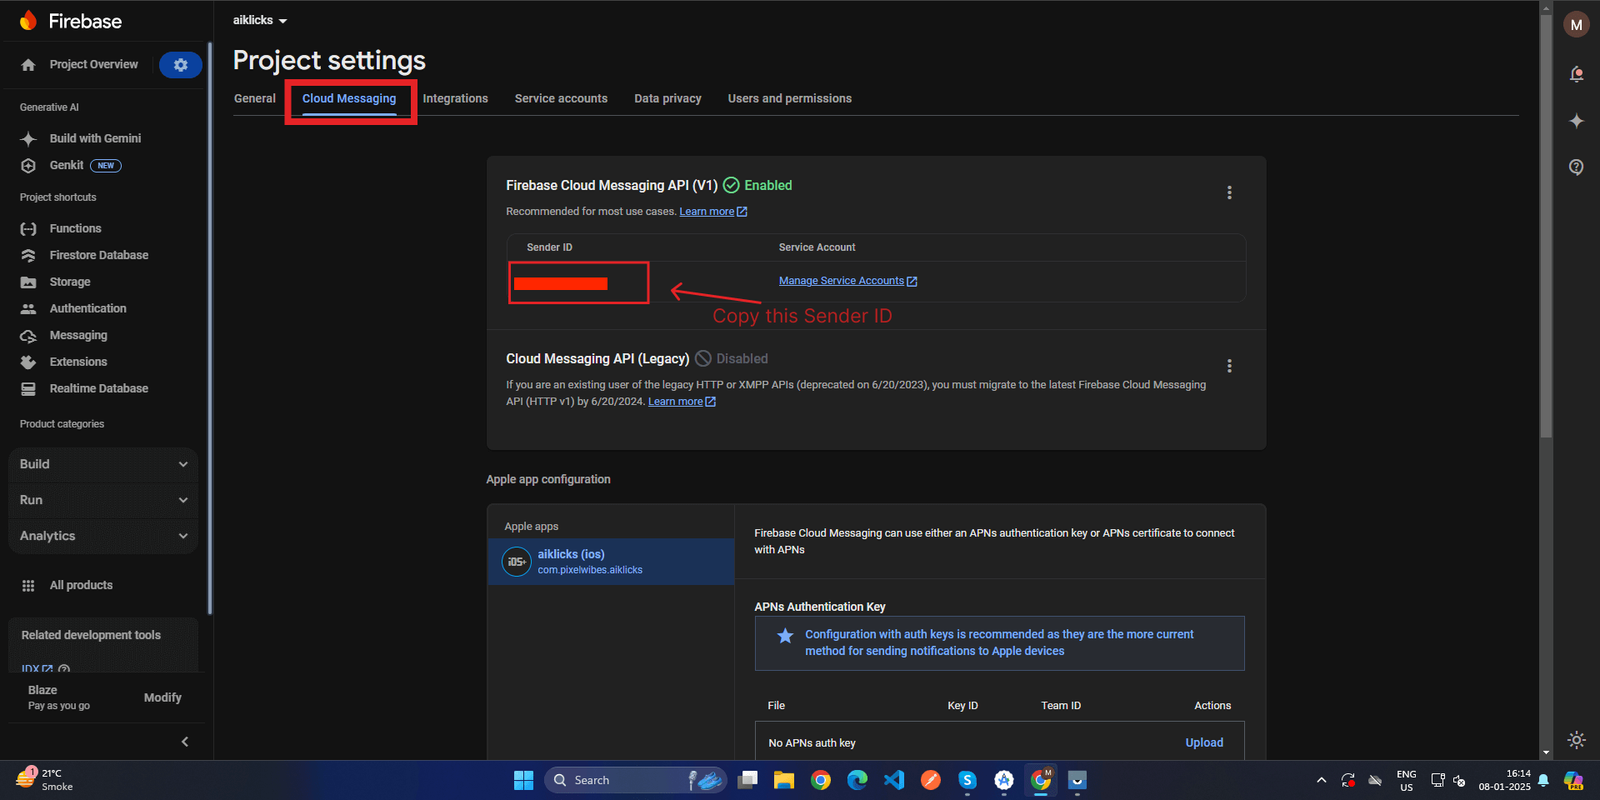
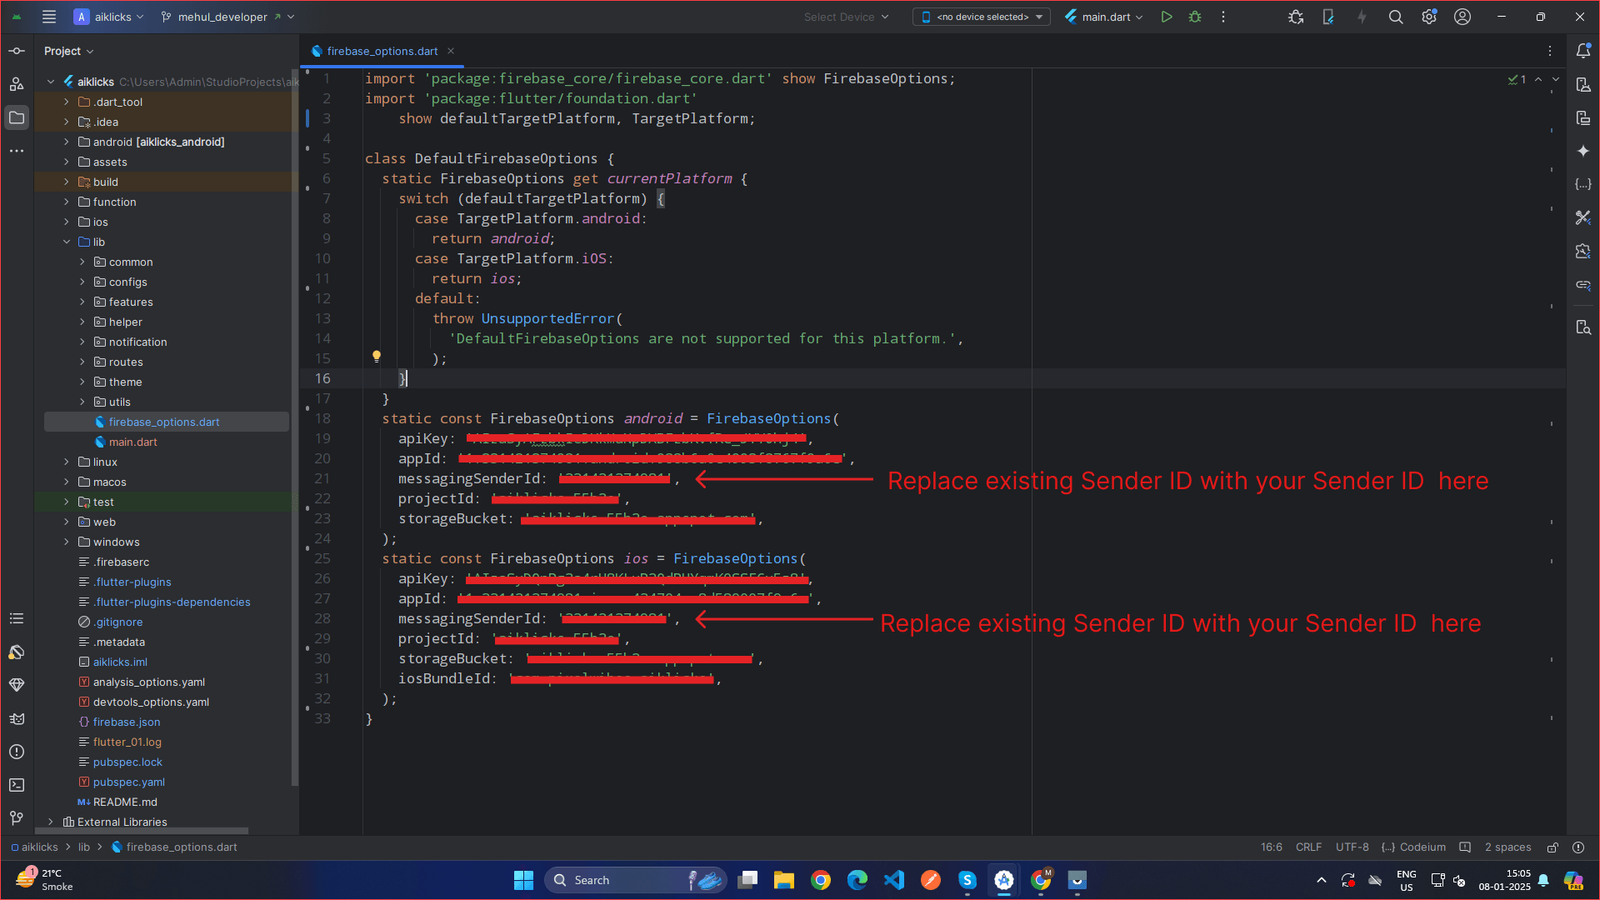
Update messagingSenderId for both android and ios :
- Under the Cloud Messaging tab, locate the Sender ID field.
-
Copy the Sender ID to your clipboard.
-
 x
x
-
-
Replace copied Sender ID from firebase console with existing messagingSenderId.
-
 x
x
-
-
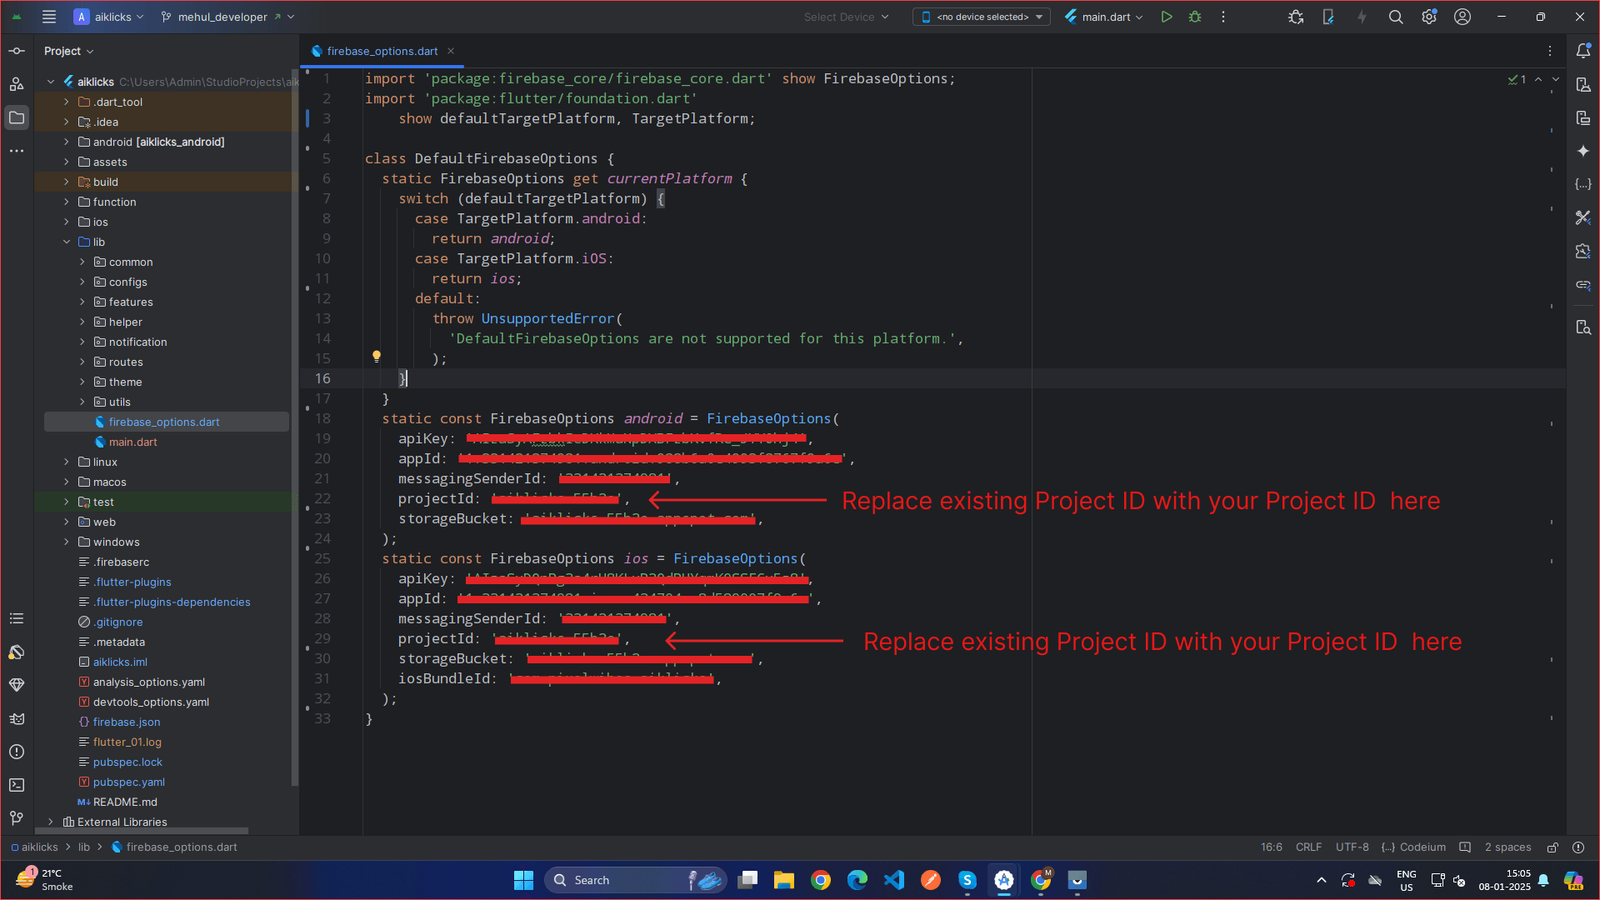
Update projectId for both android and ios :
-
Under the General tab, locate the Project ID field.
-
 x
x
-
- Copy the Project ID to your clipboard.
-
Replace copied Project ID from firebase console with existing projectId .
-
 x
x
-
-
Under the General tab, locate the Project ID field.
-
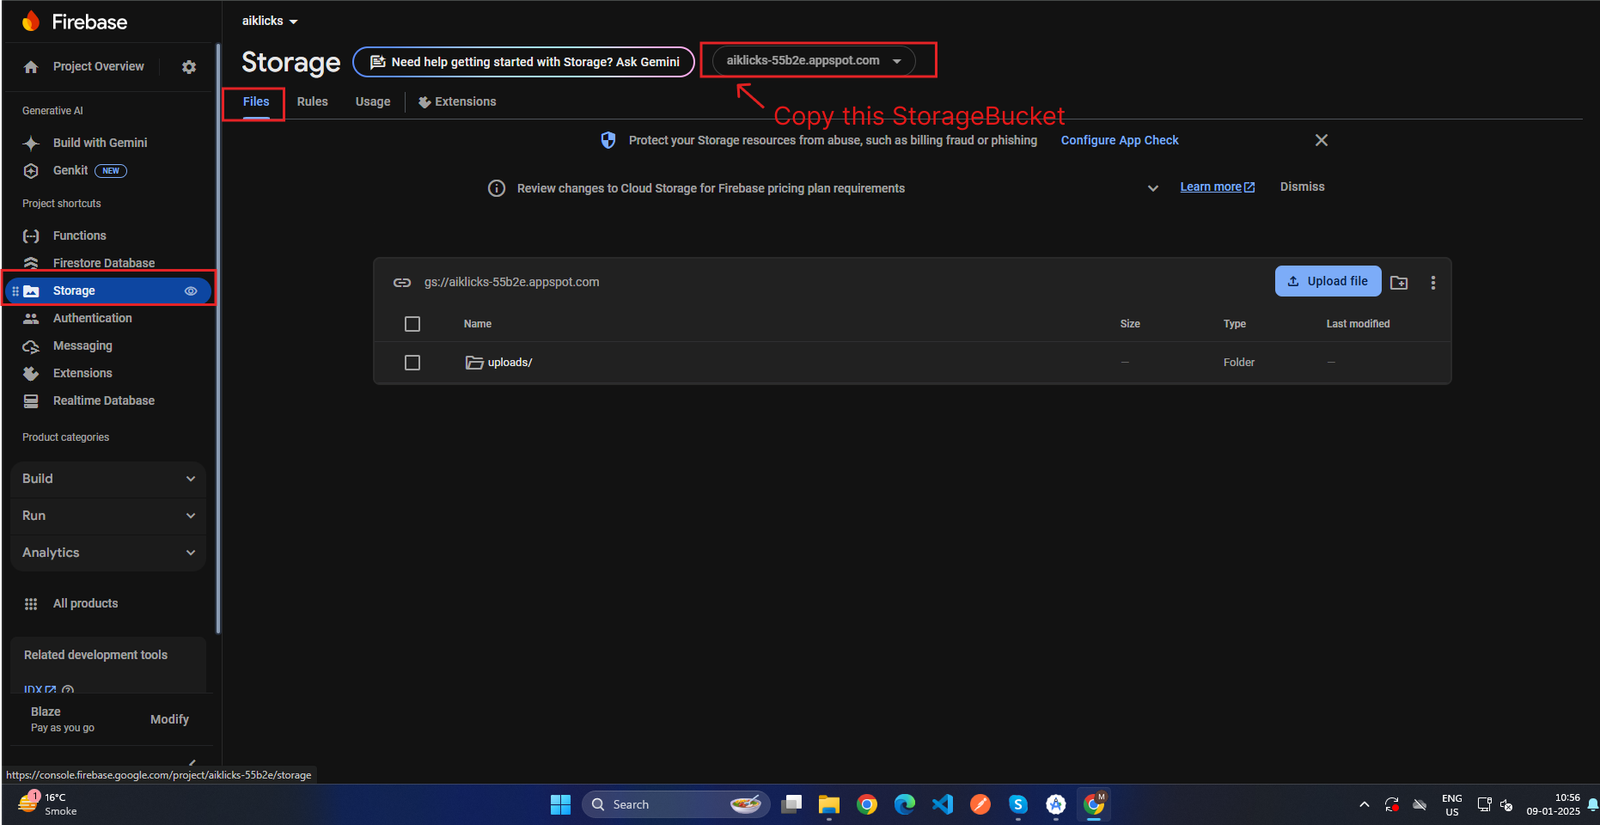
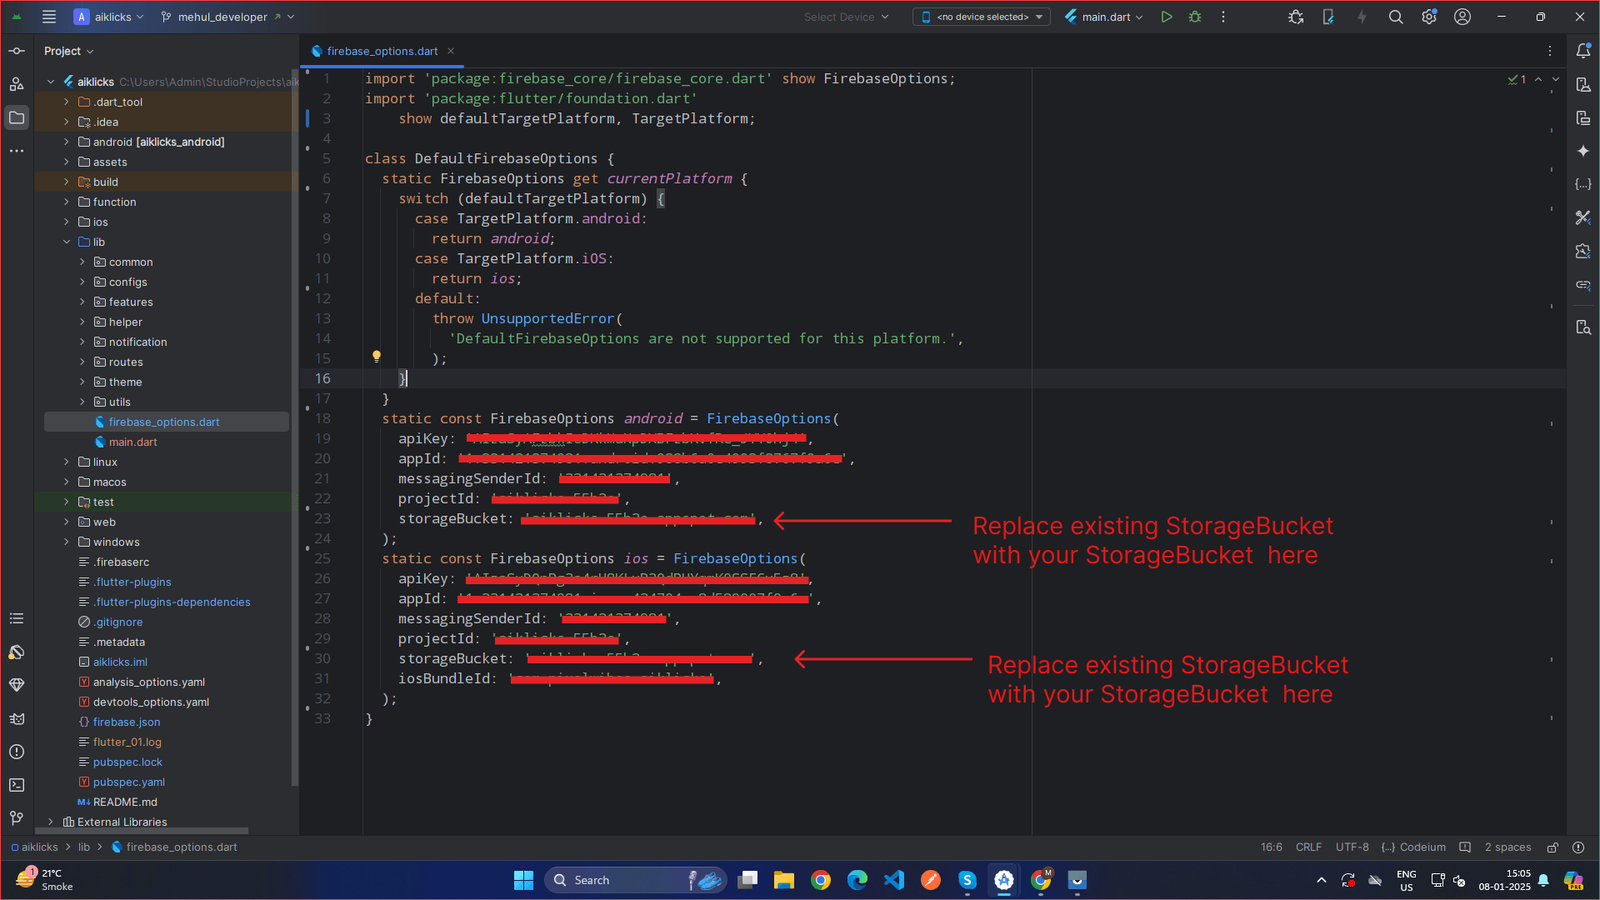
Update storageBucket for both android and ios :
- In the left-hand menu, navigate to Build > Storage
- At the top of the Storage page, locate the Storage Bucket field.
-
Copy the Storage Bucket URL to your clipboard.
-
 x
x
-
-
Replace copied Storage Bucket URL from firebase console with existing storageBucket .
-
 x
x
-
-
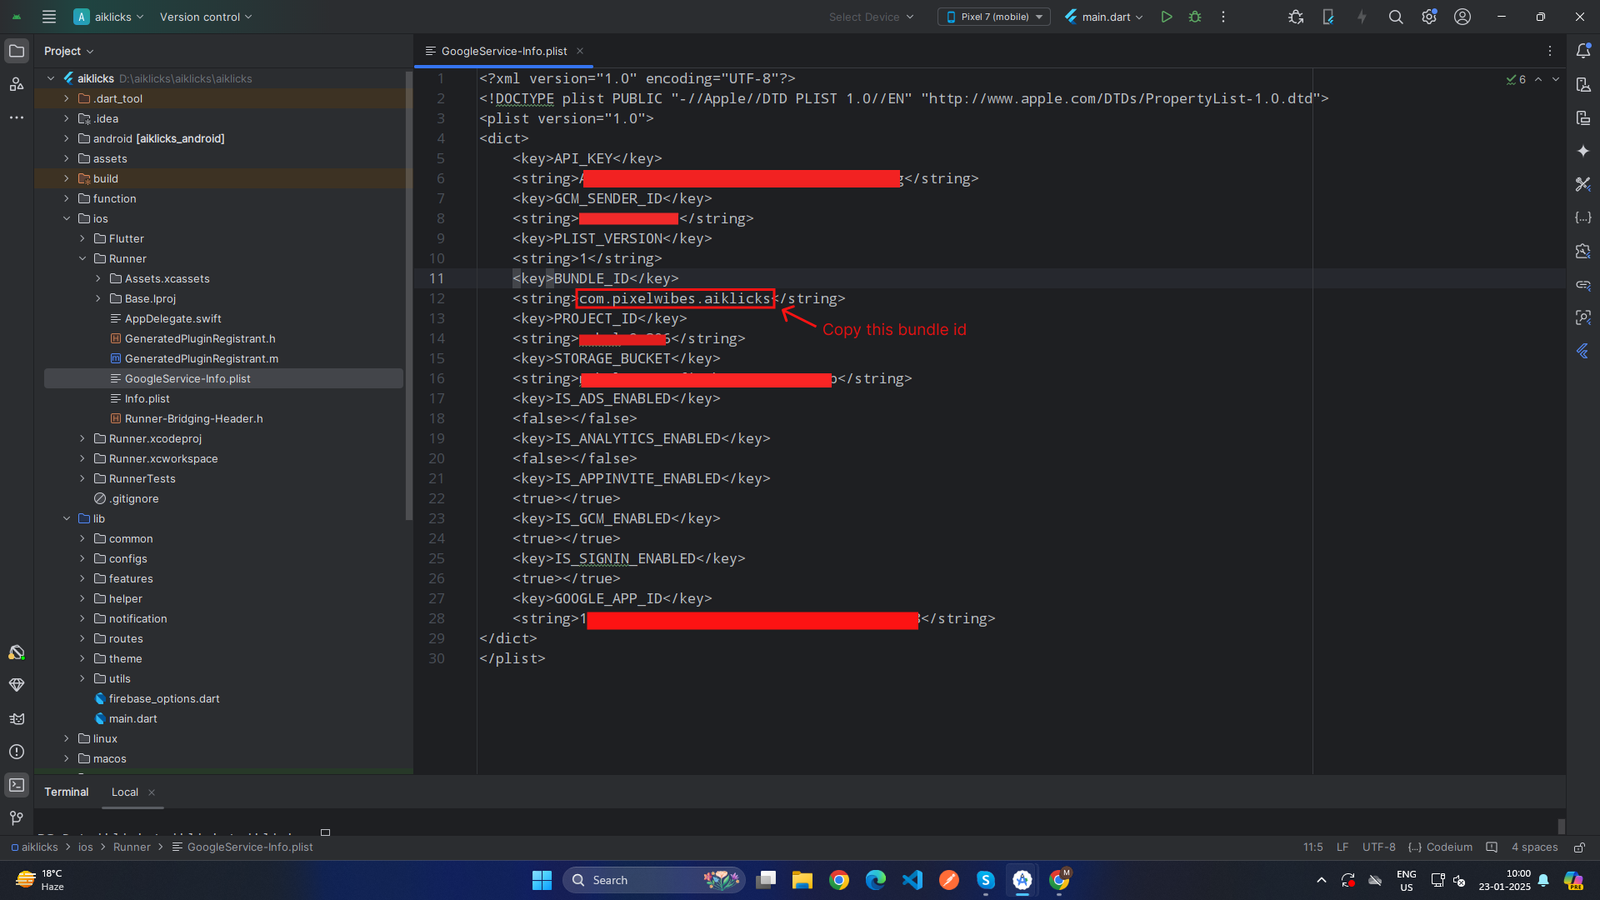
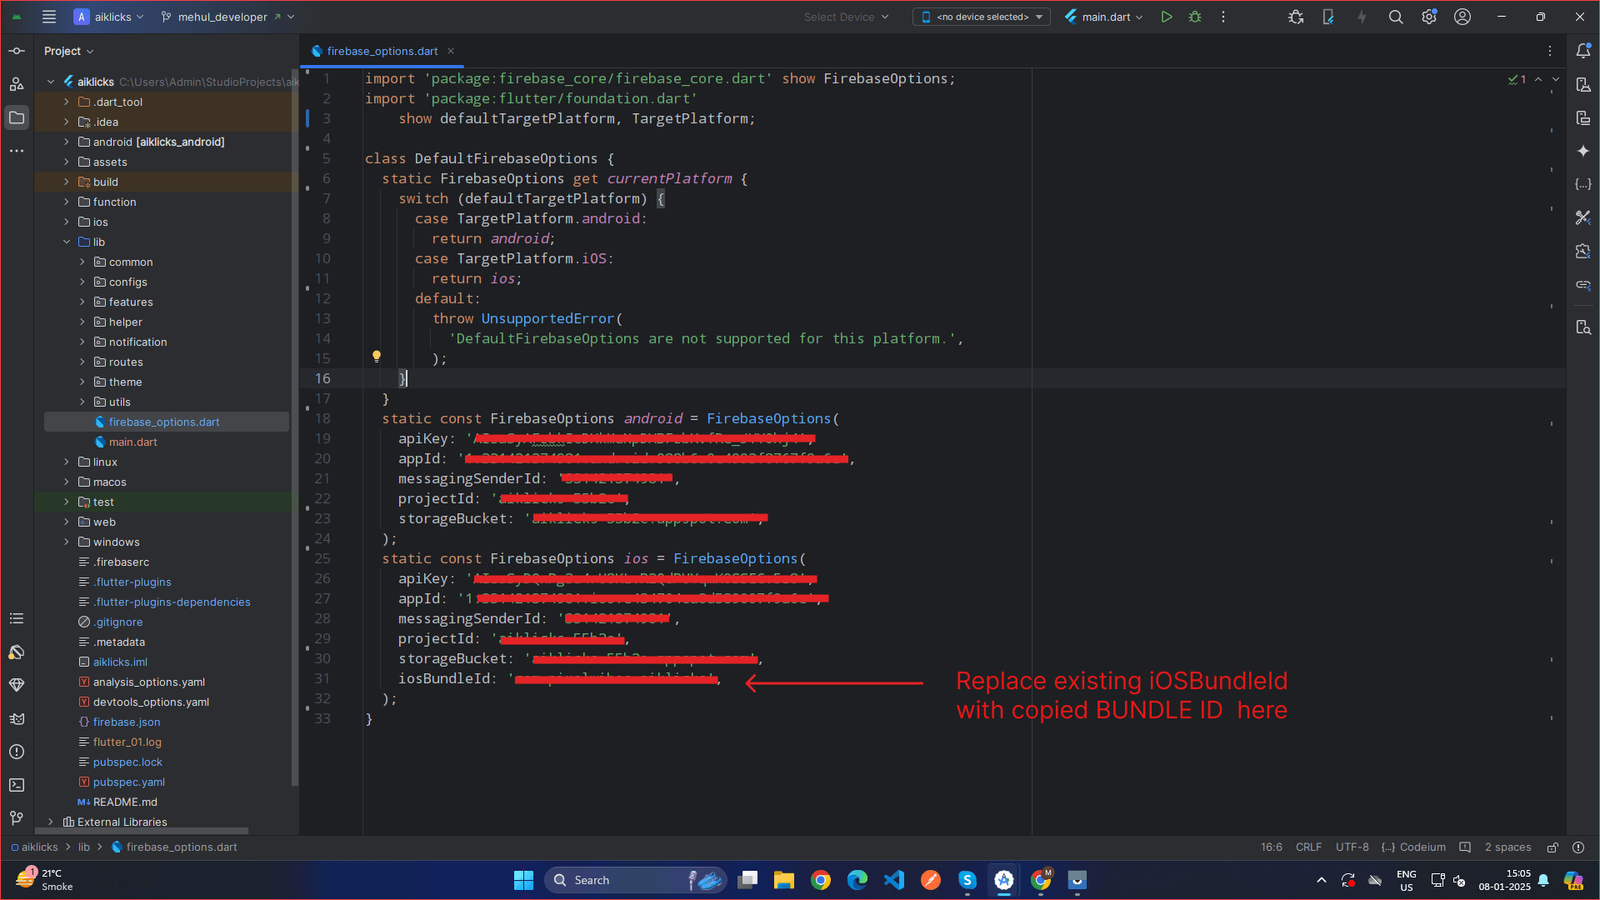
Update IosBundleId for IOS
-
Go to the ios/Runner/GoogleService-Info.plist
file.
-
 x
x
-
- Copy the BUNDLE ID to your clipboard.
-
Replace copied BUNDLE ID with existing iosBundleId.
-
 x
x
-
-
Go to the ios/Runner/GoogleService-Info.plist
file.
-
Update apikey for both android and ios :
-
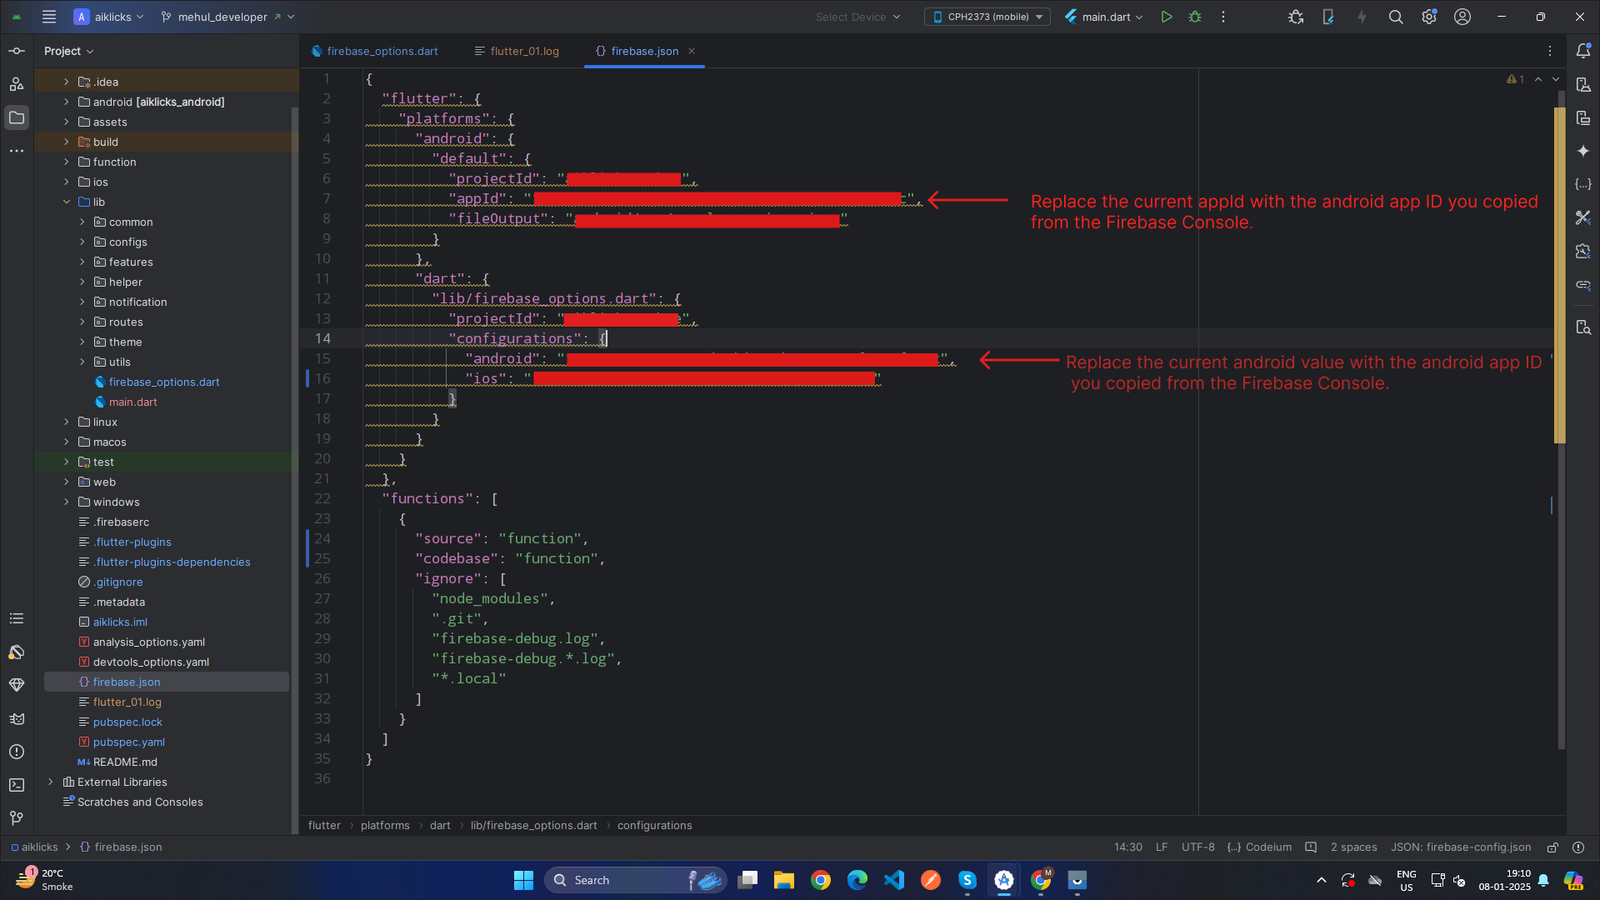
Update firebase.json file
- Go to the Firebase Console and log in using the Google account associated with your Firebase project.
- Select your Firebase project from the dashboard.
-
Navigate to Project Settings:
- Click the Settings (gear icon) in the left-hand menu.
- Select Project Settings from the dropdown.
-
Update appId value and android value :
- Under the Your Apps section, locate the Android App.
- Click on your Android App to view its details.
-
Locate the App ID field under the app configuration details.
-
x
-
- Copy the App ID to your clipboard.
-
Replace copied App ID from firebase console with existing appid and android.
-
 x
x
-
-
Update projectId value :
-
Under the General tab, locate the Project ID field.
-
x
-
- Copy the Project ID to your clipboard.
-
Replace copied Project ID from firebase console with existing projectId
-
x
-
-
Under the General tab, locate the Project ID field.
-
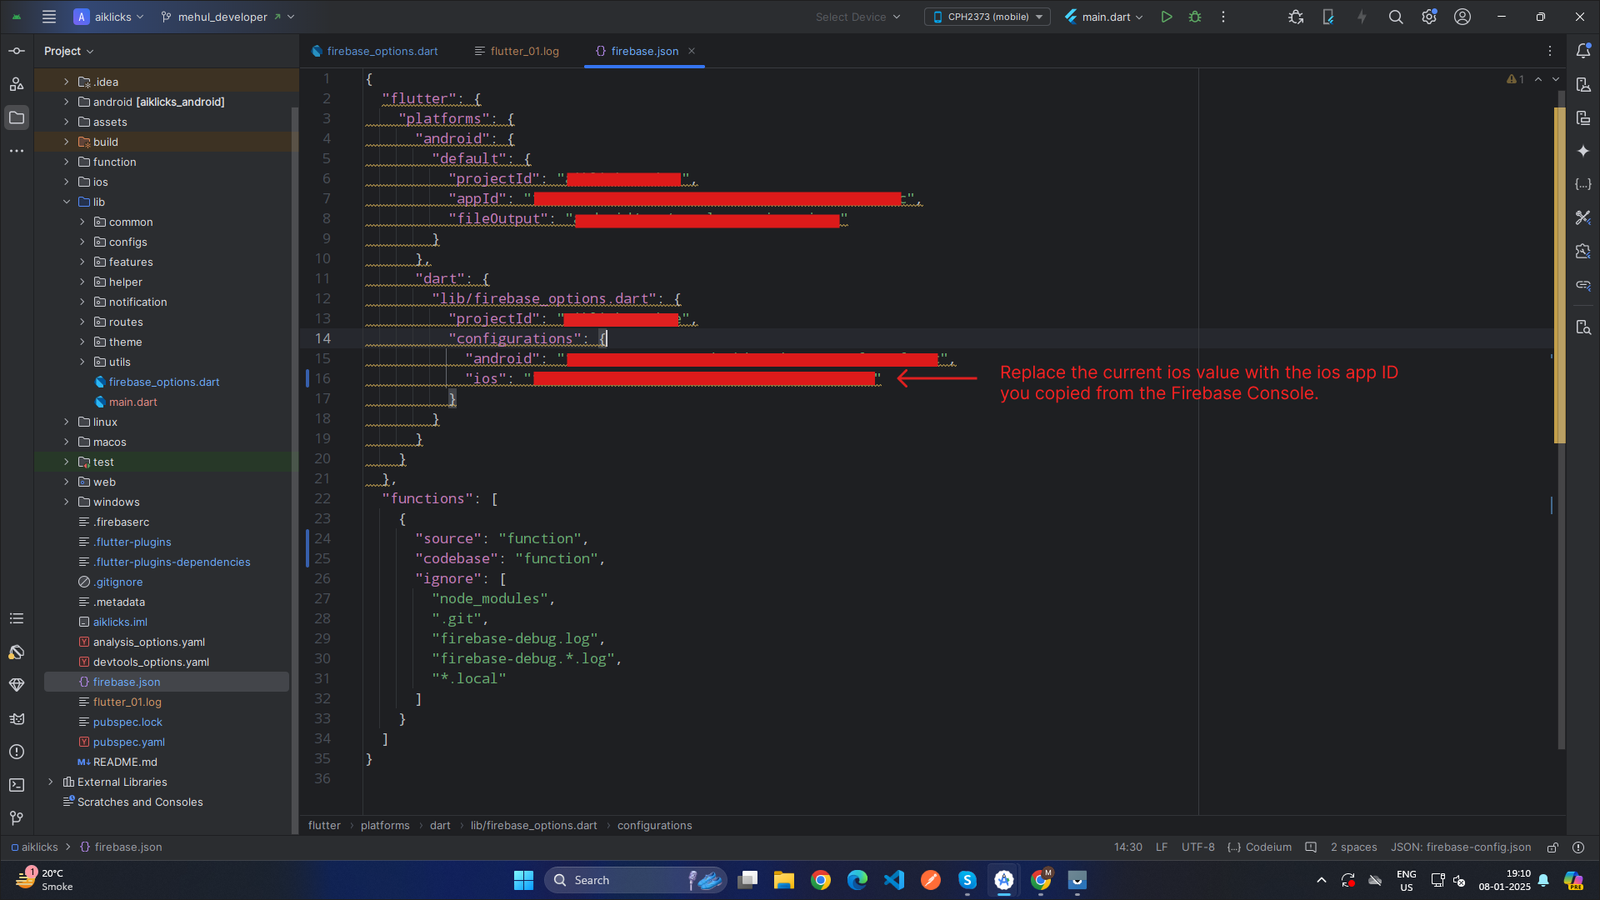
Update ios value:
- Under the Your Apps section, locate the iOS App.
- Click on your iOS App to view its details
-
Locate the App ID field under the app configuration details.Copy the App ID to your clipboard.
-
x
-
- Copy the App ID to your clipboard.
-
Replace copied App ID from firebase console with existing ios.
-
 x
x
-
How to Create configs Collection in Firebase Console
Note:
Please create the configs collection directly from the Firebase Console. If you skip this step, the app will not work as expected. You must follow the steps below and use the collection name exactly as shown:
×-
Collection name : configs
Follow these steps to create config collection in your firebase project
-
Open Firebase Console
- Go to the Firebase Project.
- Select Your Project
-
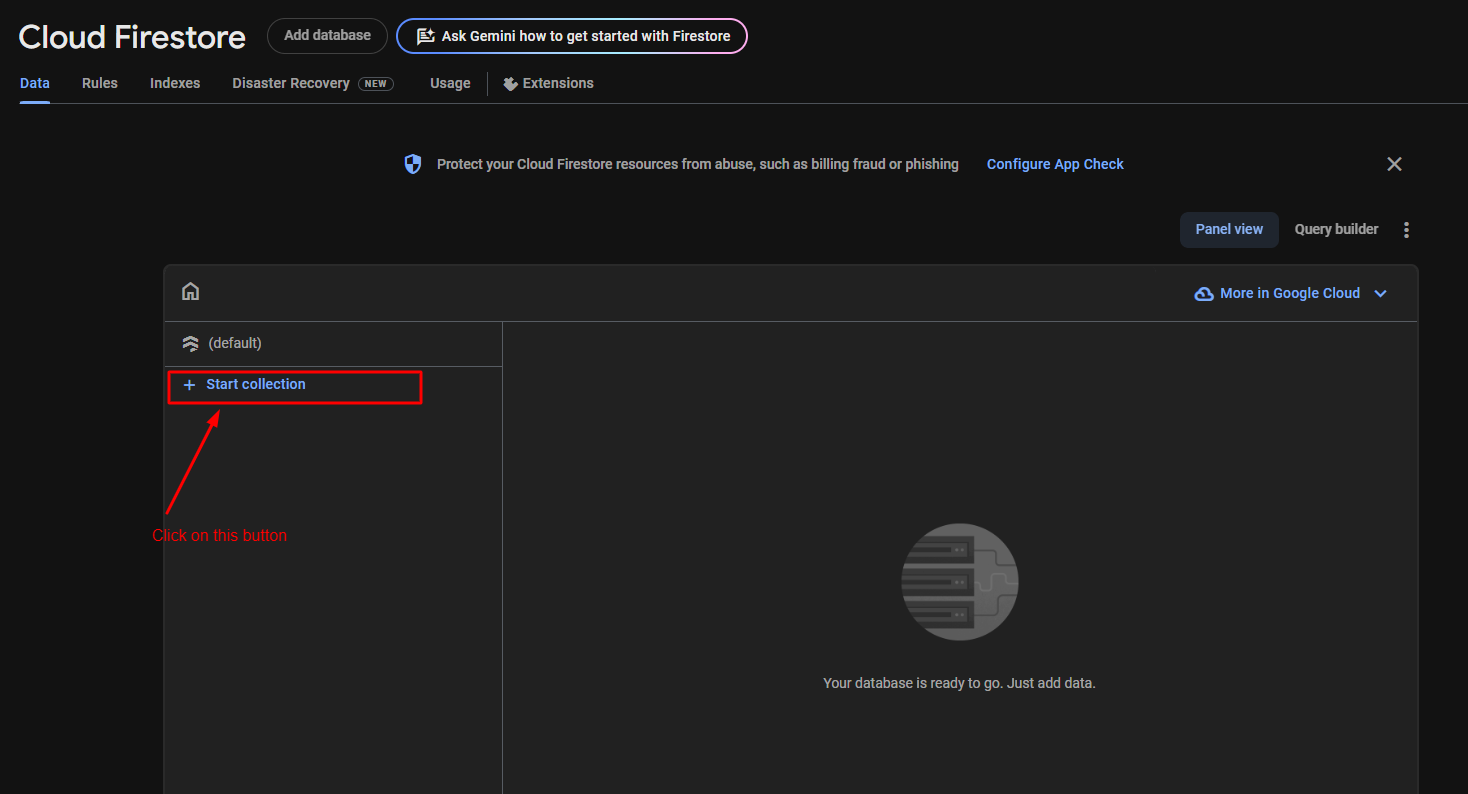
Navigate to Firebase Database
- In the left hand menu , click on build
- Select Firebase Database
- Click on Start Collection button
-
-
 x
x
-
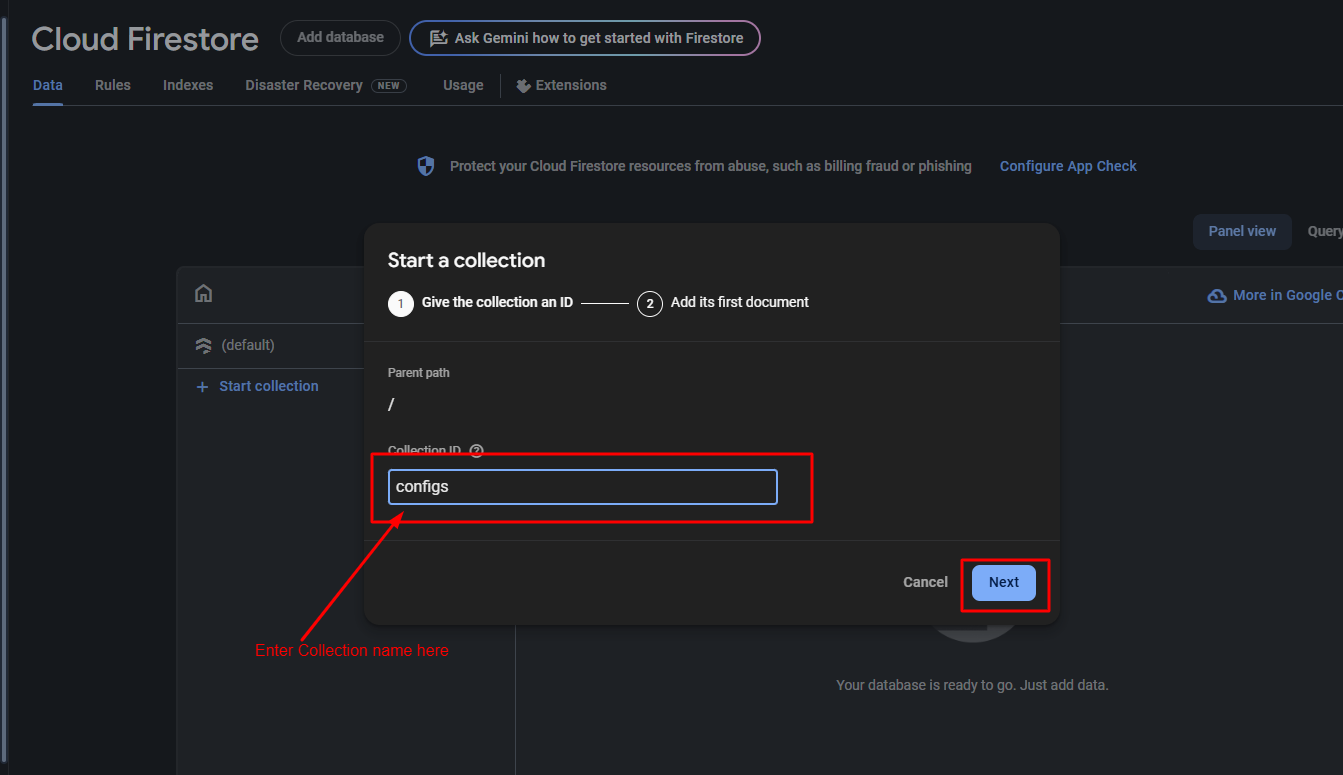
- After this you see a popup window like this in this popup enter collection ID
- must enter collection ID same as Screenshot.Collection ID : configs
- Collection ID : configs
-
-
 x
x
-
- After enter collection ID click on next button.
- After that opens a popup
-
-
 x
x
-
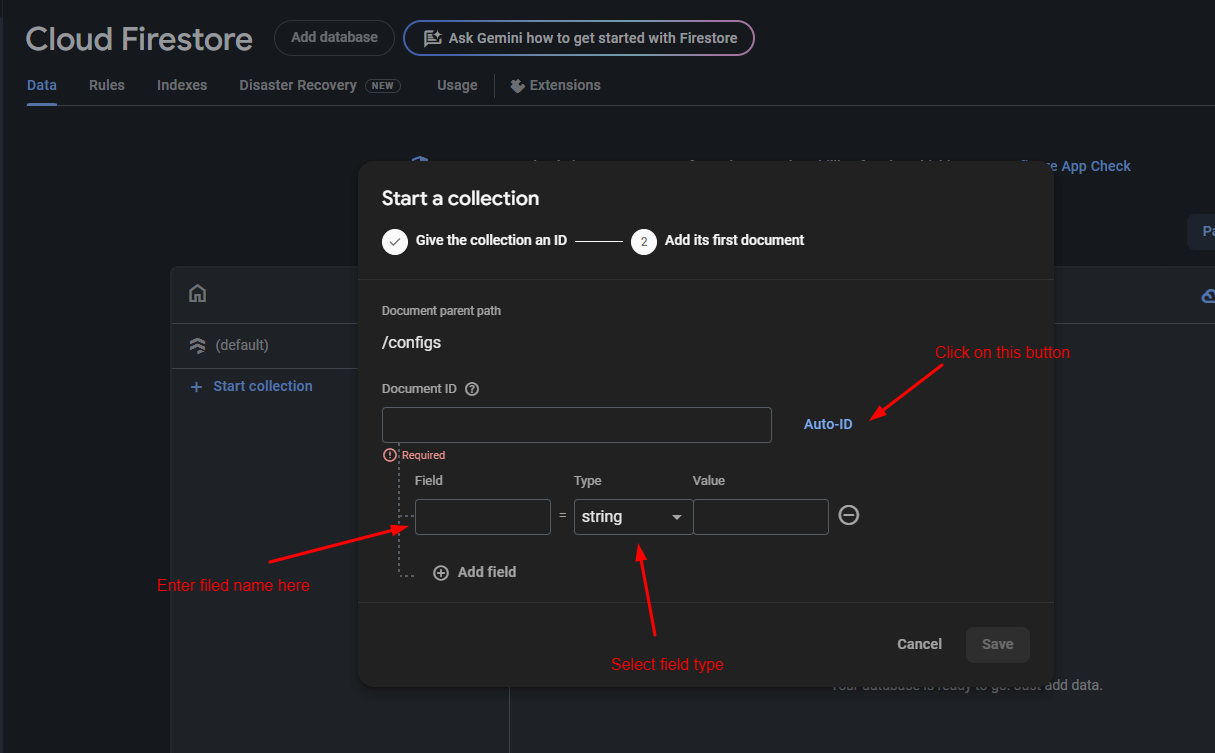
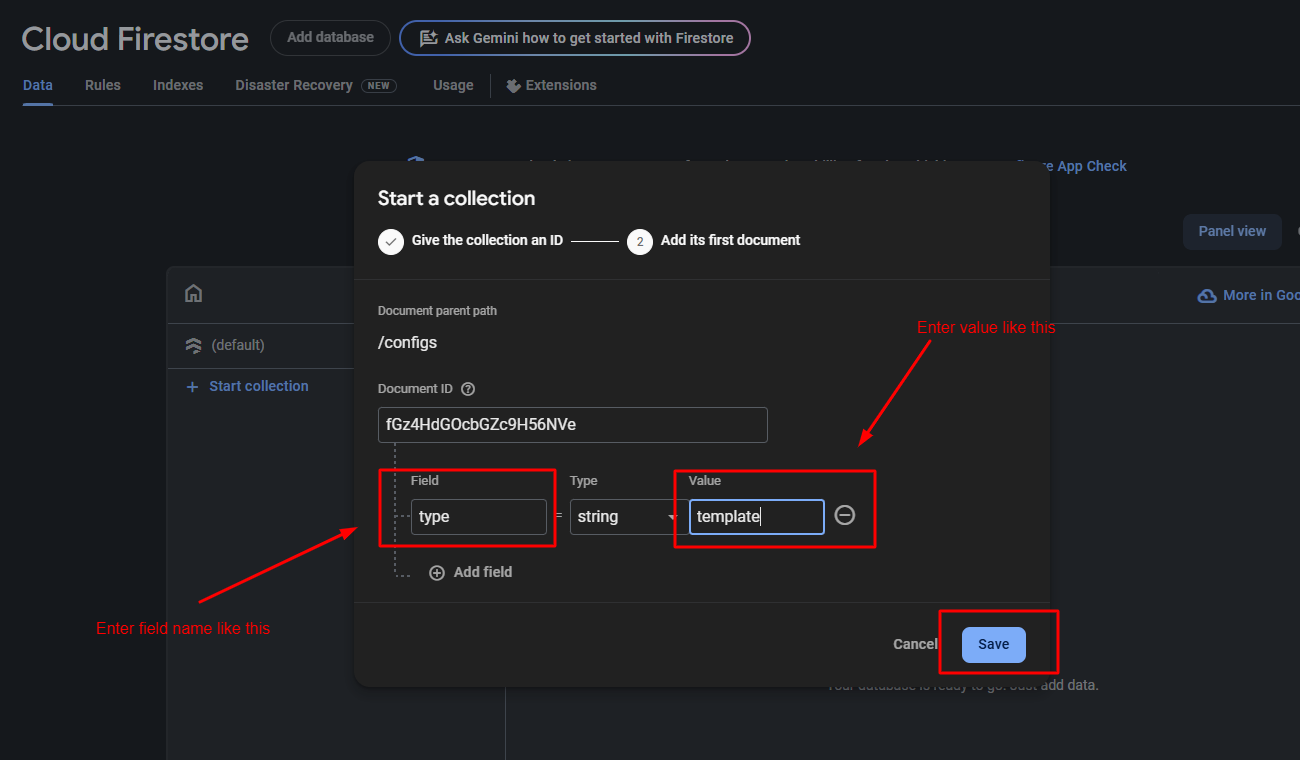
- In this popup click on Auto ID button to get Document ID.
- After this enter field name and select its type same as below image
-
-
 x
x
-
- Now click on Add Field Button
- Click on save button
-
-
 x
x
-
- After that opens a add field popup
-
-
 x
x
-
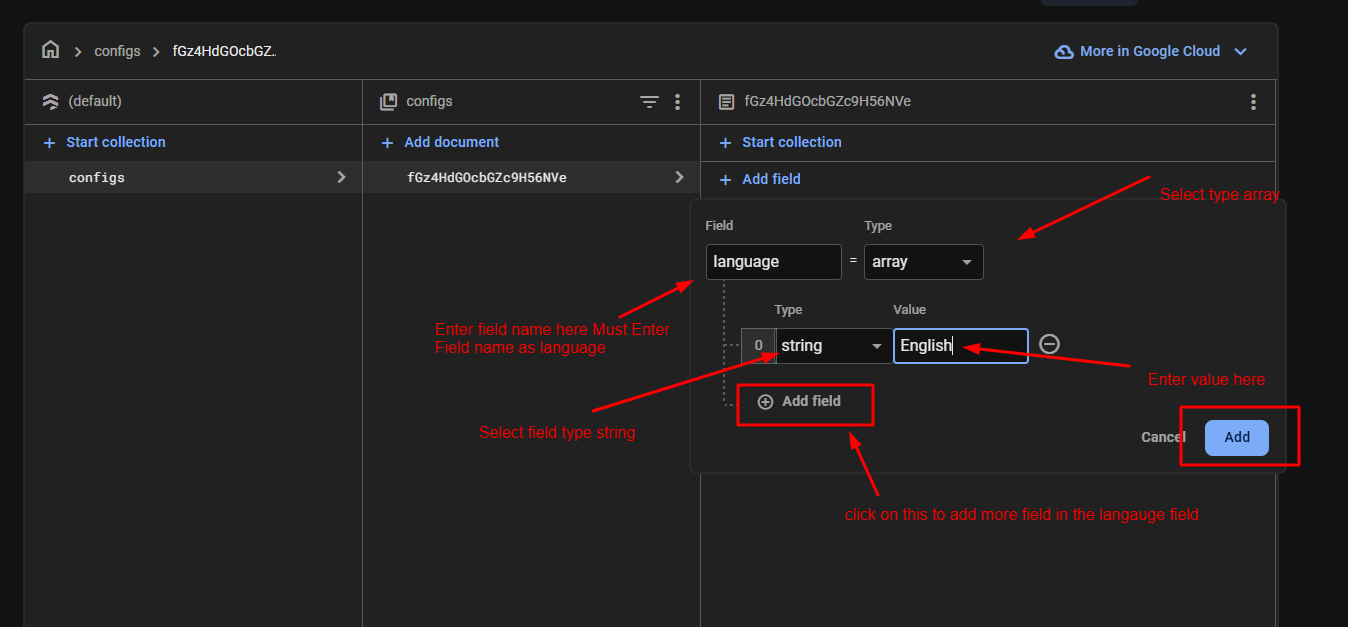
- Must Enter Field name as language and select its type as array make sure enter same name and its type same as above image.
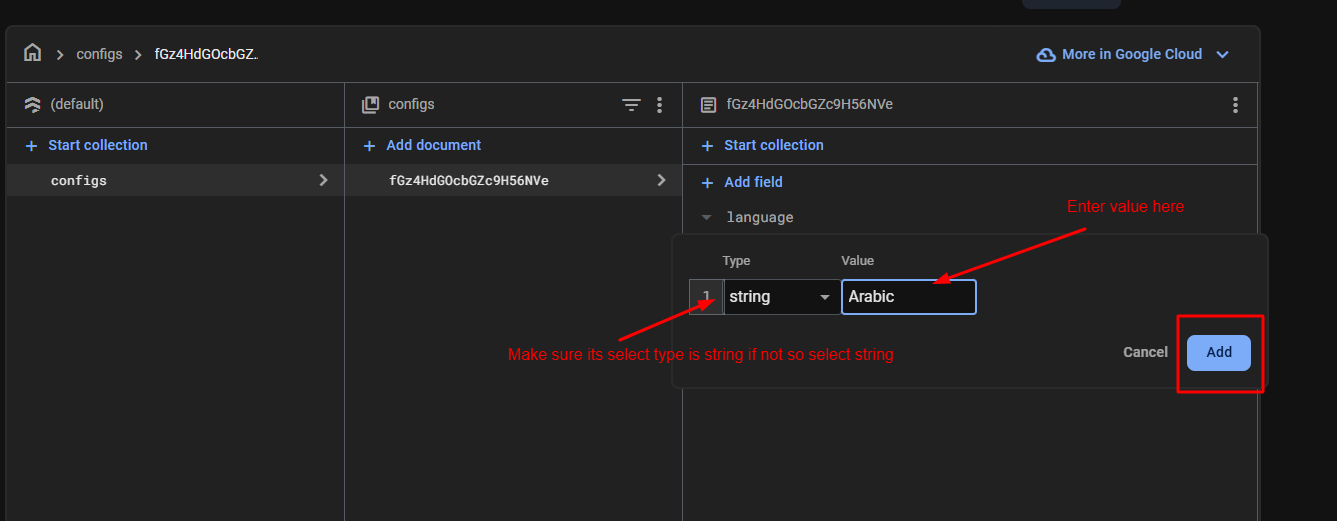
- After that enter first value as English and make sure its selected type is string. If you want more value like English so click on Add Field button after that you see a new row with type and value make sure its selected type is string if you select other type so does not work as expected.
- click on save button.
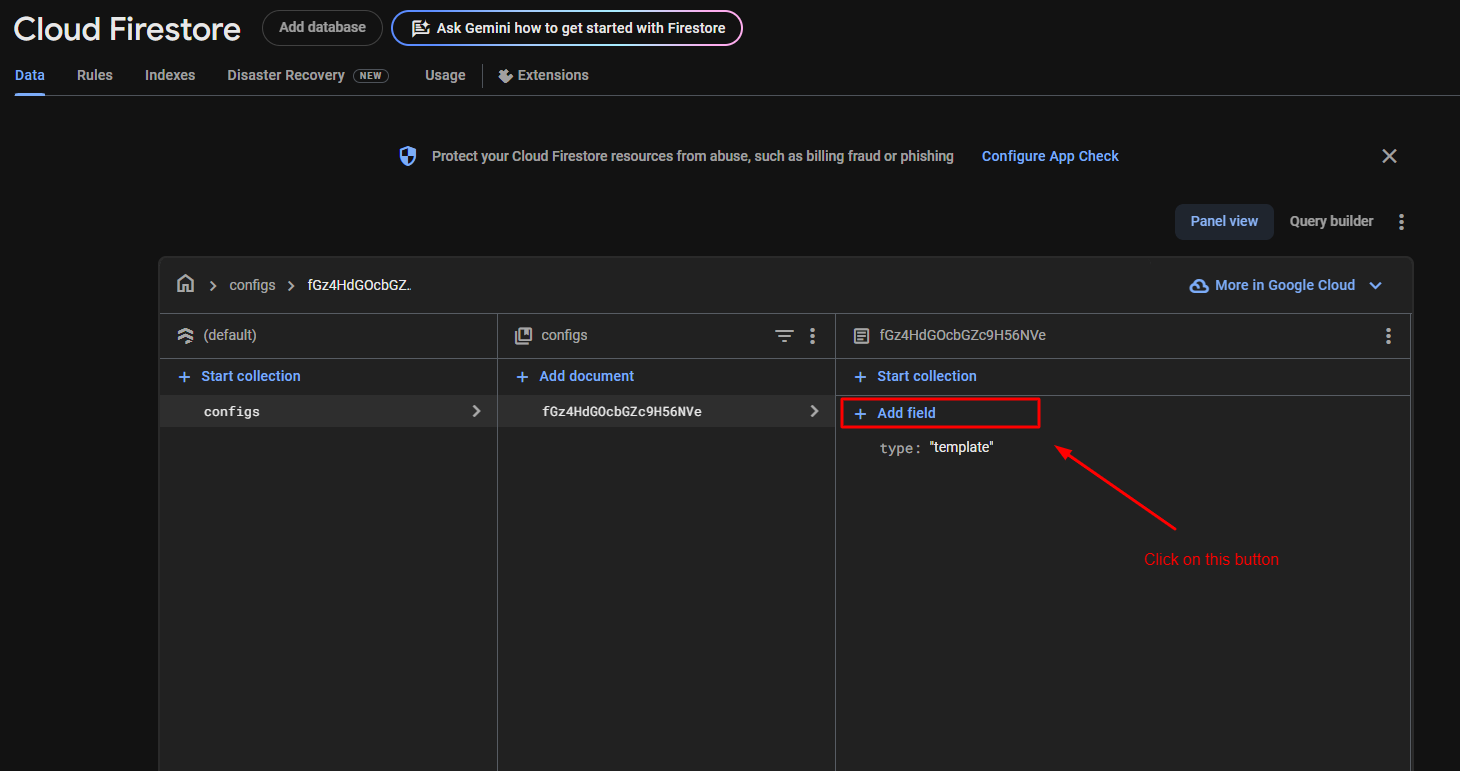
- After that add a new filed in collection click on add new field button same as below image.
-
-
 x
x
-
- After that opens a add field popup.
-
-
 x
x
-
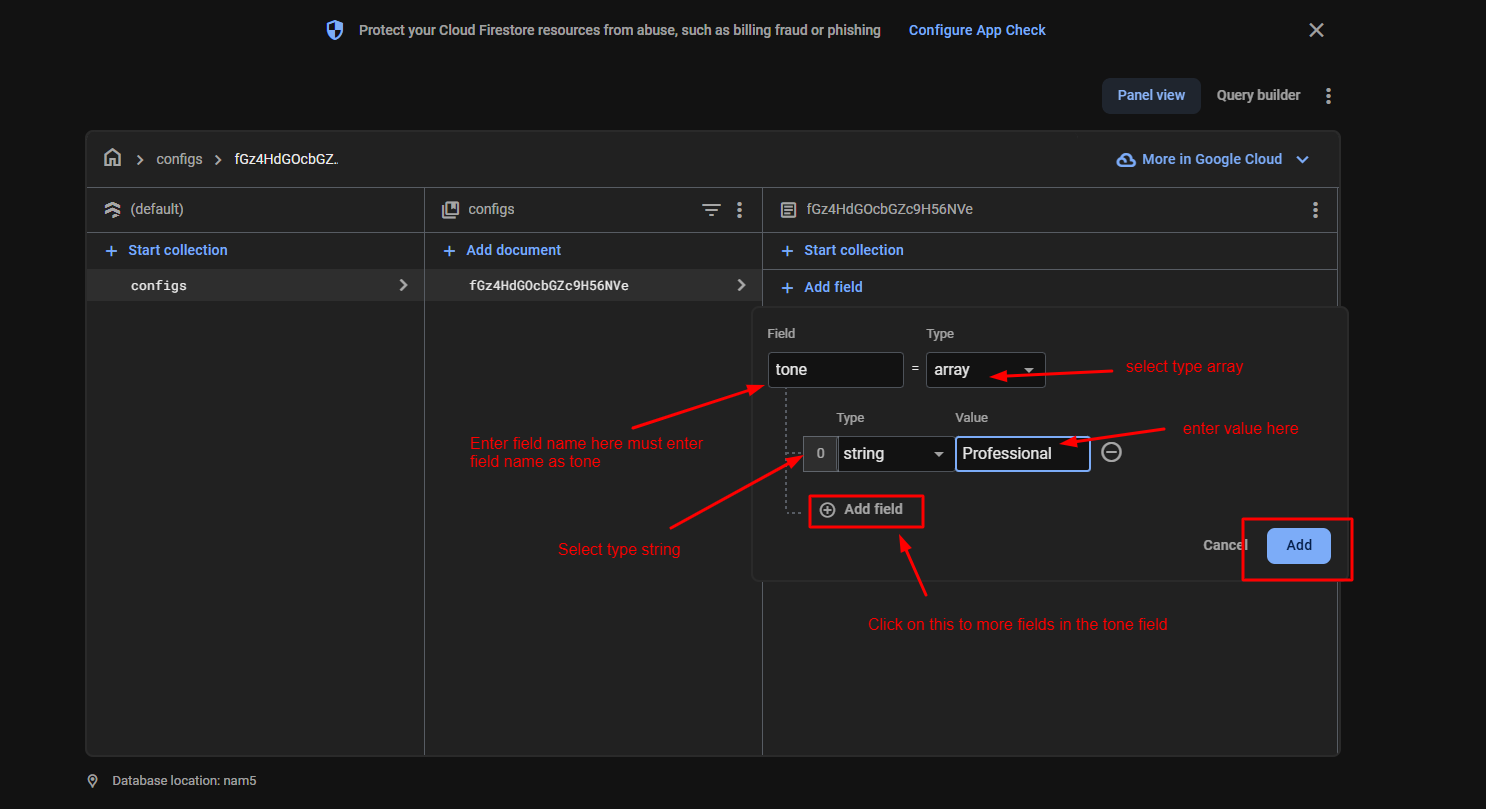
- Must Enter Field name as tone and select its type as array make sure enter same name and its type same as above image.
- After that enter first value as Professional and make sure its selected type is string. If you want more value like Professional so click on Add Field button after that you see a new row with type and value make sure its selected type is string if you select other type so does not work as expected.
- click on save button.
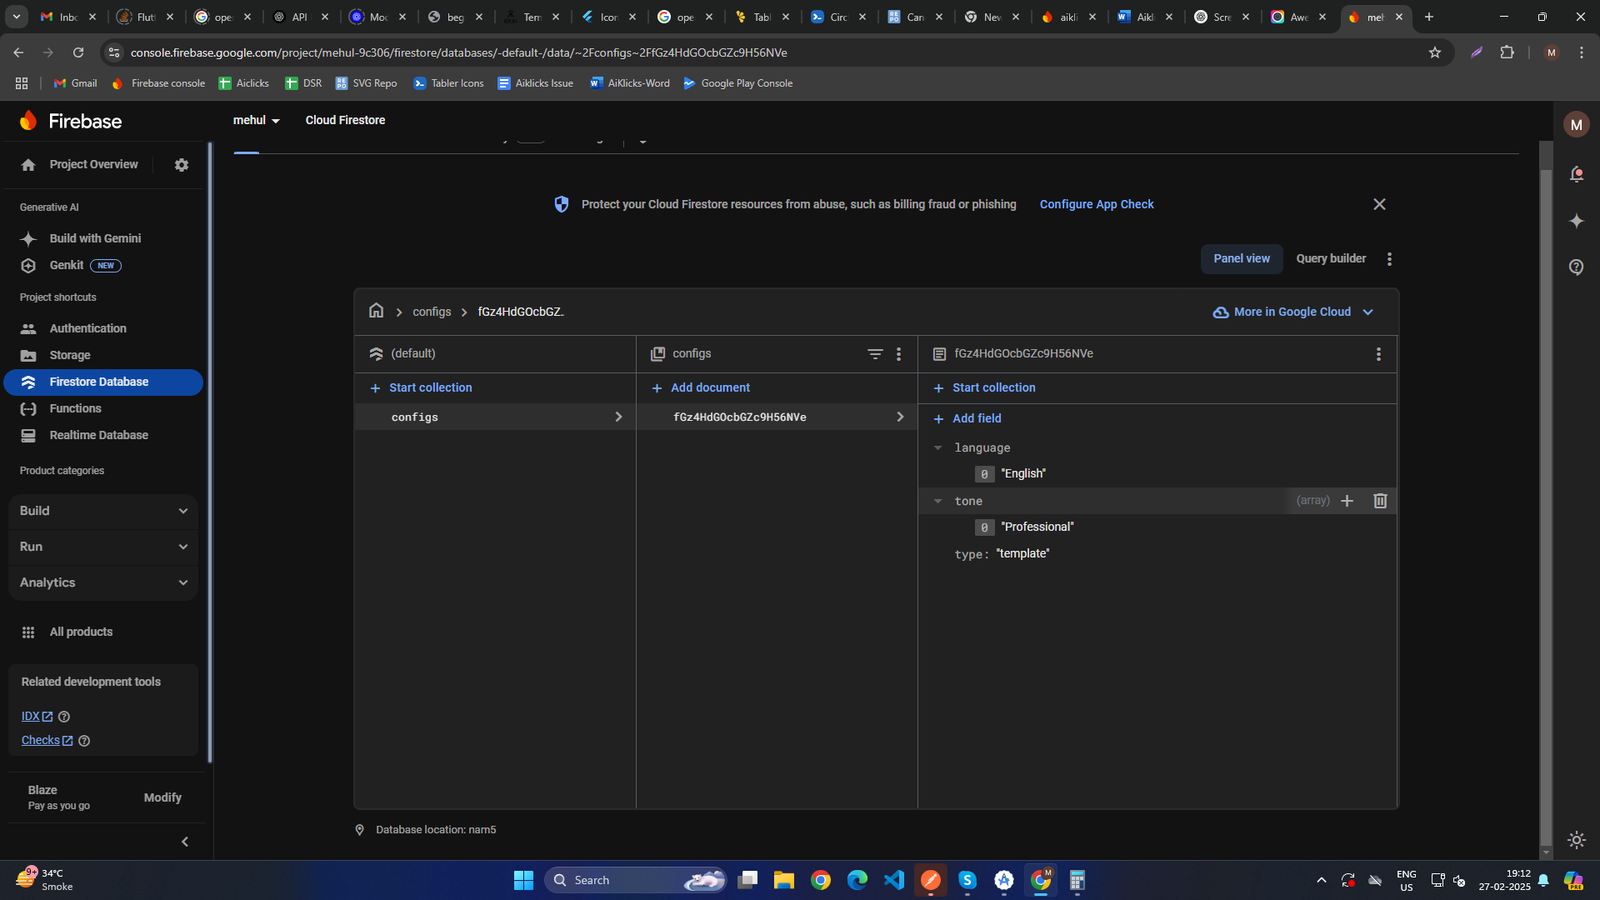
- After that, the configs collection is created with the proper data, and it appears as shown in the image below
-
-
 x
x
-
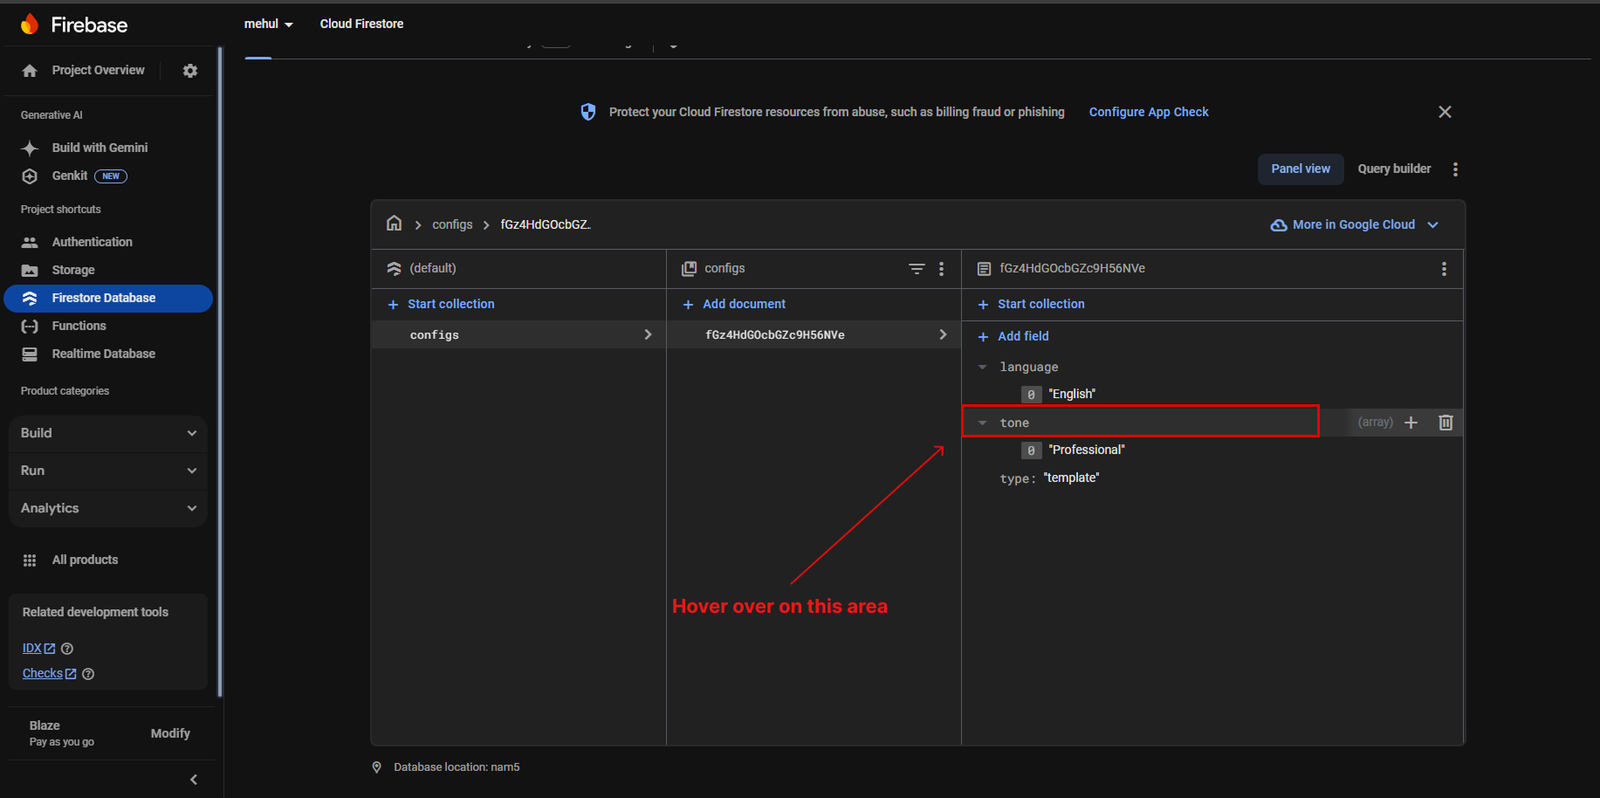
- After that Add more values in language and tone field.
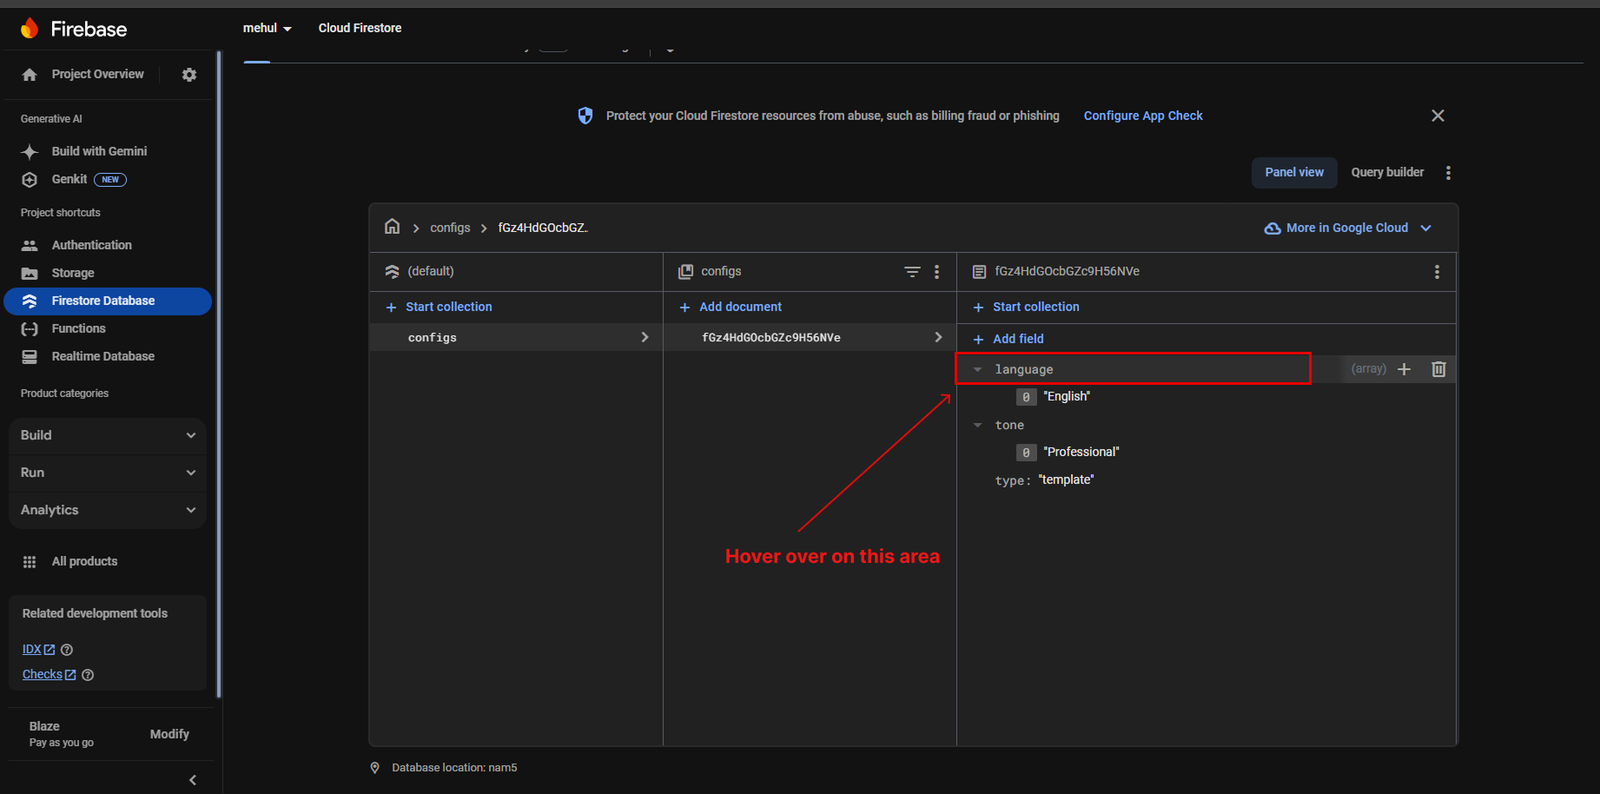
- To Add more values in language field Hover over the field name (language) – you will see a plus(add) icon and a trash (delete) icon appear
-
-
 x
x
-
- click on add icon.
-
-
 x
x
-
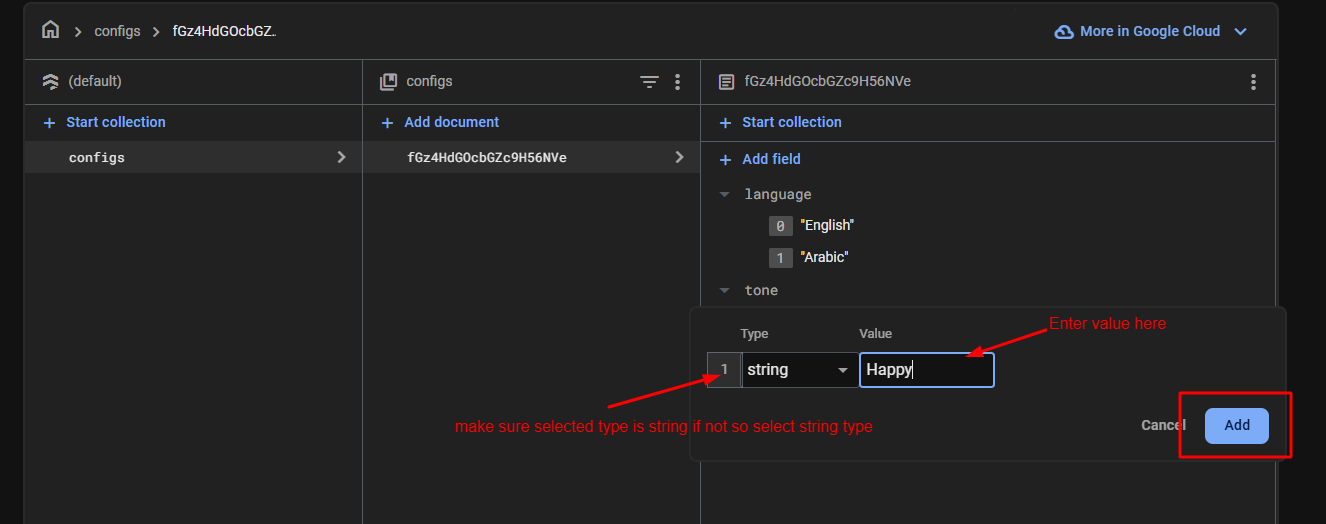
- Enter value like this after that click on add button.
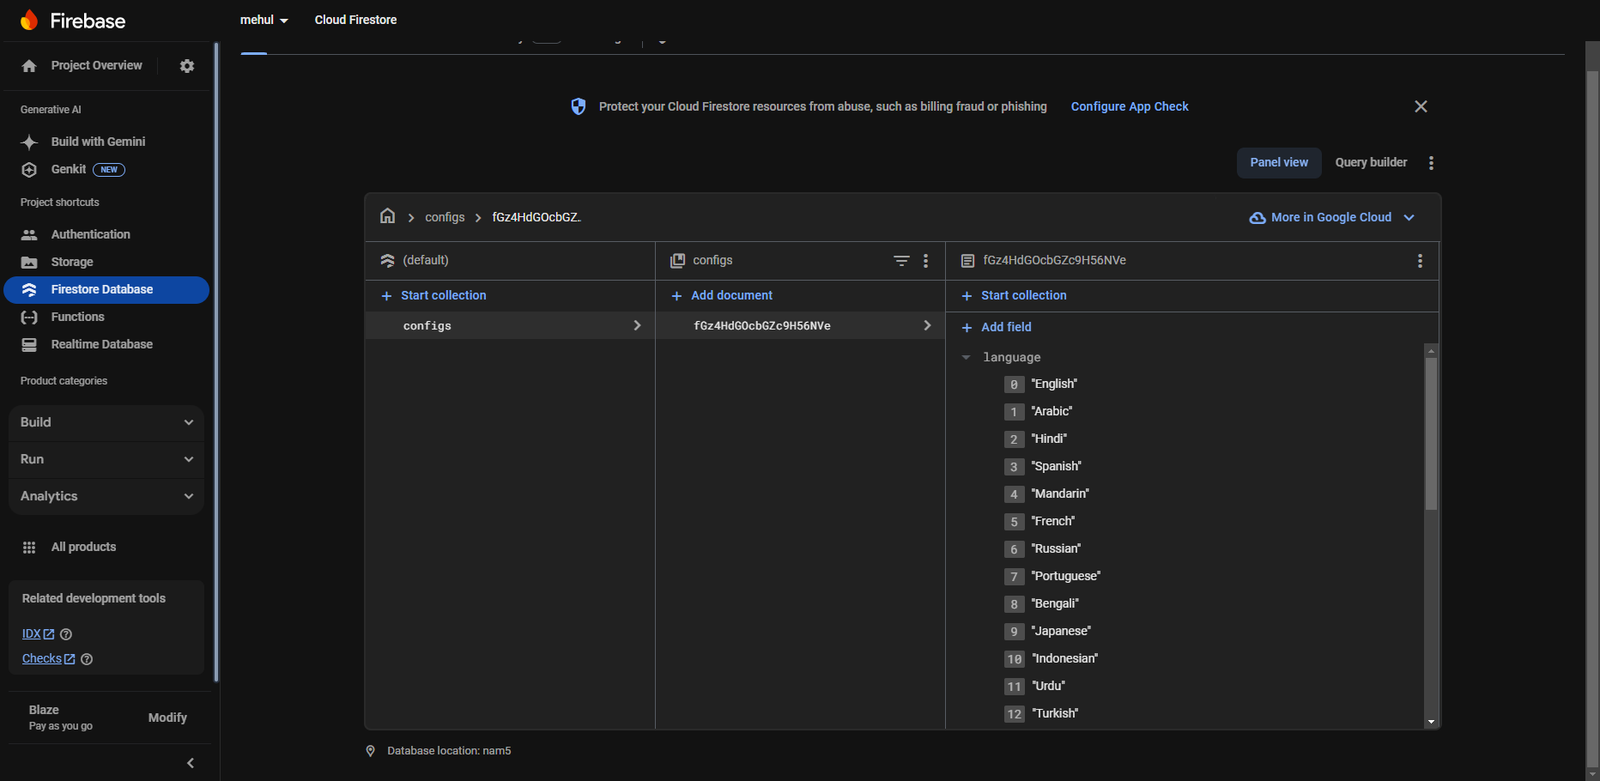
- Add at least these values in language field one by one same as above image.
Hindi, Spanish, Mandarin, French, Russian, Portuguese, Bengali, Japanese, Indonesian, Urdu, Turkish, German, Gujarati - After adding all values in language field step by step language field looks likes below image.
-
-
 x
x
-
- To Add more values in tone field Hover over the field name (tone) – you will see a plus(add) icon and a trash (delete) icon appear
-
-
 x
x
-
- click on add icon.
-
-
 x
x
-
- Enter value like this after that click on add button.
-
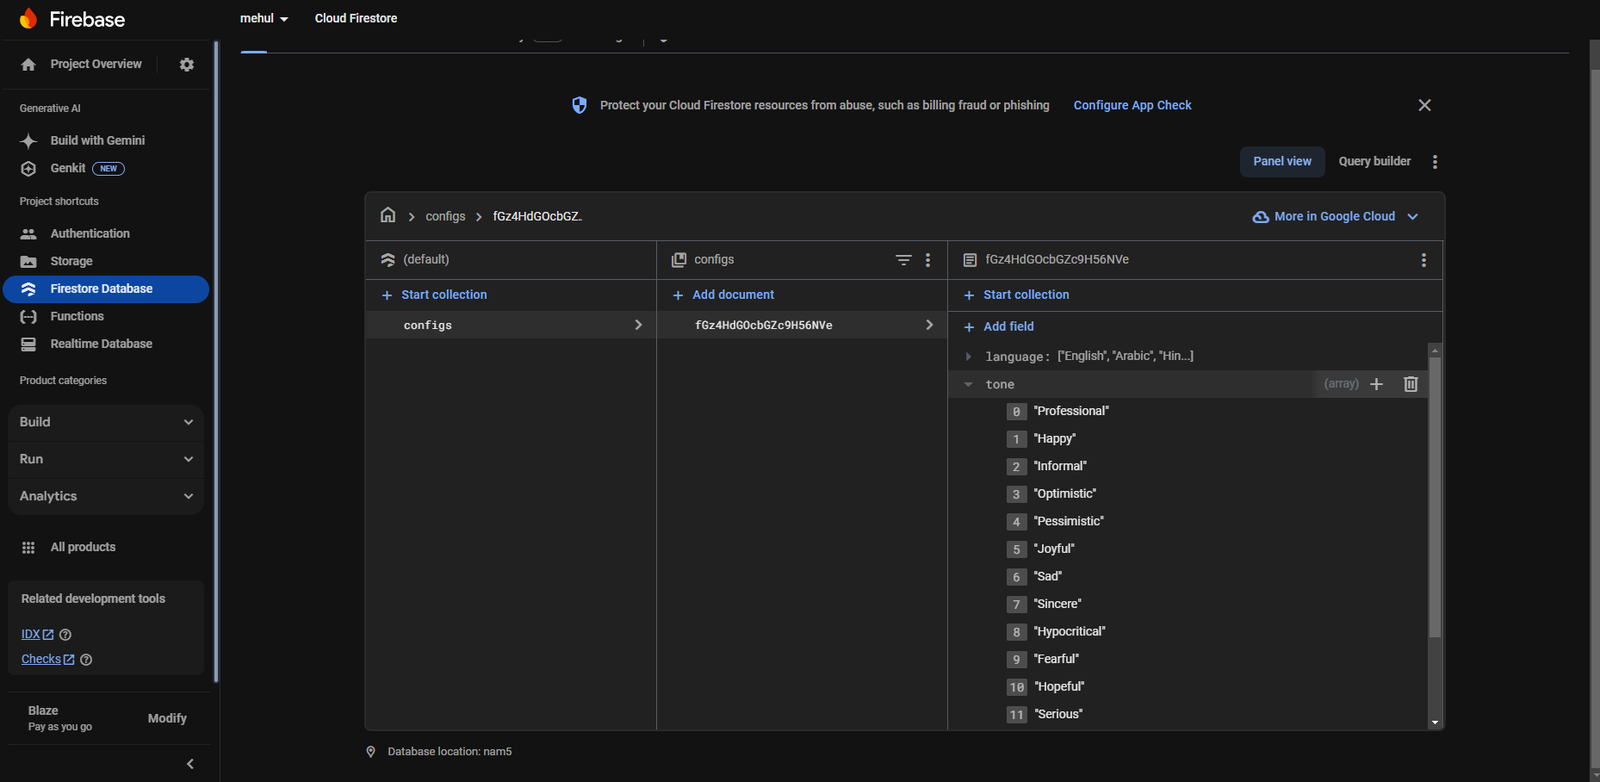
Add at least these values in tone field one by one same as above image.
Informal, Optimistic, Pessimistic, Joyful, Sad, Sincere, Hypocritical, Fearful, Hopeful, Serious, Funny, Bold, Excited - After adding all values step by step, the tone field appears as shown in the image below
-
-
 x
x
-
-
Open Firebase Console
How to Deploy Firebase Cloud Functions from Android Studio
-
Link Your Firebase Project
Before deploying Cloud Functions, ensure that your Firebase project is linked to your local development environment.
-
Open Android Studio Terminal:
- Navigate to View > Tool Windows > Terminal to open the terminal inside Android Studio.
- Ensure that you are in the flutter project directory.
-
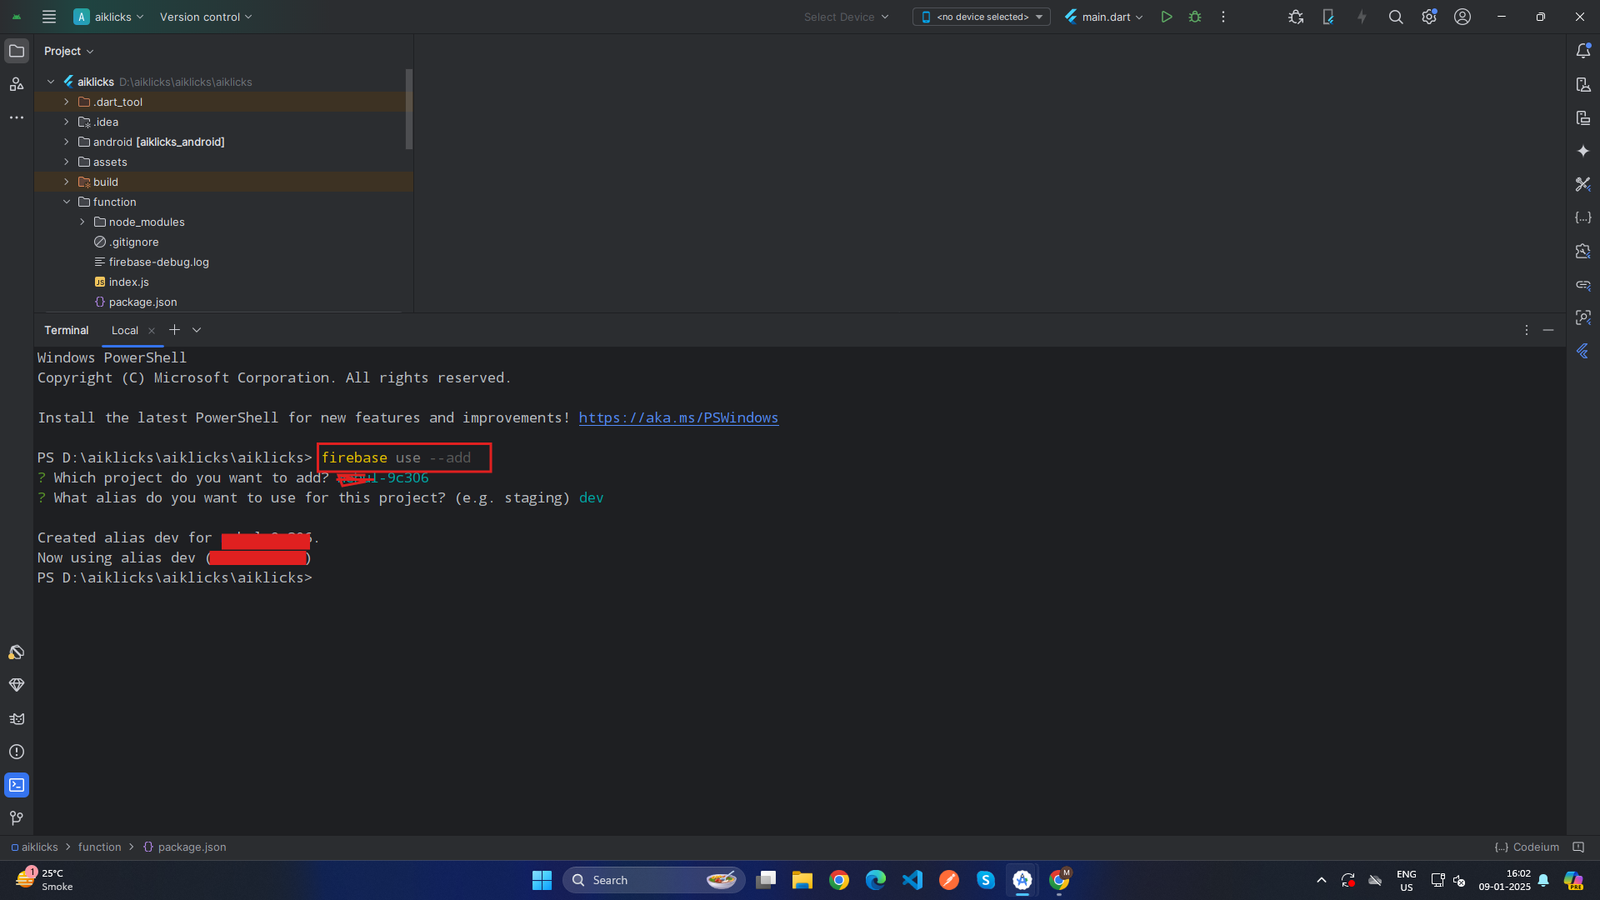
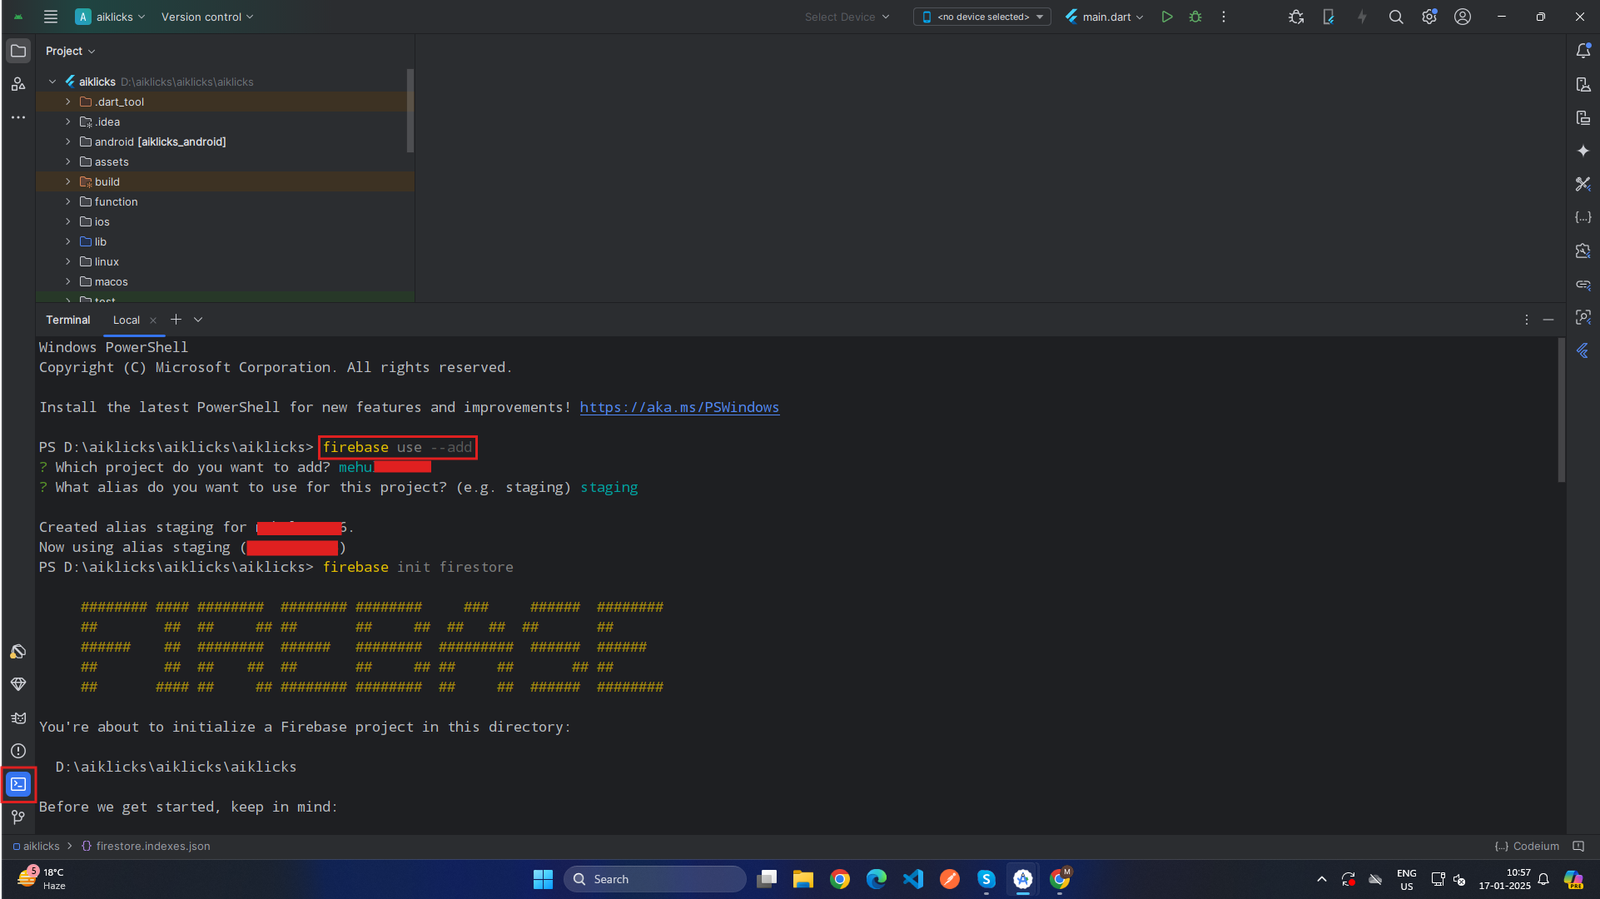
Link Firebase Project: Run the following command to link your Firebase project to your local environment:
-
firebase use –add
-
 x
x
-
- This command will prompt you to choose your Firebase project.
- Select your project from the list.
- You can assign an alias (e.g., default or prod).
-
firebase use –add
-
Verify the Selected Project: Confirm the active project by running this command in terminal :
- firebase projects:list
- The selected Firebase project will be marked with a checkmark.
-
Open Android Studio Terminal:
-
Install Dependencies
Ensure that all the necessary dependencies for Firebase Functions are installed.
-
Navigate to functions Directory: In the terminal, navigate to the function directory inside your project:
- cd function
-
Install Dependencies: Run the following command to install dependencies:
- npm install
-
Navigate to functions Directory: In the terminal, navigate to the function directory inside your project:
-
Deploy Firebase Functions
After the project is linked and dependencies are installed, you can deploy the Cloud Functions to Firebase.
-
Deploy Functions: Run the following command from the root of your Flutter project:
-
firebase deploy --only functions
-
 x
x
-
- This command deploys the functions found in the function directory to your Firebase project.
- Wait for the deployment process to complete. The terminal will provide the URL of HTTP-triggered functions and any relevant deployment information.
-
firebase deploy --only functions
-
Monitor Deployment Logs:
- Firebase CLI will display logs and progress during the deployment.
- If any errors occur, they will be displayed in the terminal for debugging.
-
Deploy Functions: Run the following command from the root of your Flutter project:
-
Test Deployed Functions
Once the functions are deployed, you can test them using the following steps:
-
View Functions in Firebase Console:
- Go to the Firebase Console for your project.
- Navigate to Build > Functions to view the list of deployed functions.
-
Test HTTP-Triggered Functions:
- Copy the provided function URL from the terminal.
- Open the URL in your browser or use a tool like Postman to test it.
-
View Functions in Firebase Console:
How to Deploy Firestore indexes from Android Studio
-
Link Your Firebase Project
Before deploying Firestore Index, ensure that your Firebase project is linked to your local development environment.
-
Open Android Studio Terminal
- Navigate to View > Tool Windows > Terminal to open the terminal inside Android Studio.
- Ensure that you are in the flutter project directory.
-
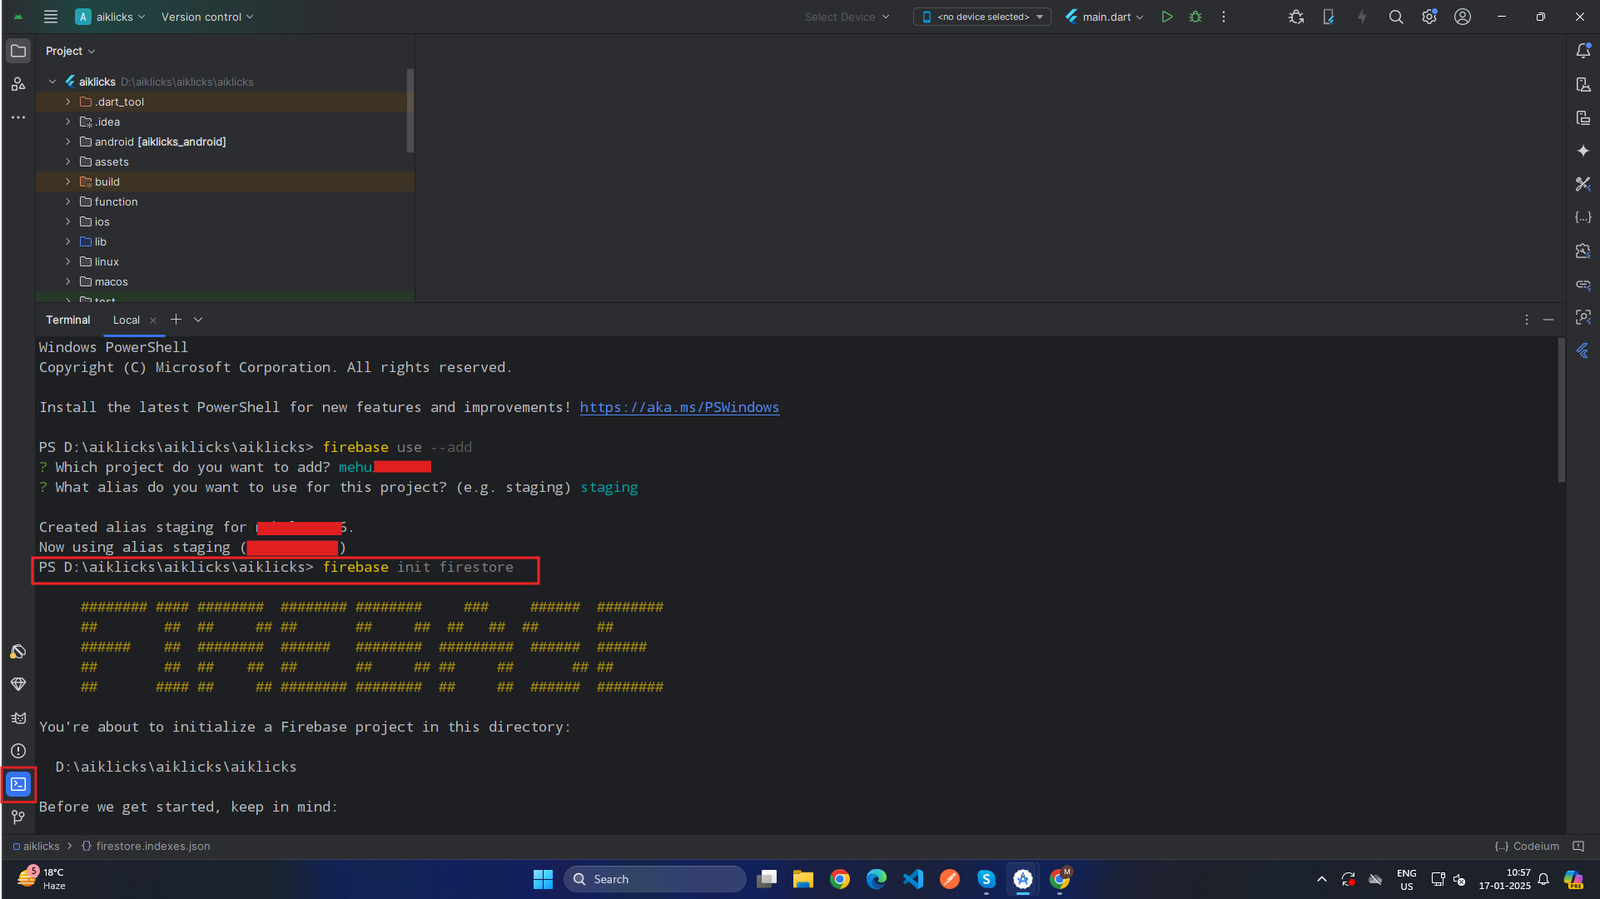
Link Firebase Project
-
Run the following command to link your Firebase project to your local environment:
-
firebase use –add
-
 x
x
-
-
firebase use –add
- This command will prompt you to choose your Firebase project.
-
Select your project from the list.
- Select your project from the list.
-
Run the following command to link your Firebase project to your local environment:
-
Verify the Selected Project:
- Confirm the active project by running this command in terminal : firebase projects:list
- The selected Firebase project will be marked with a checkmark.
-
Open Android Studio Terminal
-
Initialize Firestore
If Firestore is not already initialized in your Firebase project, follow these steps:
-
Run the Firebase initialization command: firebase init firestore
-
 x
x
-
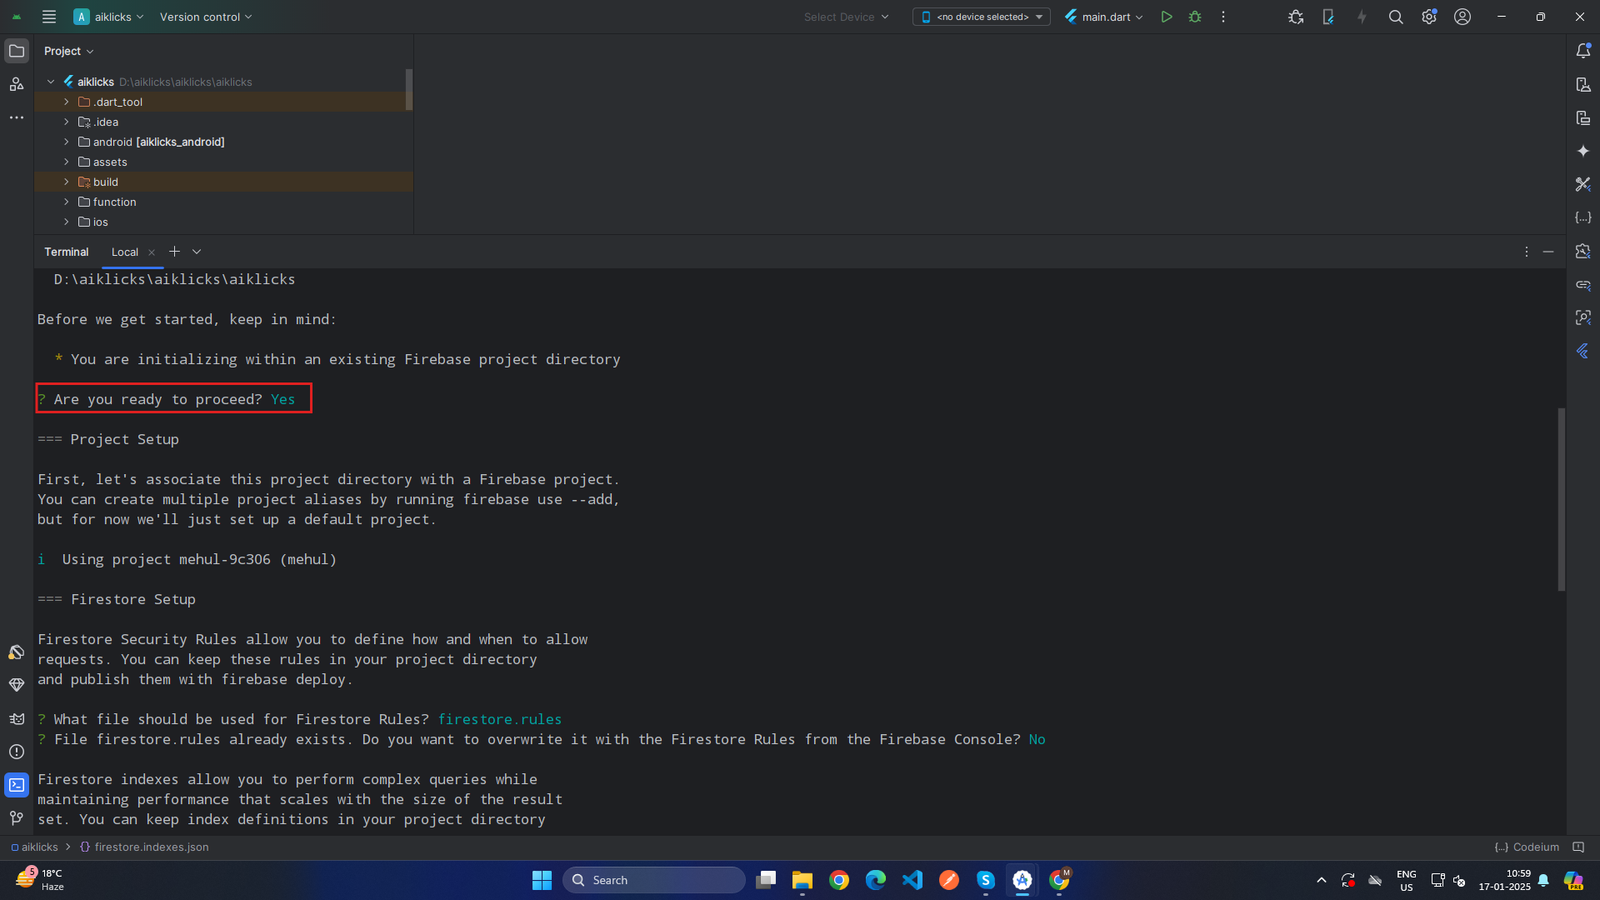
During the initialization, respond to the prompts as follows:
-
Prompt 1:
-
"You are initializing within an existing Firebase project directory. Are you ready to proceed?"
- Select: Yes
-
x
-
"You are initializing within an existing Firebase project directory. Are you ready to proceed?"
-
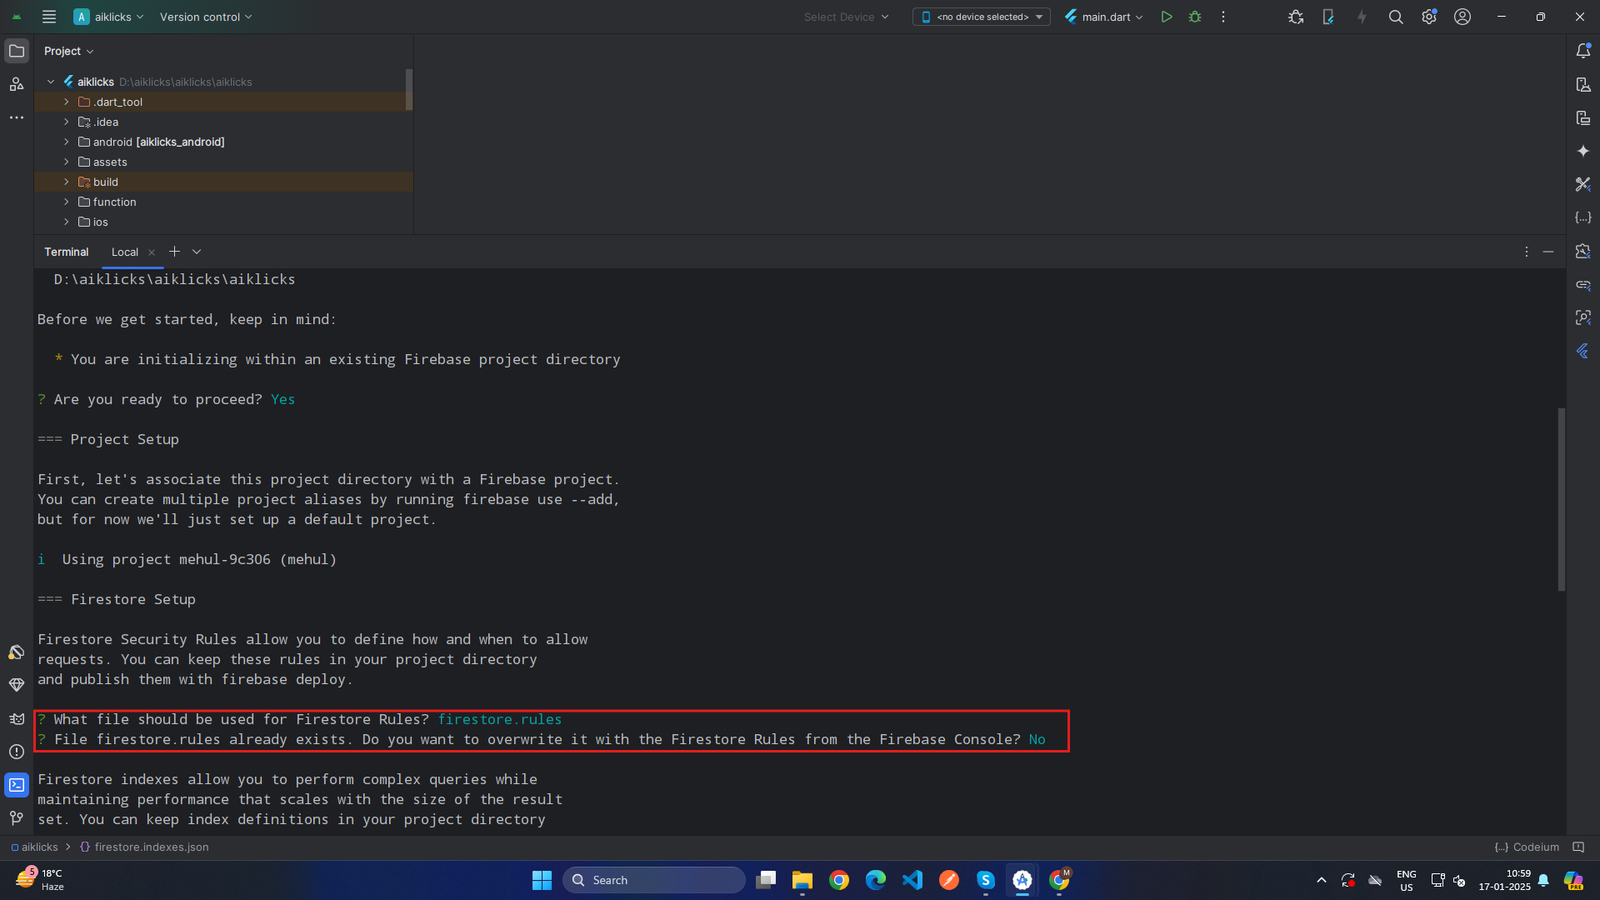
Prompt 2:
-
"What file should be used for Firestore Rules?"
-
Default: firestore.rules
-
 x
x
-
-
Default: firestore.rules
-
"What file should be used for Firestore Rules?"
-
Prompt 3:
-
"File firestore.rules already exists. Do you want to overwrite it with the Firestore Rules from the Firebase Console?"
- Select: No
-
"File firestore.rules already exists. Do you want to overwrite it with the Firestore Rules from the Firebase Console?"
-
Prompt 4:
-
"What file should be used for Firestore indexes?"
- Default: firestore.indexes.json
-
 x
x
-
"What file should be used for Firestore indexes?"
-
Prompt 1:
-
-
Deploy Firebase Index
-
Deploy Indexes: Run the following command from the root of your Flutter project:
- firebase deploy --only firestore:indexes
-
 x
x
- This command uploads your local firestore.indexes.json file to Firestore.
- Wait for the deployment process to complete. The terminal will provide the URL of project console and any relevant deployment information.
-
Monitor Deployment Logs:
- Firebase CLI will display logs and progress during the deployment.
- If any errors occur, they will be displayed in the terminal for debugging.
-
Deploy Indexes: Run the following command from the root of your Flutter project:
-
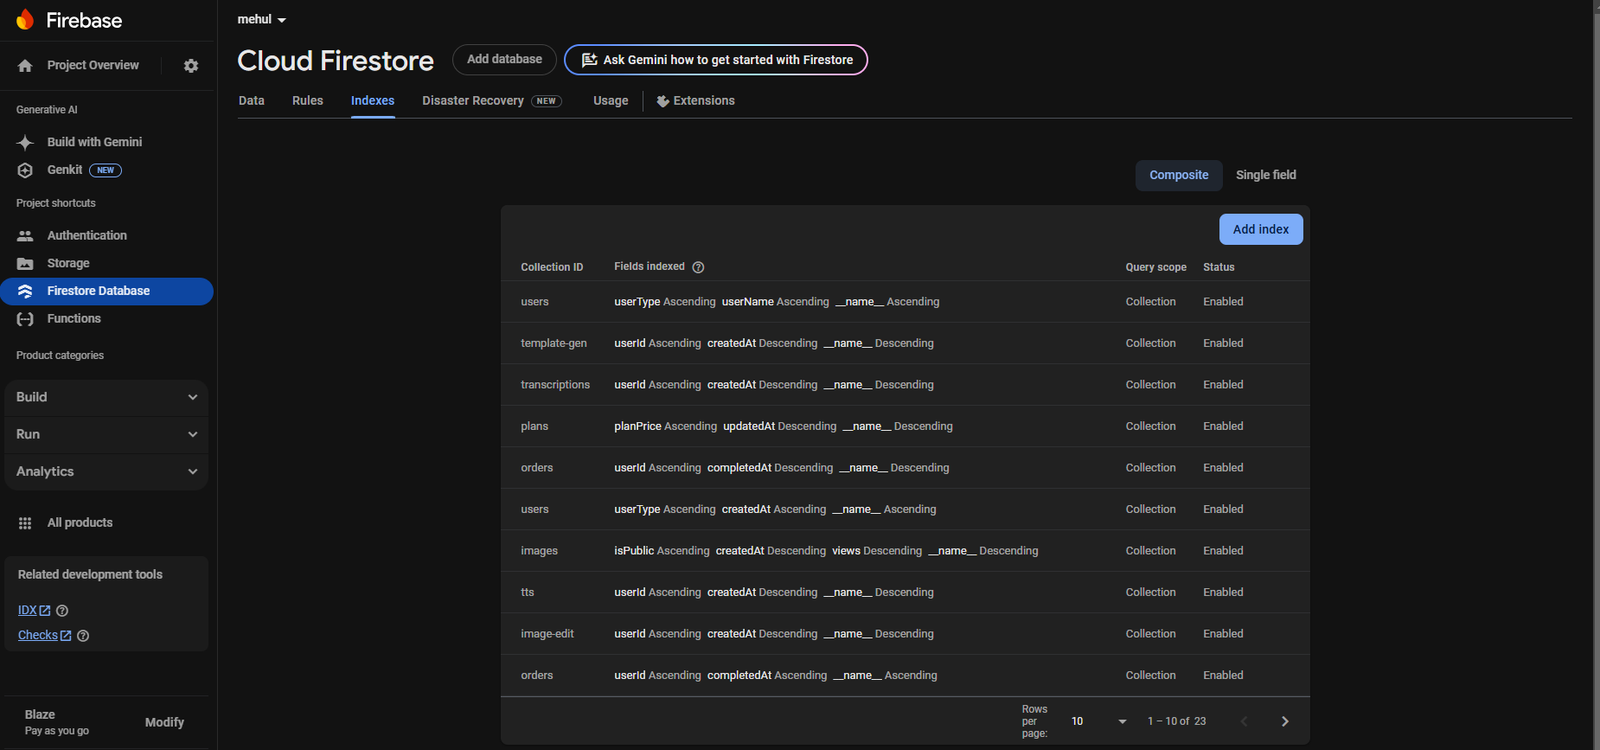
Test Deployed Firestore Indexes
Once the Firestore indexes are deployed, you can test and verify them using the following steps:
-
View Indexes in Firebase Console
- Go to the Firebase Console for your project: https://console.firebase.google.com/.
-
Navigate to:
- Build > Firestore Database > Indexes.
- This will display the list of all deployed indexes.li>
-
 x
x
-
View Indexes in Firebase Console
-
Run the Firebase initialization command: firebase init firestore
How to change OpenAI API Token
-
Log in to the Admin App:
- Open the Admin App on your device.
- Enter your login credentials (e.g., email and password) and tap Log In.
-
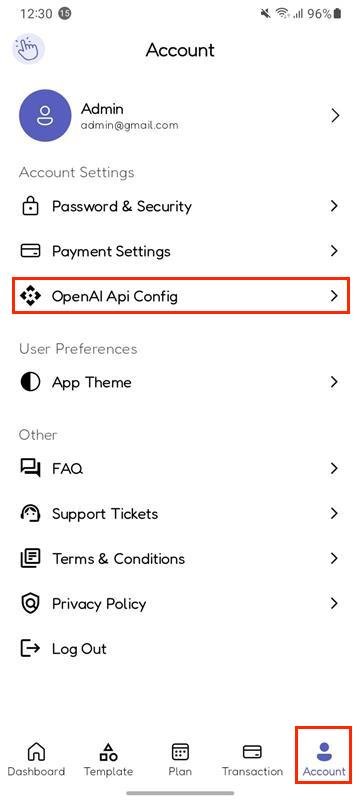
Navigate to the Account Section:
- Once logged in, locate the Bottom Navigation Bar at the bottom of the screen.
-
Tap on the Account tab to access the
account-related settings.
-
-
Open API Configuration:
- Inside the Account section, scroll through the options and locate API Config.
- Tap on API Config to view and manage the API settings
-
 x
x
-
-
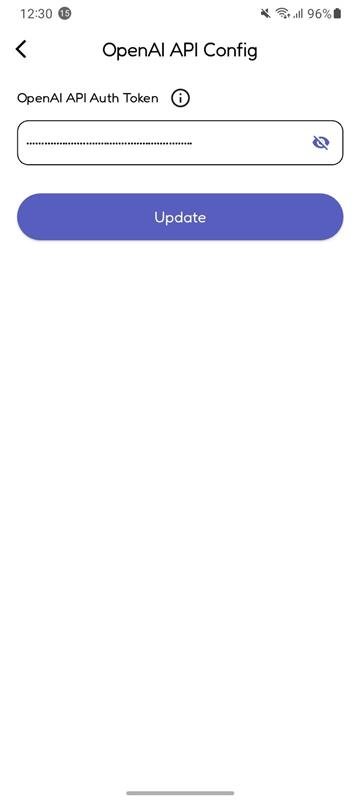
Enter or Update API Token:
- If no API key has been entered previously, you will see a field to enter the API Token.
-
Enter a valid API token provided by OpenAI to enable the AI-powered features in the application.
-
 x
x
-
-
Update API Token (if applicable):
- If an API token is already entered but needs to be changed.
- Replace the existing token with the new one. .
-
Verify API Token:
- Ensure that the token you provide is accurate and corresponds to the OpenAI account associated with your application.
- Incorrect or invalid tokens may result in the AI-powered features not functioning as expected
- This section allows you to configure the API-related settings, such as entering the OpenAI API authentication token, enabling AI-powered features in the user application.
How to manage payment gateway and add or update Credential in admin app
-
Log in to the Admin App:
- Open the Admin App on your device.
- Enter your login credentials (e.g., email and password) and tap Log In.
-
Navigate to the Account Section:
- Once logged in, locate the Bottom Navigation Bar at the bottom of the screen.
- Tap on the Account tab to access the account-related settings.
-
Open Payment Settings:
- Inside the Account section, scroll through the options and tap on Payment Settings.
-
This will take you to a screen displaying a list of all integrated payment gateways.
-
 x
x
-
-
Open Payment Settings: Manage Payment Gateways:
- In the Payment Settings screen, you will see a list of all available payment gateways.
-
Each payment gateway will have the following options:
-
Toggle for
Activate/Deactivate:
- A toggle switch will be displayed next to each payment gateway
- You can activate the gateway by turning the toggle On, which will enable the gateway for use.
- You can deactivate the gateway by turning the toggle Off, which will disable the gateway for transactions.
-
View Details Icon Button:
- Next to each gateway, there will be an icon button (e.g., an eye icon or settings icon).
-
Tap the View Details icon to navigate to a detailed configuration screen where you can manage credentials and gateway settings.
-
 x
x
-
-
Toggle for
Activate/Deactivate:
-
Navigate to Payment Gateway Details Screen:
-
After tapping the View Details icon, you will be redirected to a screen where you can:
-
Toggle for
Activate/Deactivate:
- A toggle switch will be available on this screen as well, allowing you to activate or deactivate the payment gateway.
- You can enable or disable the gateway directly from this screen by turning the toggle On or Off.
-
Update/Add Credentials:
- On this screen, you can directly input or modify the API credentials (such as API keys, secret keys, account details, etc.) for the payment gateway.
-
After entering the credentials, tap add or update button to update the payment gateway configuration.
-
 x
x
-
-
Toggle for
Activate/Deactivate:
-
After tapping the View Details icon, you will be redirected to a screen where you can:
-
Navigate to Payment Gateway Details Screen: Verify Changes:
- Return to the Payment Settings screen to verify that the updated credentials and configuration are reflected properly. .
- Ensure that the gateway toggle switch is in the correct position (active or inactive) based on your changes. .
Prerequisites
-
IDE (Android Studio or Vs code)
- Windows
- Mac
-
Flutter SDK setup (version: 3.27.1)
- Windows
- Mac
- JDK with path setup (only for vs code)
- Xcode ( Version: 16.2 ) for IPA file build
Customisation
Table of Contents
Change App Color
To customize the primary color of your Flutter app, follow these steps:
-
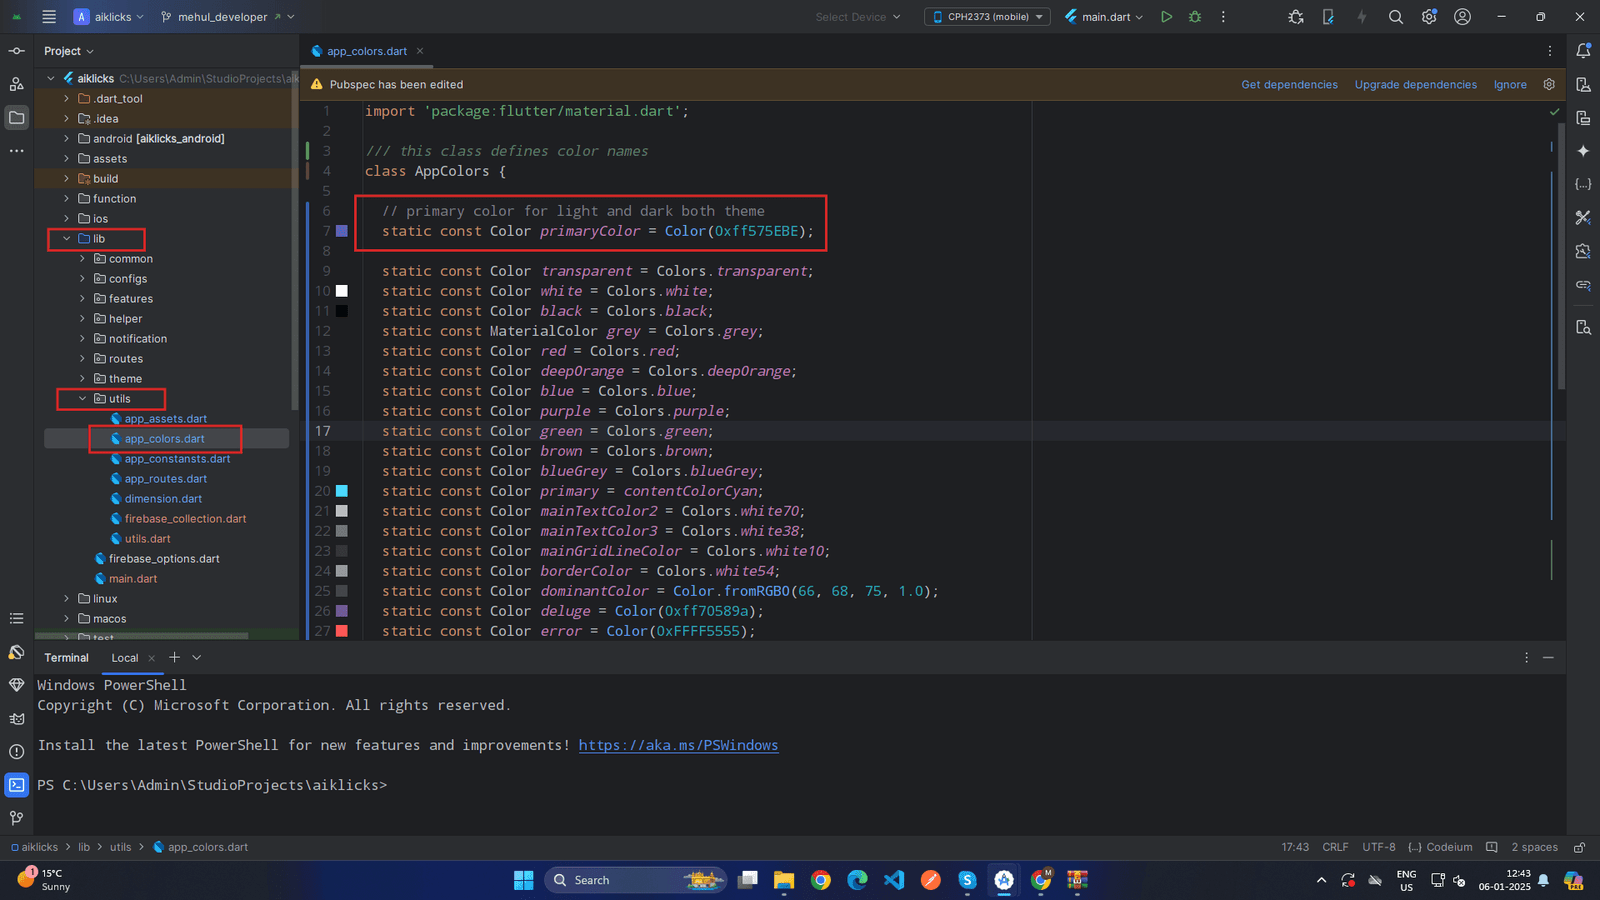
Open the Colors File
- Navigate to the file <project>/lib/utils/app_colors.dart in your project directory.
-
Modify the Primary Color
- Inside the file, locate the variable primaryColor. Update its value to reflect your desired color, keeping the variable name unchanged.
// primary color for light and dark both theme
static const Color primaryColor = Color(0xff575EBE); // Replace with your preferred color
-
 x
x
- Explanation: The color value is defined using the Color class, typically with a hex code (e.g., 0xFF6200EE for a purple shade).
-
Save Changes
- Save the file after updating the color value.
-
Rebuild the App
- Run your app to apply the new primary color throughout the UI.
Change App Font
To customize the font family used in your Flutter app, follow these steps:
-
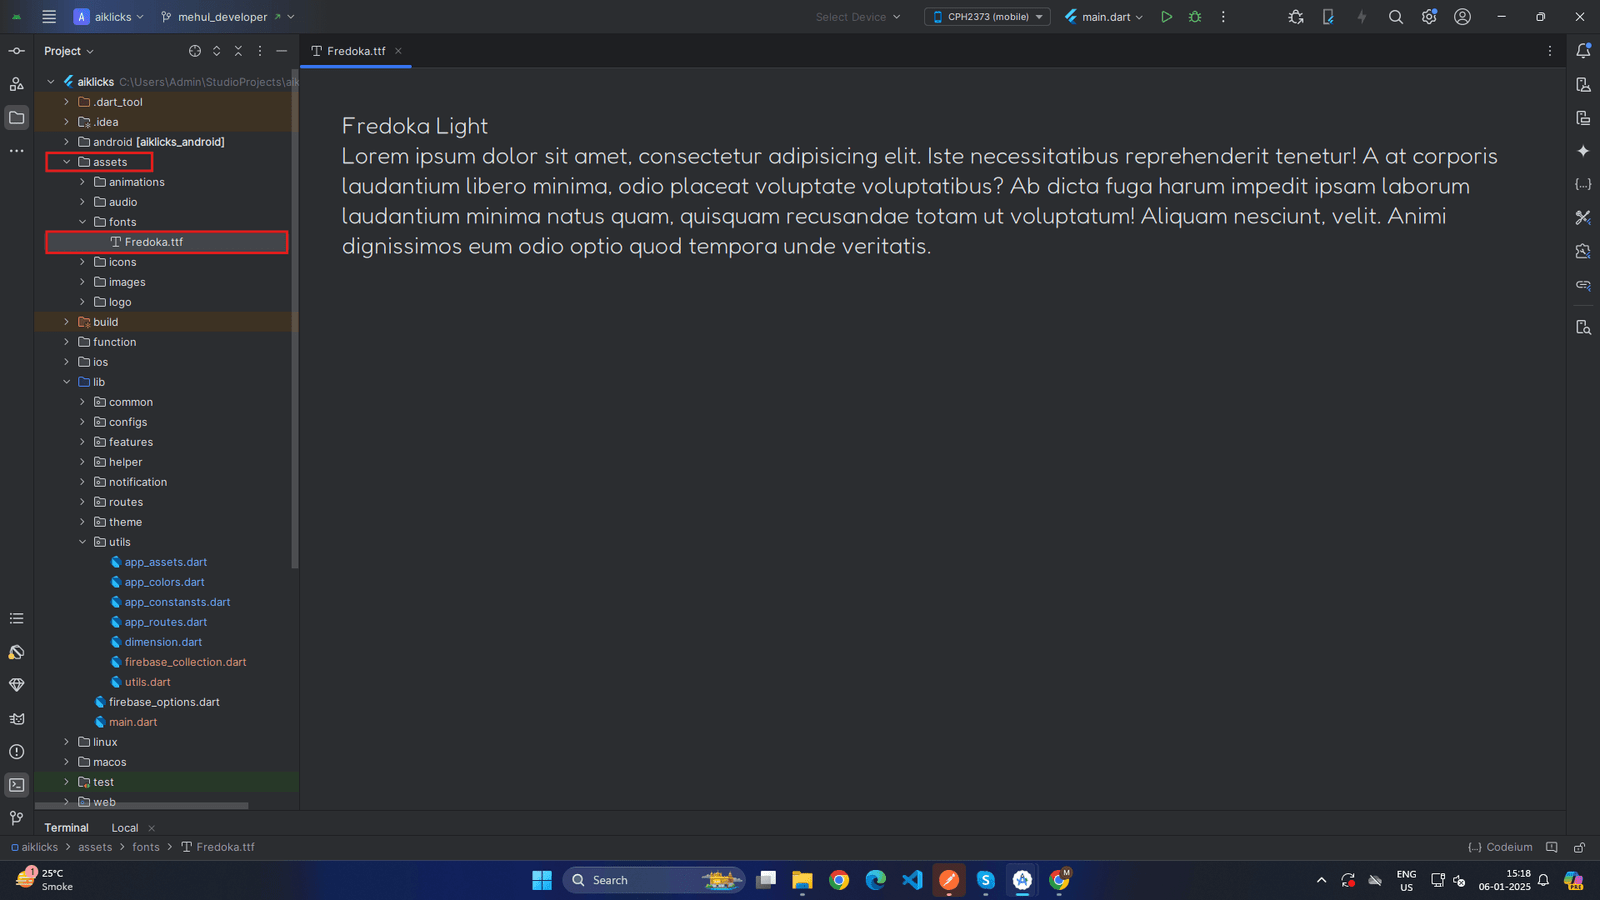
Download Font
- Download your preferred font from the internet. Google has many free fonts you can check them: https://fonts.google.com/
- Unzip fonts and paste them to <project>/assets/fonts/ folder.
-
 x
x
-
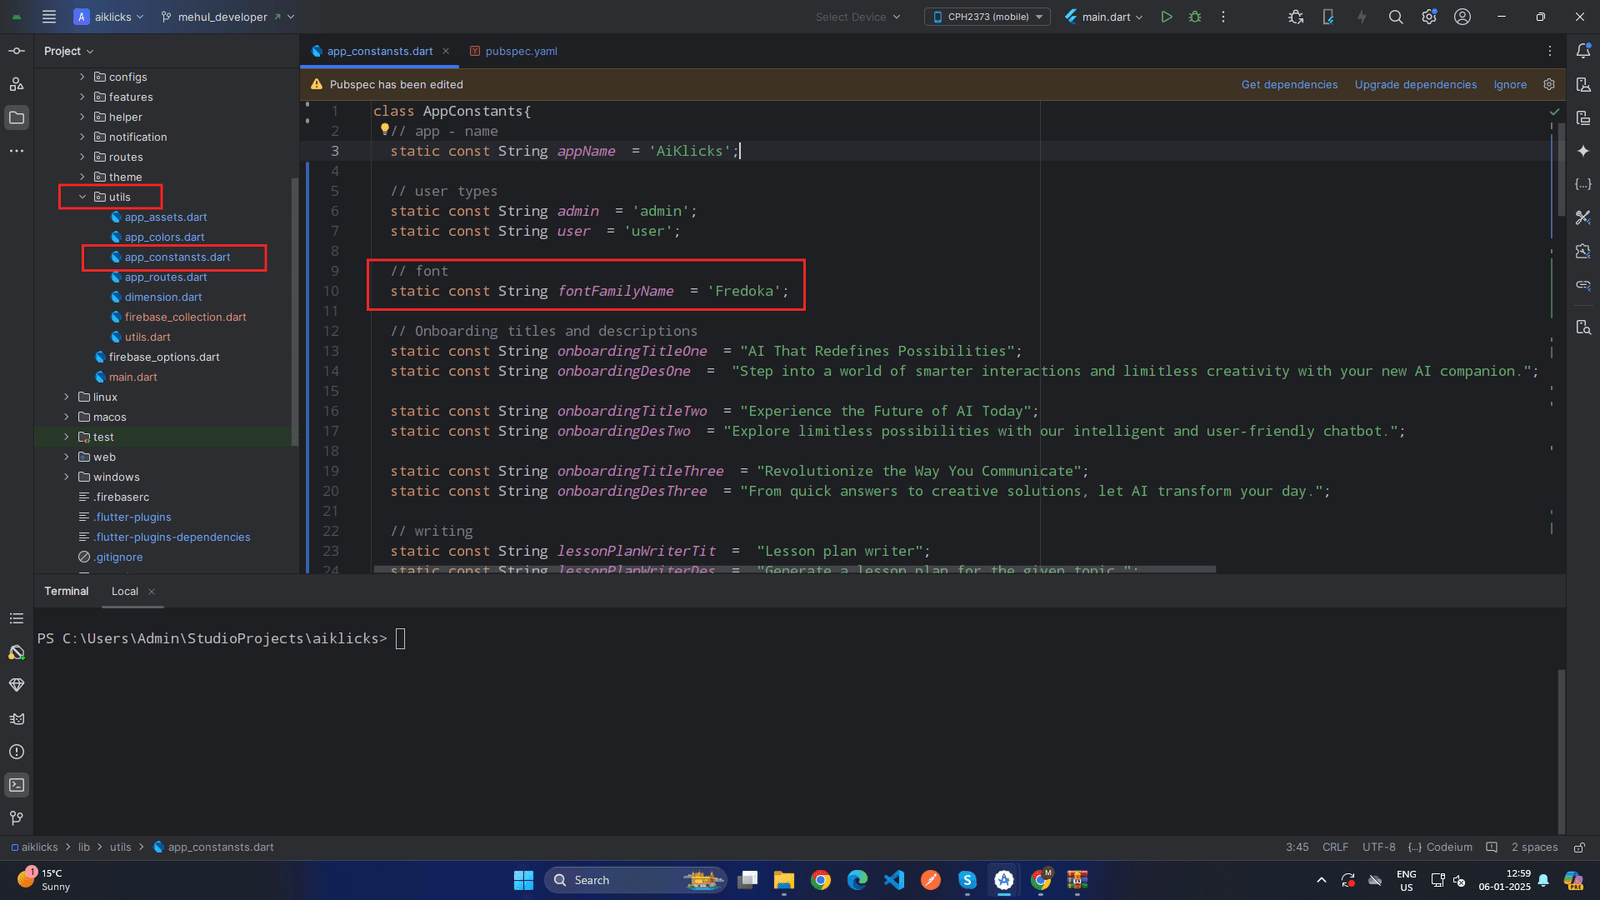
Open the Constants File
- Navigate to the file <project>/lib/utils/app_constants.dart in your project directory.
-
Locate the Font Family Variable
-
Inside the file, find the variable used for the fontFamilyName Update its value to your preferred font name without changing the variable name.
-
app_constants.dart
// App Font Family
const String fontFamilyName = 'Roboto'; // Replace 'Roboto' with your desired font family name Add the Font to Your App (If Needed)
-
 x
x
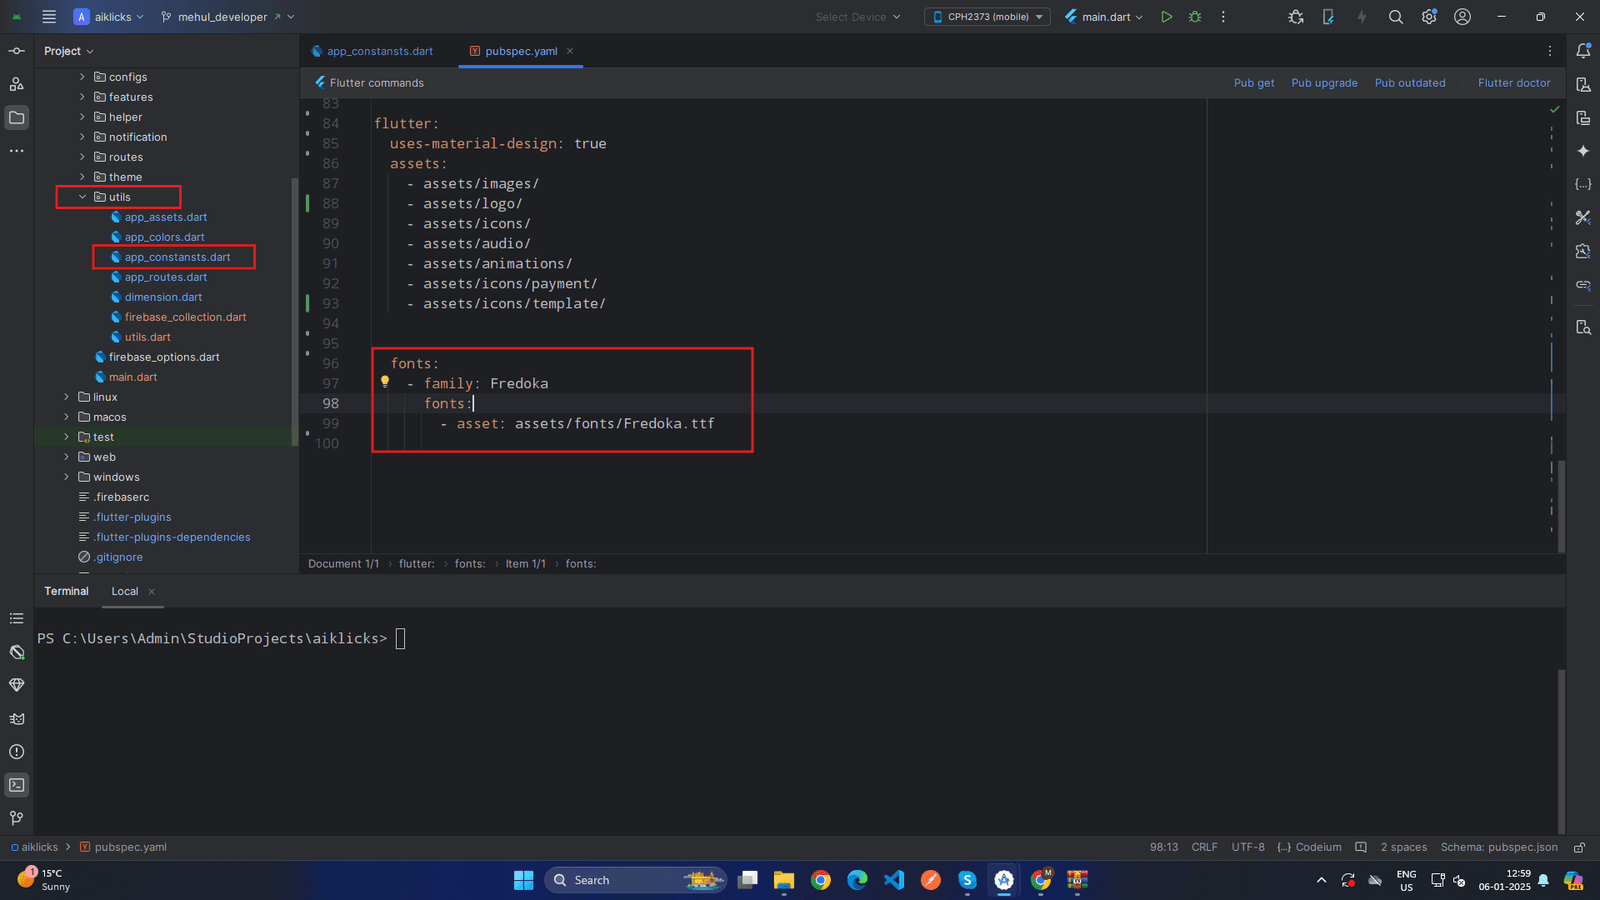
- If the font family you chose is not a default font, ensure you have added it to your project:
- Update the pubspec.yaml file to include the font:
 flutter:
  fonts:
  - family :YourFontName
       fonts:
         - asset:assets/fonts/YourFontName-Regular.ttf
-
 x
x
-
Apply the Font in Your App
- Use the updated font family in your app’s ThemeData:
-
Save and Rebuild
- Save the file and restart your app to apply the new font family.
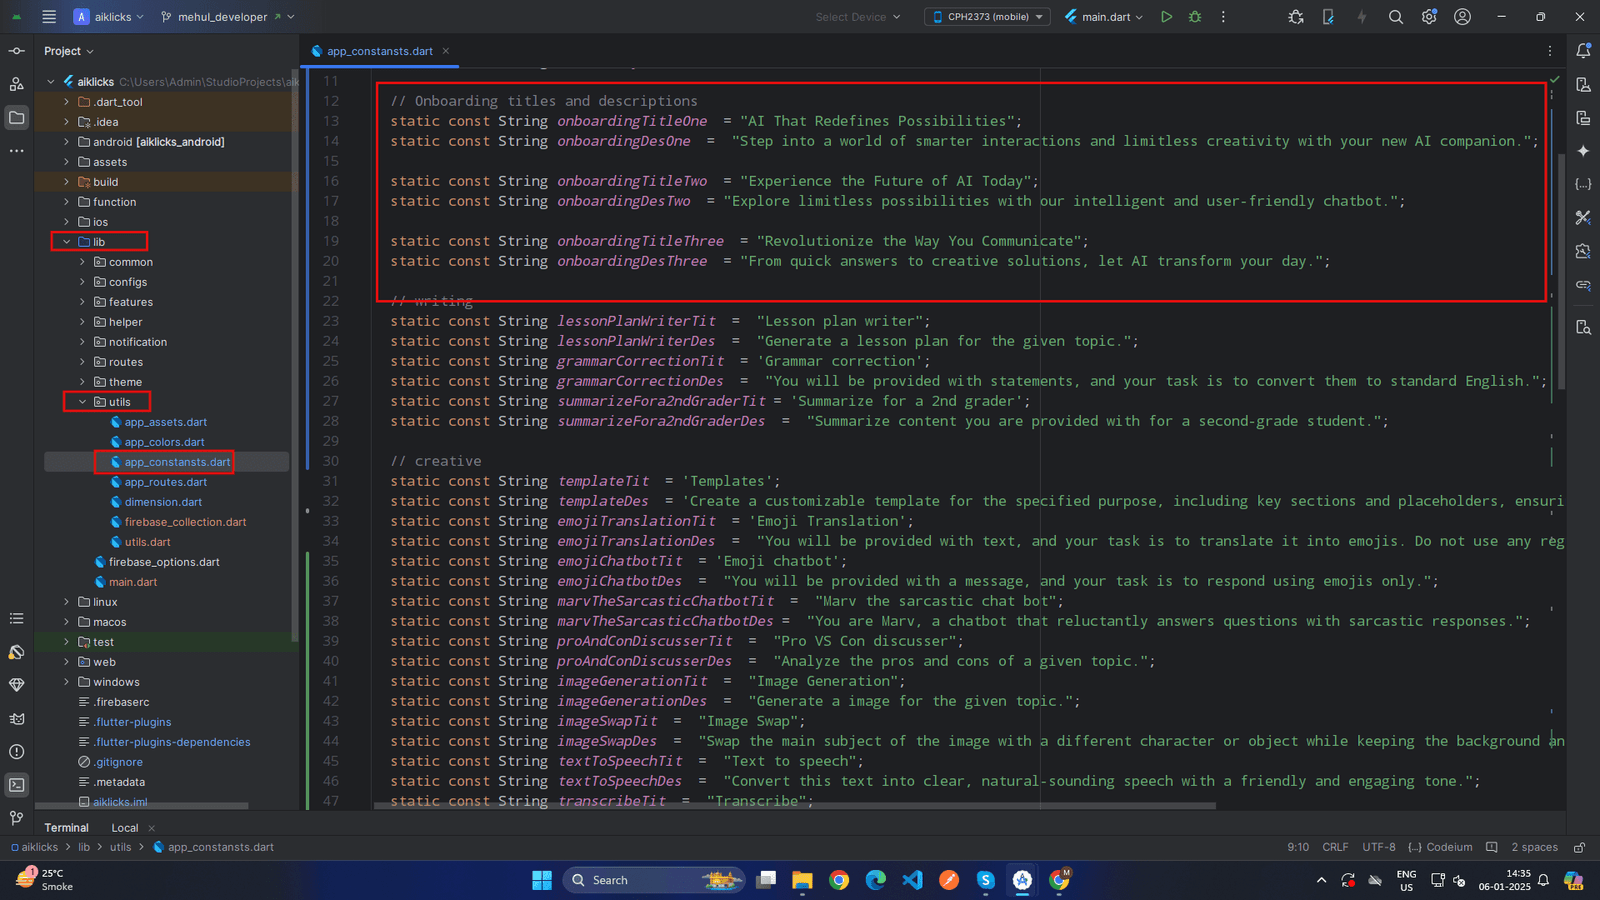
Change Onboarding Titles, Descriptions and Images
To customize the onboarding titles and descriptions in your Flutter app, follow these steps:
-
Open the Constants File
- Navigate to the file lib/utils/app_constants.dart in your project directory.
-
Modify the Values
- Inside the file, locate the variables used for the onboarding titles and descriptions. Update their values as needed without changing the variable names.
app_constansts.dart
// Onboarding titles and descriptions
static const String onboardingTitleOne = "YOUR_PREFERRED_TITLE_ONE";
static const String onboardingDesOne = "YOUR_PREFERRED_DESCRIPTION_ONE";

static const String onboardingTitleTwo = "YOUR_PREFERRED_TITLE_TWO";
static const String onboardingDesTwo = "YOUR_PREFERRED_DESCRIPTION_TWO.";

static const String onboardingTitleThree = "YOUR_PREFERRED_TITLE_THREE";
static const String onboardingDesThree = "YOUR_PREFERRED_DESCRIPTION_THREE";
-
 x
x
-
Save Changes
- Save the file after making your modifications.
-
Rebuild the App
- Run your app to see the updated titles and descriptions on the onboarding screens.
Note:
Ensure you only change the values of the variables, not the variable names.Otherwise it will not work.
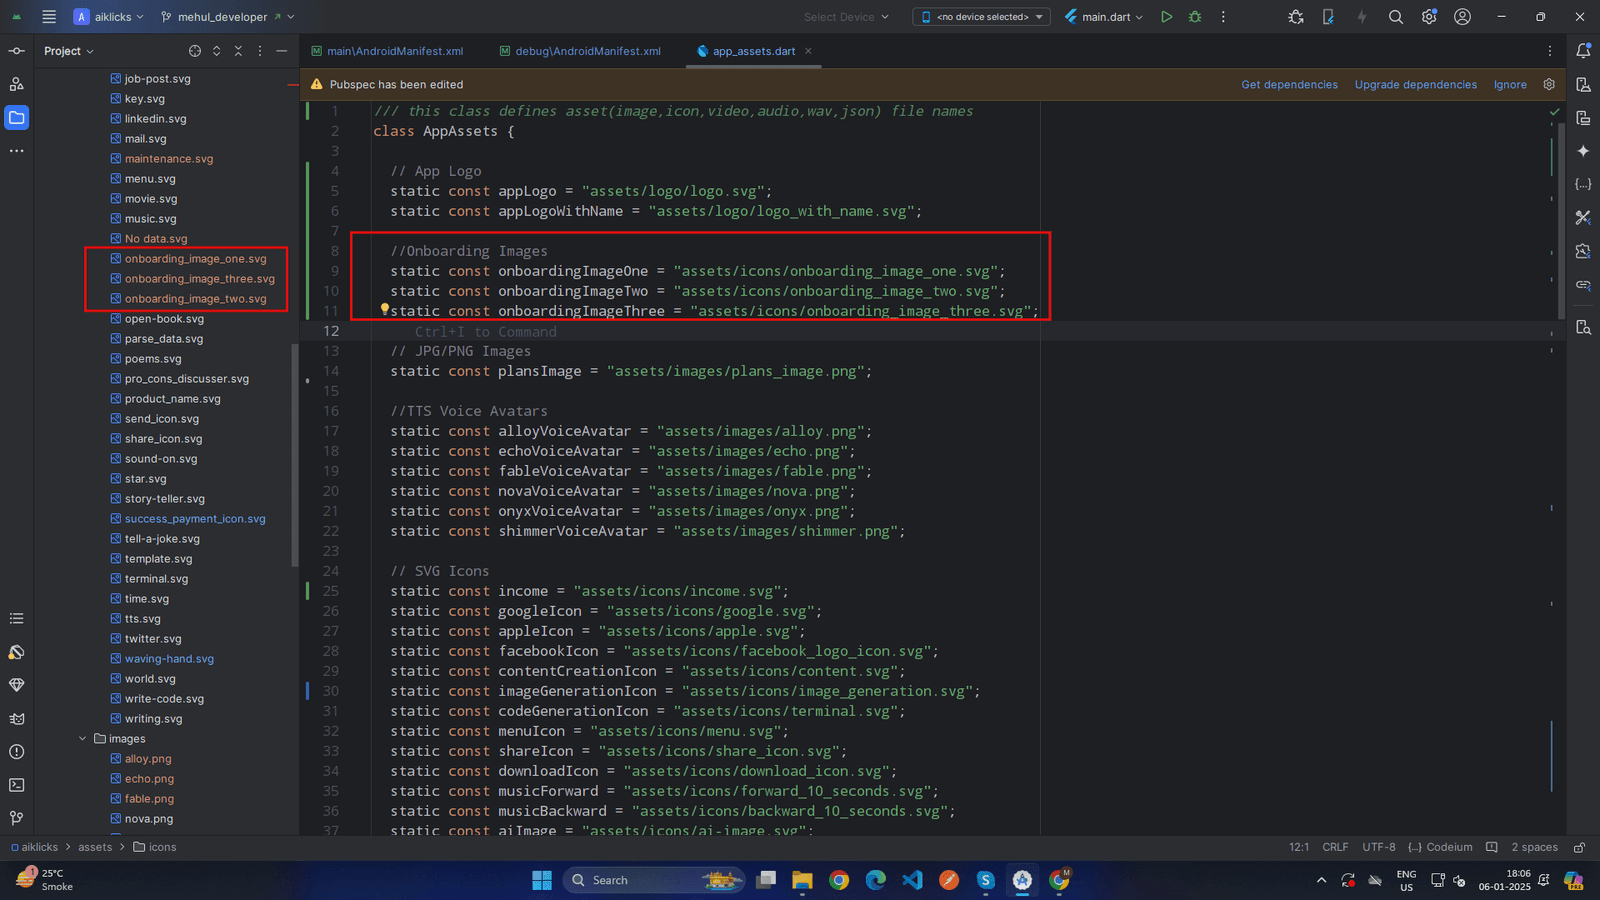
×To customize the onboarding images in your Flutter app, follow these steps:
- Go to <project>/assets/icons/ and replace onboarding_image_one.svg with your own svg image for onboarding_image_one image.
- Go to <project>/assets/icons/ and replace onboarding_image_two.svg with your own svg image for onboarding_image_two image.
- Go to <project>/assets/icons/ and replace onboarding_image_three.svg with your own svg image for onboarding_image_three image.
-
 x
x
App Build & Release
Table of Contents
Build for Android
Run the following command to build the APK
flutter build apk
- This command will compile your Flutter code and generate the APK file. You can find the APK in the build/app/outputs/flutter-apk directory inside your project folder. The APK file will be named something like app-release.apk or app-debug.apk.
- By using the above command, you will get a larger merged apk with this. But you can split them with this command
flutter build apk --target-platform android-arm,android-arm64,android-x64 --split-per-abi
- With this command, Flutter will generate three APKs, use one of them which is compatible with your device.
- For deploying it please follow this documentation: https://docs.flutter.dev/deployment/android
Build for iOS
- There is no general way to generate apps for iOS. Apple doesn’t allow you to install apps like this. If you want to install it on your iOS device, then you have to deploy it on TestFlight or AppStore. For deploying it, please follow this documentation: https://docs.flutter.dev/deployment/ios
Admin User Setup
Table of Contents
Admin User Setup in Firebase
- Sign Up as a User in the App
- Open the Flutter app and navigate to the Sign-Up screen.
- Enter the required details (email, password, etc.).
- Submit the form to create an account.
- Upon successful registration, Firebase Authentication will store the user credentials.
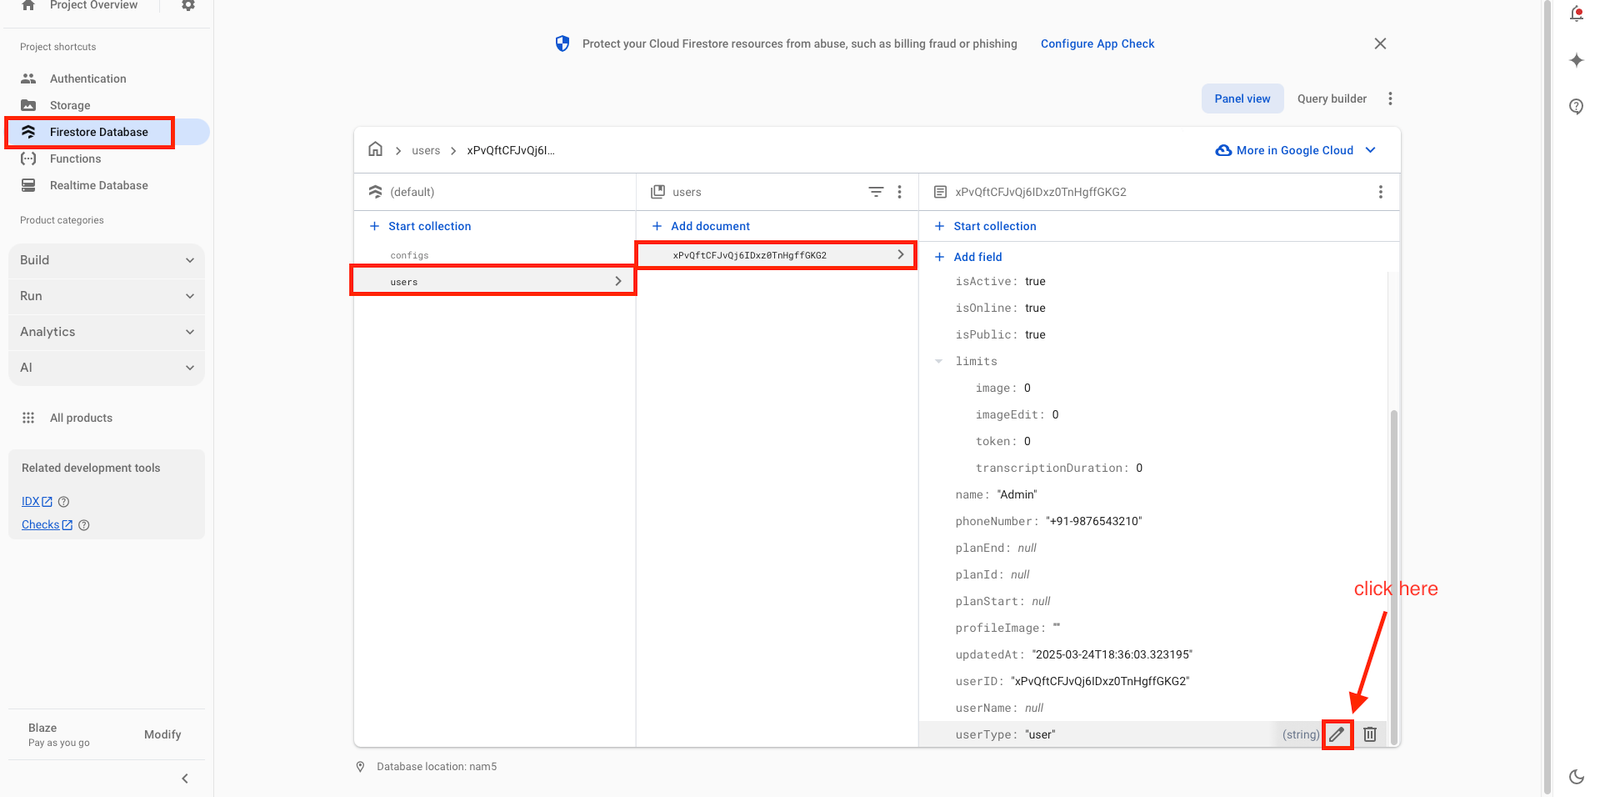
- Update User Role in Firebase Console
- Go to Firebase Console.
- Select your Firebase project.
- Navigate to Firestore Database from the left sidebar.
- Click on the users Collection.
- Find the newly registered user by searching for their email.
-
 x
x
-
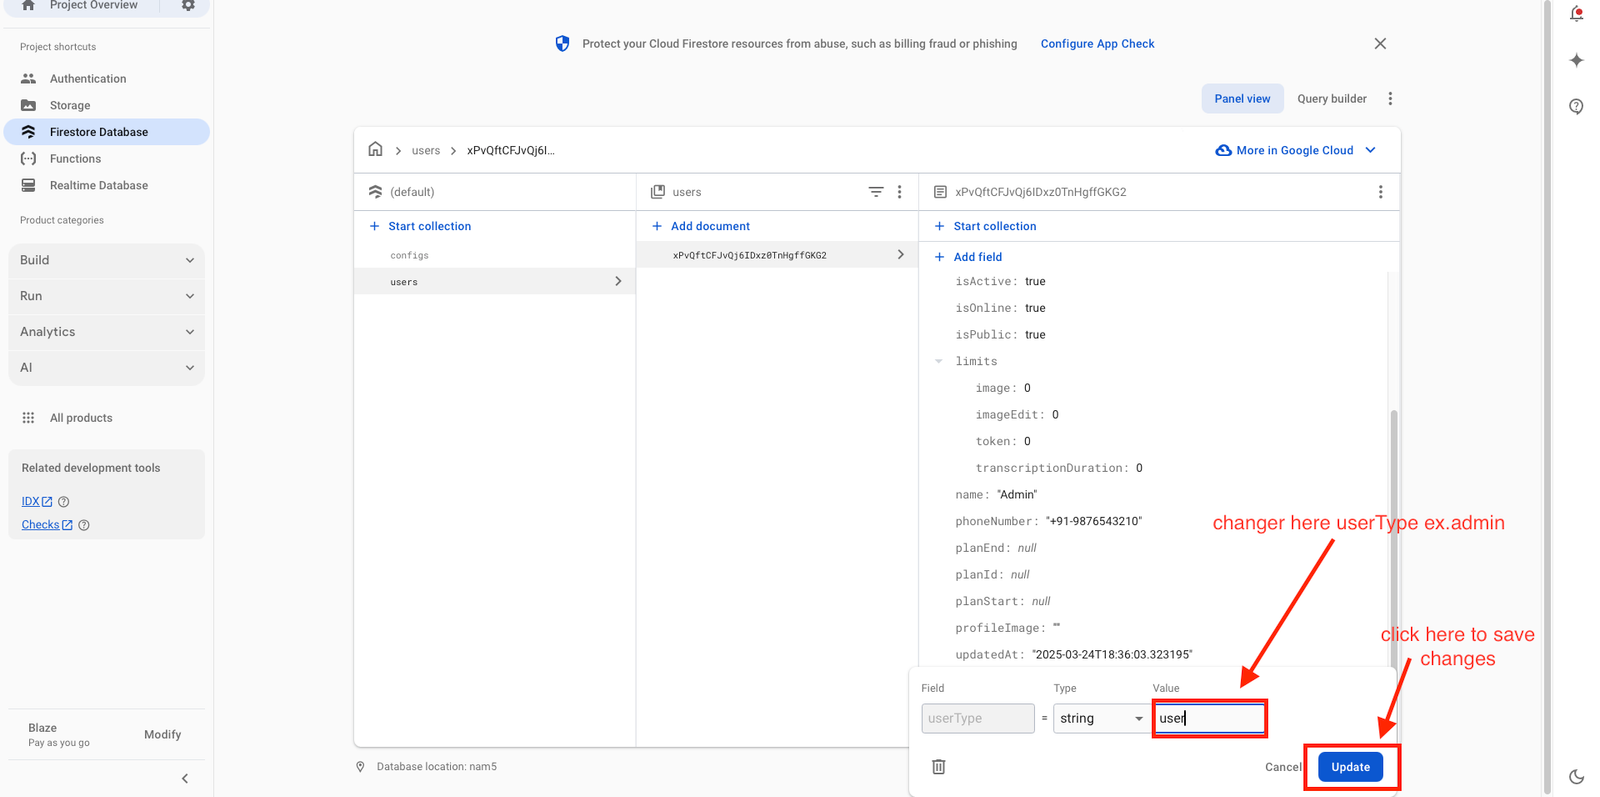
- Locate the field named userType.
- Change the value of userType from user to admin.
-
 x
x
-
- Click Save Changes.
- Log in as Admin in the App
- Open the app and go to the Login screen.
- Enter the same email and password used during sign-up.
- Upon successful login, the app will fetch user details from Firestore.
- The app will check if userType is admin.
- If userType is admin, the user is redirected to the Admin Dashboard.
- If userType is still user, they will remain in the regular user interface.